Mendota Explorer Posted June 10, 2015 Report Share Posted June 10, 2015 My WSO 580 endlinks arrived and I am trying to get these to fit with my Puretime 1680 case and gen spec bars. Here is my problem: The end pieces accept the bars just fine, and when I install them it feels like the tips of the pins are engaging with the interior chamfer of the lugholes, but for the life of me I cannot get the pins to engage further and fully snap into the actual hole. This is a much better fit than my original Puretime endlinks, which didn't even allow the tips to come close to the holes, but it still isn't acceptable. The underside of the WSO endlinks also fits flush against the underside of the case, whereas the underside of the original Puretime endlinks was angled. Overall the WSO looks like a more professional and well designed fit - cleaner. Is there something else I should be doing with these? I have tried pushing on the ends to try to get them to engage. I have tried pushing towards the case while wiggling, I have tried pushing up and down, and from different angles. Am I missing a simple step here? Do these need to be bent or sanded? Thanks! Quote Link to comment Share on other sites More sharing options...
tomhorn Posted June 10, 2015 Report Share Posted June 10, 2015 Misiekped said he had to do a little bit of work on mine when fitting to the HH5514 case. Might want to reach out to him. Quote Link to comment Share on other sites More sharing options...
dbane883 Posted June 10, 2015 Report Share Posted June 10, 2015 pry the endlinks open a touch to get the spring bars closer to the case if you know what I mean.. Even gen endlinks sometimes take a bit of work to get in the first time, or if they've been squashed over several years... Quote Link to comment Share on other sites More sharing options...
Mendota Explorer Posted June 10, 2015 Author Report Share Posted June 10, 2015 pry the endlinks open a touch to get the spring bars closer to the case if you know what I mean.. Even gen endlinks sometimes take a bit of work to get in the first time, or if they've been squashed over several years... Great tip! I'll try that when I'm back at my desk. I didn't think to change the shape of the triangle formed by the top and bottom sides. I'll report back. Quote Link to comment Share on other sites More sharing options...
pam007 Posted June 10, 2015 Report Share Posted June 10, 2015 Open them up to move the pins closer to the case Close them up to move the pins away from the case Quote Link to comment Share on other sites More sharing options...
sgtguk Posted June 10, 2015 Report Share Posted June 10, 2015 Open them up to move the pins closer to the case Close them up to move the pins away from the case Sage advice already given, done this quite a few times now with new end links battle to get them done first time but great afterward Quote Link to comment Share on other sites More sharing options...
Mendota Explorer Posted June 10, 2015 Author Report Share Posted June 10, 2015 Sage advice already given, done this quite a few times now with new end links battle to get them done first time but great afterward Great advice, indeed. Never even thought of that. I can't wait to try it. In theory, that would mean I could get my Puretime endlinks to fit and actually work, but these WSO end links really have a much nicer shape and overall appearance to them. No question about it. Quote Link to comment Share on other sites More sharing options...
pam007 Posted June 10, 2015 Report Share Posted June 10, 2015 Yup. I currently have my end links pinched half way on my 1680 like this: Quote Link to comment Share on other sites More sharing options...
mymanmatt Posted June 10, 2015 Report Share Posted June 10, 2015 Here is a tip for getting springbars in the hole. Take a small pair of needle nose pliers. Bend the end of the spring bar slightly with the needle nose. When you put the spring bar in the lug area, take your small screwdriver and rotate the end of the springbar until it pops into the hole. This is a tip for mounting any bracelet that the springbars don't match up with the hole. Quote Link to comment Share on other sites More sharing options...
Kime Posted June 11, 2015 Report Share Posted June 11, 2015 I ideally of course you need to file the end of the endlink to make it slightly shorter, bending spring bars is not a good idea. Quote Link to comment Share on other sites More sharing options...
mymanmatt Posted June 11, 2015 Report Share Posted June 11, 2015 Of course the pic is an example of extreme bending to show what I mean. It's always a good Idea. Doesn't hurt a thing. The chinese have been doing it for years and never had a problem. Not everyone has the ability or the tools to trim end pieces. Quote Link to comment Share on other sites More sharing options...
Mendota Explorer Posted June 11, 2015 Author Report Share Posted June 11, 2015 So I'm looking at my end pieces and how the heck do I open them up without scratching or ruining them? The stainless is a bit sturdier than I expected, for being as thin as it is. I suppose they aren't made of tin or aluminum! What tool would work best to open the link a little bit? My only concern about bending the springbar, versus opening up the link a little bit, is this is my only set of 2mm bars. They of course work just fine with leather. Quote Link to comment Share on other sites More sharing options...
droptopman Posted June 11, 2015 Report Share Posted June 11, 2015 So I'm looking at my end pieces and how the heck do I open them up without scratching or ruining them? The stainless is a bit sturdier than I expected, for being as thin as it is. I suppose they aren't made of tin or aluminum! What tool would work best to open the link a little bit? My only concern about bending the springbar, versus opening up the link a little bit, is this is my only set of 2mm bars. They of course work just fine with leather. Use some needle nose pliers and it does not take much. Just bend the tab on the underside out a hair. You should be able to hold it by hand and bend the tab. If not mount it with some smaller spring bars on an old case, then slip a screw driver between the case and tab on the bottom and lift just slightly, that will open them up as well. Quote Link to comment Share on other sites More sharing options...
Mendota Explorer Posted June 11, 2015 Author Report Share Posted June 11, 2015 Use some needle nose pliers and it does not take much. Just bend the tab on the underside out a hair. You should be able to hold it by hand and bend the tab. If not mount it with some smaller spring bars on an old case, then slip a screw driver between the case and tab on the bottom and lift just slightly, that will open them up as well. Cool. Thanks for the tip! I'll give it a try shortly. Quote Link to comment Share on other sites More sharing options...
pam007 Posted June 11, 2015 Report Share Posted June 11, 2015 Of course the pic is an example of extreme bending to show what I mean. It's always a good Idea. Doesn't hurt a thing. The chinese have been doing it for years and never had a problem. Not everyone has the ability or the tools to trim end pieces. You must be trolling... Doesn't hurt a thing? I do a lot of Judo Chops when I'm walking around and the only thing that is keeping my $7000 watch from kissing the pavement is the springbars... 1 Quote Link to comment Share on other sites More sharing options...
droptopman Posted June 11, 2015 Report Share Posted June 11, 2015 Mendota, the other thing you can do if opening them up does not quite work is to sand down the curved area on the top of the end link where it touches the case. If the hole is lining up too far away from the case this may help. On my 1016, I have WSO 580's and the end link hole placement was a little farther away from the case lug holes than I would like, so took some sandpaper to the curve and shortened the length ever so slightly and now they fit perfect. I have used a dremel for this but found the best results using wet/dry sandpaper by hand. 1 Quote Link to comment Share on other sites More sharing options...
Nanuq Posted June 11, 2015 Report Share Posted June 11, 2015 I use a pencil in the open "clamshell" of the end link to get the curve I want. Or a slightly thicker wood rod... put it in the opening then press the sharp tips of the clamshell against a table edge to recurve the end piece. I do that to make bands fit lug profiles all the time. Some end pieces are hard to bend, others are flimsy so be careful. Altering the curvature will also change the springbar to case distance so figure that into your efforts. Quote Link to comment Share on other sites More sharing options...
Mendota Explorer Posted June 12, 2015 Author Report Share Posted June 12, 2015 Thanks for the tips, guys. I am so frustrated with these tiny pieces of metal. Man, they are a beeatch to work with. I finally got one of the ends to fully seat the spring bar, but now the top side edge of the end link is sticking up over the lugs. grrr. I'd much rather have the bottom side of the link stick farther down. I just don't seem to have much control over which part of it opens up when I'm using the pliers, though. It seems to be opening the top of the clam shell. Oh well, my main objective right now is to just get these little bastards to connect to the watch and fully seat the spring bars. Once I have them both fully seated, then I'll snap a pic of my destruction and see if there are some insights into how to clean it up. Maybe that involves using the sandpaper method, or somehow bending the top edge back down? Why is it so much easier to open up an engine and change spark plugs, or remove and replace computer or home appliance parts, than it is to fiddle with these little tin a-holes? For what it is worth, I learned that I had to remove my bezel in order to monkey around with this. The first few times I was working on it the bezel flipped off, so I just set it aside so it wouldn't get in the way. Quote Link to comment Share on other sites More sharing options...
jmb Posted June 12, 2015 Report Share Posted June 12, 2015 I use a Dremel with a fairly large diameter stone. This seems to allow a better fit as far as the end-link contour to lug contour. Quote Link to comment Share on other sites More sharing options...
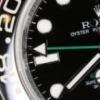
Mendota Explorer Posted June 12, 2015 Author Report Share Posted June 12, 2015 (edited) Ok, here's my problem now. I finally got both links seated (I think) but now the pointy edges of the top sides are riding up above the lugs. First of all, it looks sloppy. But second, when I put the bezel back on it is so tight that it won't even rotate. Here's what it looks like: Any suggestions? Is this where using the sandpaper comes in or where Nanuq's pencil or table idea comes into play? I'd much rather have the bottom edge hang down but that isn't happening. Edited June 12, 2015 by Mendota Explorer Quote Link to comment Share on other sites More sharing options...
pam007 Posted June 12, 2015 Report Share Posted June 12, 2015 at this point I would eat Ramen noodles for a week to spring (pun intended) for some gen end links life is not worth stressing over end links Quote Link to comment Share on other sites More sharing options...
Mendota Explorer Posted June 12, 2015 Author Report Share Posted June 12, 2015 Aaaaand done! Thanks for the tips, fellas. I ended up laying a plastic ziplock bag over each of those endlink tips that were protruding and then I used the tip of the needle nose to push down on each one until they were at the level of each lug. I fixed the issue and my bezel works the same as before. I think these look way nicer than my Puretime ones ever did. Quote Link to comment Share on other sites More sharing options...
Nanuq Posted June 12, 2015 Report Share Posted June 12, 2015 Very nice, your persistence paid off. However......... I'd still take it apart again and work on it some more. That arc where the curve of the end link meets the curve of the case (covering up the REGISTERED DESIGN and 1680 text) needs to be ground down some. We're talking maybe .25mm here. There's an awful lot of tension on those springbar tips in the lugs. Like JMB said a big Dremel will do it, or wrap sandpaper around a length of 1" dowel and set to it. Keep a nice constant radius curve and take your time. When you're done the end link arc will fit the case curvature and the clamshells will match the lug curves. And, the top of the end link will be flat across from one lug to the other. It takes some dedicated effort and diligence but you'll get it. Quote Link to comment Share on other sites More sharing options...
Nanuq Posted June 12, 2015 Report Share Posted June 12, 2015 Take a look here at a discussion we had a couple years ago:http://www.rwgforum.net/index.php?/topic/146159-Endlink-Question Quote Link to comment Share on other sites More sharing options...
mymanmatt Posted June 12, 2015 Report Share Posted June 12, 2015 No choice now but to trim the end pieces. Take a dremel and cut the end piece. Take a black marker and just barely run across the edge. It will leave a thin blk line on the end link. Start by cutting that off. Then ck and do it again if you need to. Then bend the end pieces down to fit flush with the case and lugs. 1 Quote Link to comment Share on other sites More sharing options...
Recommended Posts
Join the conversation
You can post now and register later. If you have an account, sign in now to post with your account.