manodeoro Posted December 11, 2017 Report Share Posted December 11, 2017 (edited) Hi crazy watch lovers When I begun that build I made myself a promise that I would not create this thread before having a complete story to tell. But I'm too impatient so I have to post now ... and I will write and post eveything else later all along the builsing process. So what is this all about?... about an A/6538 ... a "Burford" one specifically Question was ... what should I do to wear this watch? 1st option was to become VERY wealthy and lucky enough to find one to buy ... 2nd option was to have some imagination plus a little patience and build one. Unfortunately, as far as I know, a correct 6538 case that already can receive a 5513 bezel costs about $800 to $1500 - totally out of my budget. Fortunately !!! I have A BUNCH of imagination and A BUNCH of patience. So here is what is already done : 1 - start with a Silix 6538 midcase ... $ 45 but NOT accepting a 5513 bezel assembly 2 - shave the rehaut and graft a new one ... "gen-specs" an "easy" mod as long as you know how to measure, design, draw ... and have a friend who own a lathe and is OK to provide some help 3 - build a Burford dial strating from scratch ... and while I was in the building a vintage dial I decided to make it "Tropical" So here I am now, with still a lot of work to do but the most difficult parts of that build (grafting the rehaut + building the dial) are already done. Building the custom bezel won't be easy but it's already in progress ... the rest will be a peace of cake So let's talk about THE CASE The Silix 6538 midcase have been rworked on a lathe and the original rehaut have been "shaved". A new rehault has been turned, on the lathe too. I did all the technical design but the lathe work has been done by my friend @mascob (not a member here unfortunately). @mascob sent me back the reworked midcase and the rehaut and I managed to make it all fit together. Here are some pics Silix 6538 midcase with the new rehaut already "grafted" + the T19 and the 5513 bezel assembly Same midcase with the T19 and bezel assembly on ... the bezel turns perfectly A "nice" insert (will change that one) and the home-made 26mm Burford dial that I'll put in that case About the ... BURFORD DIAL making Well ... that was "almost" easy I already had designed (for a nice forum member) a crispy Burford dial some months ago, using both Photoshop and Illustrator (dozens of hours searching for good pics + dozens of hours working on the design using a 5000ppi definition). That design was black and withe only and done for a standard Silix case using a 29mm dial so I : 1 - resized everything using Illustrator so the design could fit a 26mm dial (25.8mm exactly as the Burdford dials where supposed to be reprinted on on 6538 Gilt dials) 2 - spent about a dozen of hours (again) using Photoshop to design a "blank" tropical 26mm dial 3 - copied the white parts of the first design and pasted that on the "tropical" design 4 - printed on clear decal paper and protected with 2 coats of matte varnish 5 - prepared a 26mm dial with a "cream" paint ... randomly applied so that some areas where more or less clear or dark ... then sanded finely to get an almost smooth surface (not perfect) 6 - applied the decal on the dial and sprayed 2 coats of matte varnish ... each coat dried for about 24 hours 7 - sprayed a 3rd coat of matte varnish and used an hairdryer spo that the varnish dried faster on some areas 8 - sprayed a 4th coat of matte varnish and used the hairdryer again ET VOILA ... Now the next fun part of that build will be to put a 25.8mm dial in a modded 6538 midcase with a 26mm case opening WITHOUT holding it with a Gen movement It could be, theoretically, impossible ... But there are ways, you know, and I have a few more tricks up my sleeves and ... THAT is another part of the story that I still have to write ... just hope you liked this one Edited December 11, 2017 by manodeoro 3 Quote Link to comment Share on other sites More sharing options...
capre Posted December 11, 2017 Report Share Posted December 11, 2017 I really want to see this finished. It seems as you got what it takes to make the build one of a kind Quote Link to comment Share on other sites More sharing options...
Desai Posted December 11, 2017 Report Share Posted December 11, 2017 Phew.. Hard work, patient and dedication.Sent from my A0001 using Tapatalk Quote Link to comment Share on other sites More sharing options...
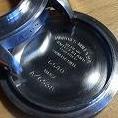
manodeoro Posted December 11, 2017 Author Report Share Posted December 11, 2017 Thanks @capre @Desai As you already saw in the first post, those A/6538 came with a really special bezel. So let's just talk about that part of the build (work just in progress) A/6538 CUSTOM BEZEL First let me quote (partially) Shane Griffin from "Gear Patrol" :"Around 1957, when the MOD was ready to commit to the Submariner, Rolex was several years and several upgraded references into the Submariner’s history. The 6538 ... was made into a MOD-spec version, the A/6538. The MOD required, among other specific features, a larger bezel, allowing gloved divers more gripping power; and a bezel material of German silver, which would typically dent upon impact, versus cracking or breaking." The required bezel was virtually (and as far as I know) a "thick" 5513 bezel build in 2 parts : - downer part (the one that clipped on the retaining ring) made from stainless steel - upper part made from "german silver" That specific construction could be controversial but when one look at the pic below it really seems the bezel is made from 2 parts, the upper part being corroded differently than the downer part. The different color of the upper part could be due to the specific composition of the "german silver" ("nickel silver", "maillechort") that can contain a significant percentage of copper (40 to 70%). In all cases, that is THAT pic (plus the Burford dial of course) that made me "fall in love" with the A/6538 and that pushed me to try to build the "same" watch. So, after grafting a new rehaut to my Silix 6538 case, I am, at the moment, actually building a 2 parts custom bezel ... and I know ... I'm probably crazy I will show pics of the finished bezel and explain the building process but today I want to speak about "bronzing" stainless steel. The upper part of my custom bezel should look like the one on the pic above, so it should have what I would call a "light yellow color" So last week I PMed my good friend and "king of steel" @mascob to get some infos about how to "lightly bronze" Stainless Steel. As usually he was enthousiastic, did some tests with a torch and send me the pics altogether with process advices. Result was really nice but not "light" enough and color was too "orange/yellow". The other problem was that ... I dont have a gaz torch. So if I wanted to get that "really discreet yellow color" I had to heat the bezel : - at a lower temperature that the one obtained with a gaz torch - in a very well distribued way to get a homogeneous coloration On Saturday morning, about 6AM, I was cleaning my italian coffe maker (search Bialetti Moka Express on the web) and I had an epiphany !!! The downside of my coffe maker, plain stainless steel, was partially showing a light yellow color :cheese::cheese::cheese: So to reproduce the process I just had to analyse "how do I heat my coffee maker" ... The answer was : - very low heat - long time So, just after drinking me coffee, I took an old twisted bezel, put it on the smallest burner of my cooking plate, light the burner and waited to see if something would happen. And my expectations were more than fullfilled ... after 2 heating periods of 30mn each my bezel showed a really light but really nice yellow/gold color That was all for Saturday but on Sunday afternoon I have decided to try another 30mn heating period and I put my bezel on the burner again At this very moment I had a little "problem" as my wife entered the kitchen and looked alternatively at me and the bezel on the burner ... Her :"Please tell me, my love, are you cooking a ... watch ?" Me :"Well, darling, I'm NOT actually cooking a complete watch ... just a watch bezel" Her :"Are we supposed to ... eat that thing ?" Me :"Definitely NO my dear ... you know I cook organic food only and I can't attest that that bezel is an organic product" There is moments in life when you're dealing with your wife/girl-friend and you know that you HAVE to find something to say and/or do if you want to avoid sleeping on the couch. So I flashed my "Clooney's smile" (Clooney ... not clowny) and said :"We've been living together for ... 35 years and see, I'm still able to surprise you ... what else ?" Then she laughed and kissed me, poored two glasses of Saint-Mont (Tannat, Pinenc, Cabernet Franc and Cabernet Sauvignon) and waited with me for the final result. So here are the pics, almost exactly the colored I 'm trying to reproduce and BTW ... I did not slept on the couch 1 Quote Link to comment Share on other sites More sharing options...
Nanuq Posted December 12, 2017 Report Share Posted December 12, 2017 Hah! Fantastic result. Well done. And I see nothing at all wrong with stoves and watches! 1 Quote Link to comment Share on other sites More sharing options...
manodeoro Posted December 12, 2017 Author Report Share Posted December 12, 2017 Hah! Fantastic result. Well done. And I see nothing at all wrong with stoves and watches! Thanks@Nanuq BTW ... please just remind me to say "NAY" if you ever invite me to a BBQ sent from my Moto G5 Plus using Tapatalk@Dlf ... would like to share that thread with you If it weren't because of you I could have never discovered that model ... Thanks a lotsent from my Moto G5 Plus using Tapatalk Quote Link to comment Share on other sites More sharing options...
manodeoro Posted December 12, 2017 Author Report Share Posted December 12, 2017 Wake up early this morning, so I had some spare time for "bezel ring cooking" Some comparison pics, 5513 eBay bezel ring untouched vs 5513 bezel ring polished and "cooked" (still same process : 30mn cooking / cooldown, repeat 3 times) I definitely LOVE that subtle "yellow/gold" color ... next month I'll try coloring a complete watch using that method I will also do some test soaking a stainless steel piece in linseed oil before "cooking" to see what I get ... linssed oil is supposed to enhance the process so I should get a more brownish color 1 Quote Link to comment Share on other sites More sharing options...
rails Posted December 16, 2017 Report Share Posted December 16, 2017 Wake up early this morning, so I had some spare time for "bezel ring cooking" Some comparison pics, 5513 eBay bezel ring untouched vs 5513 bezel ring polished and "cooked" (still same process : 30mn cooking / cooldown, repeat 3 times) I definitely LOVE that subtle "yellow/gold" color ... next month I'll try coloring a complete watch using that method I will also do some test soaking a stainless steel piece in linseed oil before "cooking" to see what I get ... linssed oil is supposed to enhance the process so I should get a more brownish color Great work as usual, thanks for sharing!Sent from my iPhone using Tapatalk Quote Link to comment Share on other sites More sharing options...
manodeoro Posted December 16, 2017 Author Report Share Posted December 16, 2017 Great work as usual, thanks for sharing!Sent from my iPhone using TapatalkThanks !!! and you're welcomeAlong the next months I'll make tests to see the different colors one can achieve using that method and I'll try to build a chart with :- gaz burner size- "cook" duration- colorIf I achieve that I could call my thread "Mastering the Art of Watches Cooking" sent from my Moto G5 Plus using Tapatalk 1 Quote Link to comment Share on other sites More sharing options...
slake Posted December 20, 2017 Report Share Posted December 20, 2017 (edited) Sacré toi tu devrais être capable de nous sortir un insert avec un micro onde et un peu de plastique @manodeoroyou should be able to make a insert with a microwave and a little bit of plastic Edited December 20, 2017 by slake Quote Link to comment Share on other sites More sharing options...
jmb Posted December 21, 2017 Report Share Posted December 21, 2017 Two-toning it will be pretty easy if you have access to a lathe. Chuck it in the lath, spin it up, and apply a Scotch-Brite (or fine sandpaper) to the section you want "silvery" and you're done! Quote Link to comment Share on other sites More sharing options...
manodeoro Posted December 22, 2017 Author Report Share Posted December 22, 2017 Two-toning it will be pretty easy if you have access to a lathe. Chuck it in the lath, spin it up, and apply a Scotch-Brite (or fine sandpaper) to the section you want "silvery" and you're done!Thanks for the advice The problem is I want one part to be "coppery", not "sylvery".That's why I'm building this with 2 parts, one is plain steel, the other one I have "coppered" it with a stove.The work's going well but I won't work on it between the Eve's cause I'm leaving for a ski journey.sent from my Moto G5 Plus using TapatalkOf course I wish you all the best Eves ( Christmas and New Year) you can have.sent from my Moto G5 Plus using Tapatalk Quote Link to comment Share on other sites More sharing options...
rwatch0 Posted February 21, 2018 Report Share Posted February 21, 2018 Great read and kudos to you for your courage, patience and skills!Thanks!Sent from my Nexus 5 using Tapatalk Quote Link to comment Share on other sites More sharing options...
Dan71 Posted March 12, 2018 Report Share Posted March 12, 2018 bravo! Quote Link to comment Share on other sites More sharing options...
manodeoro Posted March 12, 2018 Author Report Share Posted March 12, 2018 1 hour ago, Dan71 said: bravo! Thanks Still no new pics to post because I'll wait for that watch to be finished to show anything more, but some build updates : - lug drilled - fixed bars and tubes modded ... still not on the case because I want to engraved it @6 before - engravement templates ready for the case and caseback - silix caseback modded so that it looks more accurate - handset selected and aged and ready for lume (will do that along with the dial) The two-tone custom bezel proves to be much more difficult than I thought to achieve - first one was a complete failure ... - second one was cool but didn't cliped firmly on the retaining ring - next one ... should be perfect ... at least that's what I hope Next week I'm leaving for a 3 weeks trip in Vietnam so I wont work on that build until mid April. If everything goes as supposed I hope I'll show something in May. 1 Quote Link to comment Share on other sites More sharing options...
manodeoro Posted October 27, 2018 Author Report Share Posted October 27, 2018 Hi guys, It's been a long time since my last post on that topic. And now I see that all my pics are gone so I will have to reupload. That build proved to be much more difficult than I thought but today I'm close to finish that watch. I still have some work to do on it but I'm feel I'm really close. So here is a little teaser 1 Quote Link to comment Share on other sites More sharing options...
manodeoro Posted October 27, 2018 Author Report Share Posted October 27, 2018 One last pic before supper Quote Link to comment Share on other sites More sharing options...
jmb Posted October 27, 2018 Report Share Posted October 27, 2018 Coming along nicely. Quote Link to comment Share on other sites More sharing options...
manodeoro Posted October 27, 2018 Author Report Share Posted October 27, 2018 3 hours ago, jmb said: Coming along nicely. thanks Justin ... I still have some work to do on the case, lume the dial and hands and put everything together Quote Link to comment Share on other sites More sharing options...
jmb Posted October 27, 2018 Report Share Posted October 27, 2018 You have way more patience than I, my friend! Quote Link to comment Share on other sites More sharing options...
manodeoro Posted October 28, 2018 Author Report Share Posted October 28, 2018 8 hours ago, jmb said: You have way more patience than I, my friend! In 1652 Axel Ostenstiern (a Swedish politician) wrote that "patience is the daughter of necessity" And as you say in the USA ... "necessity is the mother of invention" So I could say that it all starts with "necessity" 😉 and that I don't have the machines and I don't have big money to send so that people would do those things for me ... so I have to be "patient" and "inventive" But that would be only partially true. I do all that because I like that, finding ways to do things and do these things. And the process of the building (really building I mean ... not paying people to build for me) is as much as important as the final result 1 Quote Link to comment Share on other sites More sharing options...
jmb Posted October 28, 2018 Report Share Posted October 28, 2018 I understand... Quote Link to comment Share on other sites More sharing options...
manodeoro Posted December 27, 2018 Author Report Share Posted December 27, 2018 Hey guys ... look what I got under the tree 4 Quote Link to comment Share on other sites More sharing options...
Nanuq Posted December 27, 2018 Report Share Posted December 27, 2018 Yummmmmm, tasty! Let's see some profile shots of that bad boy. Quote Link to comment Share on other sites More sharing options...
manodeoro Posted December 27, 2018 Author Report Share Posted December 27, 2018 Yummmmmm, tasty! Let's see some profile shots of that bad boy. Thanks !!!Will post more pics early January Profile is ... not that bad with 2mm fixed bars, "german silver" bezel and a nice big crown But that's just my opinion and I suspect myself to be sort of ... partial Won't be there a lot next few days because I'll take care of my grandchildren s.So I wish you (and all members) to have a nice New Year's Eave ... without any earthquake Envoyé de mon Moto G (5) Plus en utilisant Tapatalk Quote Link to comment Share on other sites More sharing options...
Recommended Posts
Join the conversation
You can post now and register later. If you have an account, sign in now to post with your account.