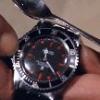
Jetsons Posted April 18, 2006 Report Share Posted April 18, 2006 (edited) I haven't figured out how to permanently install the oem components but hopeufully, something will come to mind. Suggestions are most welcome. Removed the bezel assembly and polished it and around the crystal. I also touched up the pearl with acrylic. Simple to do and the watch looked much better. oem parts added: Edited April 18, 2006 by Jetsons Quote Link to comment Share on other sites More sharing options...
By-Tor Posted April 18, 2006 Report Share Posted April 18, 2006 Looks great Jet!!! I really like the aged pearl. Quote Link to comment Share on other sites More sharing options...
Jetsons Posted April 19, 2006 Author Report Share Posted April 19, 2006 (edited) Thanks, Bytor. If I could just figure out a way to securely fasten the oem bezel to the case. I would be all set. It does give the sub a very different look. A few observations with regard to the TW components: The TW metal bezel is heavy and much more so than the oem. It's a nice piece of quality machine work. A groove is machined on the inside center where a thin rubber O ring resides. This should help seal the case from moisture specially if lubricated with silicone grease. A nice touch that could have easily been ommitted. The bezel washer is an efficient design. On the case side of the washer, a prong inserts into to a small case hole machined at 12 O'clock & the washer locks to the case. On the side that contacts the bezel, there are three prongs evenly spaced which provide the 120 clicks of the TW bezel, as opposed to the single wire design of the oem. The prongs can be adjusted (by slightly bending) to provide harder or softer clicks if one so desires. To install, line up the pearl and with a gentle press from both sides it clicks perfectly into position. Nicely done by the TW case manufacturers and it does not appear to be an inexpensive component to design and manufacture. IMO, cloning the OEM bezel assembly would have been cheaper & perhaps easier to produce. Added: A simple and worthwhile mod to subs it to remove the bezel and polish it. I used a dremel and polishing paste and the change was not subtle. The overall watch will look much nicer with the added touch of refinement. Jet Edited April 21, 2006 by Jetsons Quote Link to comment Share on other sites More sharing options...
Hari Seldon Posted April 21, 2006 Report Share Posted April 21, 2006 Can I ask how you removed the bezel without causing major damage to the case? I really want to remove the bezel on my LV rep to polish around the case unobstructed but I am afraid of trying to remove the bezel. I practiced on a couple beater Invicta's and caused HUGE gouges in the case working off the bezels. Even though they cost more than my rep, I can't bring myself to try it on the replica if I am going to cause the same damage. Quote Link to comment Share on other sites More sharing options...
Hari Seldon Posted April 21, 2006 Report Share Posted April 21, 2006 By the way, the two invicta's use the same bezel assembly as the TW you described. It seems like I have encountered at least three methods of constructing a unidirectional rotating bezel. There is the way you described, the Rolex way (see here) and a third where there is a hole drilled somewhere in the case under the bezel with a small pin placed in the hole on a spring. This pin contacts the "teeth" on the bottom of the bezel itself. The method on the TW case seems to be pretty good as the bezels on the Invictas I pretty much ruined have good bezels with nice loud clicks that are impossible to rotate clockwise. Or at least not possible for me and I am fairly strong. The pin in the hole method is used on my LV rep, and I have some "Alpha" watches, cheap Chinese made watches using rep parts but with different dials, that have the same bezel assembly method and the bezels click weakly while turning and can be turned backward without much force. I also don't understand why replicas do not use the same method Rolex does, unless it is simply that the machining needed is too precise as the guy that wrote the guide I linked seems to imply. You said you couldn't get the OEM bezel to work, does that means you have an OEM assembly with bezel, washer, and spring? I was hoping if one purchased all three parts it would fit our reps. Sounds like that is not the case. Probably good thing for me anyway as I am sure they cost a pretty penny. Quote Link to comment Share on other sites More sharing options...
Jetsons Posted April 21, 2006 Author Report Share Posted April 21, 2006 Hi, Hari: Removal of the bezel is a fairly easy excercise. I cut strips of electrical tape and placed the tape between the case and the bezel gap to protect the case. Next I used a case knife (I suspect any thin blade will work) and gently worked it between and around both ends of the bezel assembly. You will feel the bezel working itself loose and off it comes. No scrartches whatsoever to either the case or bezel. To remove the glued on insert, I placed the bezel it in a bowl warm water & dish washing liquid and allowed it to soak for an hour or so. The insert will seperate easily this way with no damage. The old glue will also be a breeze to remove. With regard to the OEM bezel, washer & insert, I can make it work by setting it with epoxy to the case. Obviously, the bezel will not rotate with this method but it would be installed. I have not done anything with the OEM parts as of yet hoping to come up with a better solution. The watch does look killer with the oem parts in place. Regards, Jet Quote Link to comment Share on other sites More sharing options...
Hari Seldon Posted April 21, 2006 Report Share Posted April 21, 2006 Thanks a lot. I am going to try the electrical tape method later on. That sounds like just the thing to keep from damaging the case. Quote Link to comment Share on other sites More sharing options...
chrono903 Posted April 21, 2006 Report Share Posted April 21, 2006 Thanks a lot. I am going to try the electrical tape method later on. That sounds like just the thing to keep from damaging the case. at the risk of over simplifying things, if you use something softer than the case/bezel metal, you need not worry about scratches. I have seen tales of tongue depressors being used. I personally used a little brown piece of plastic used to clean pampered chef stoneware. thom Quote Link to comment Share on other sites More sharing options...
Recommended Posts
Join the conversation
You can post now and register later. If you have an account, sign in now to post with your account.