

omgiv
-
Posts
669 -
Joined
-
Last visited
-
Days Won
1
Posts posted by omgiv
-
-
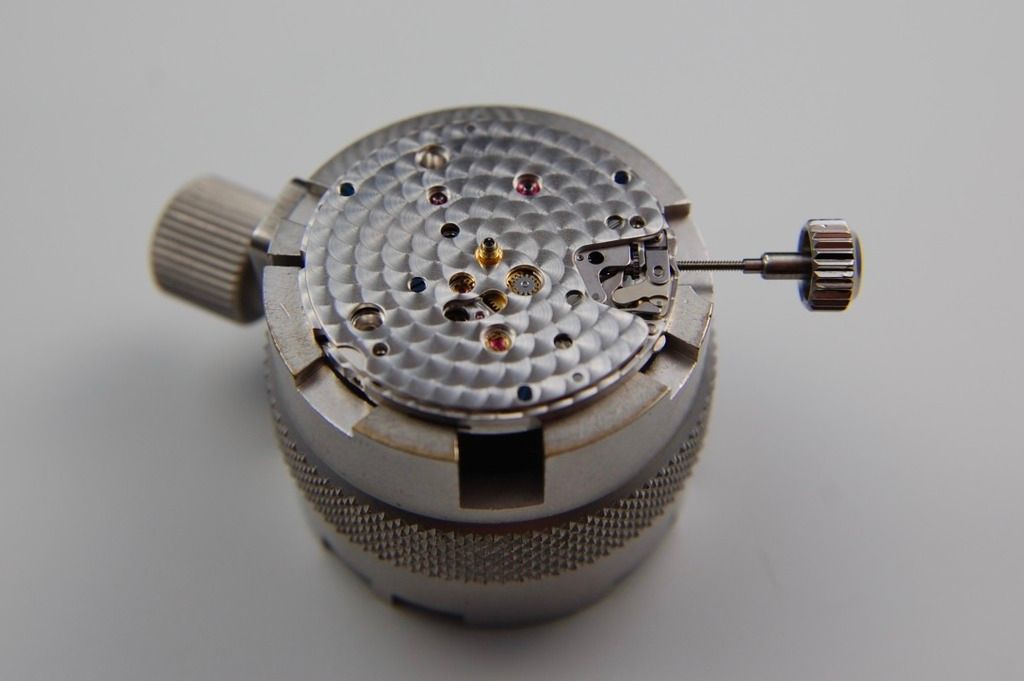
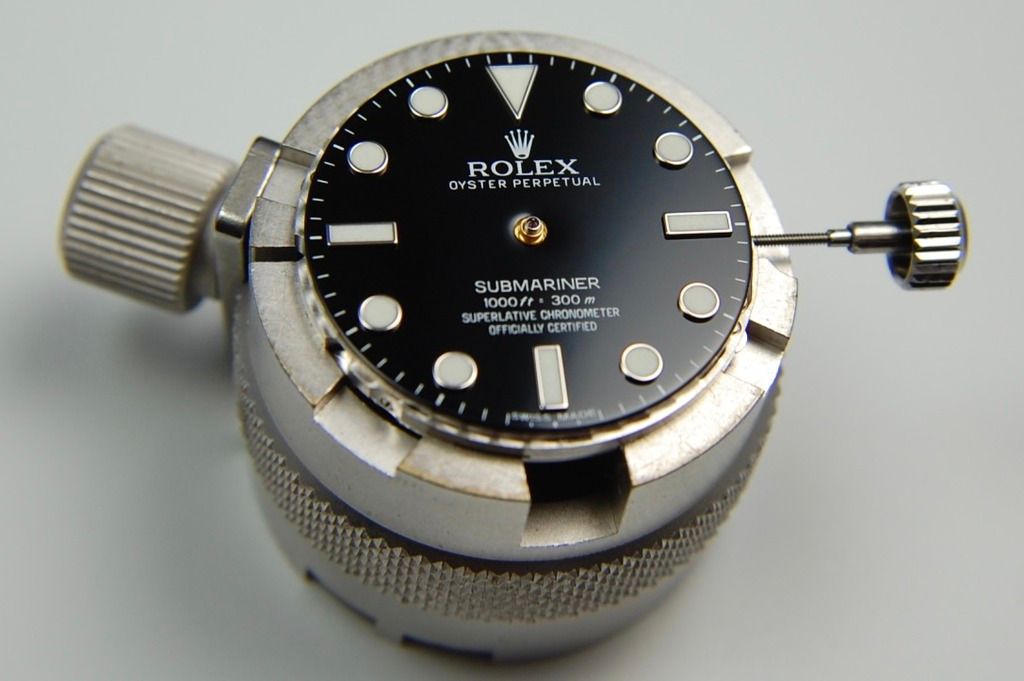
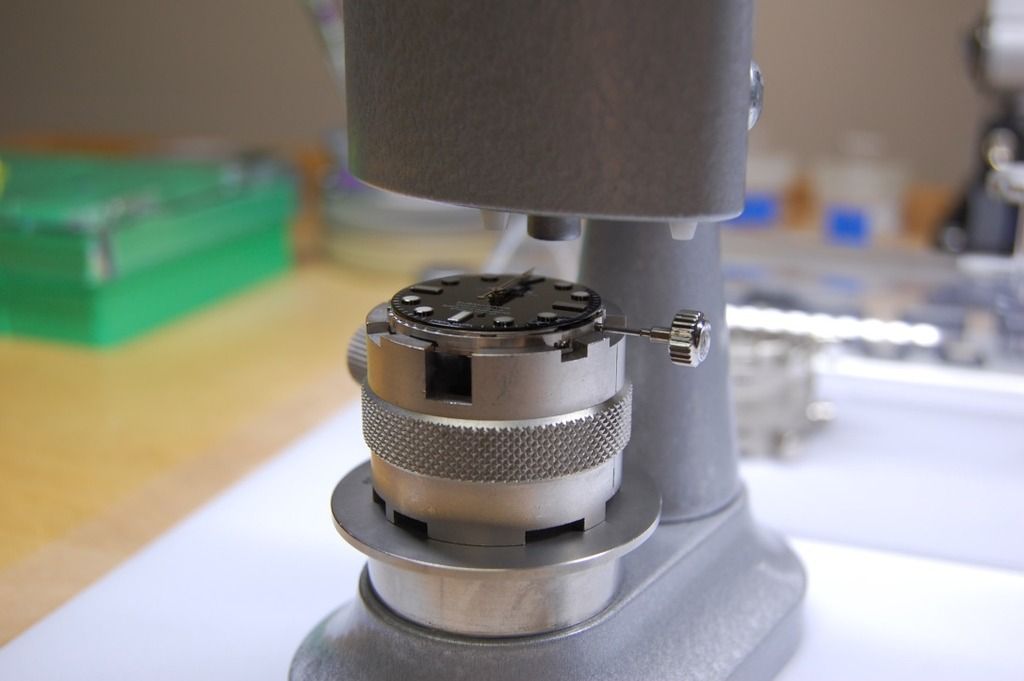
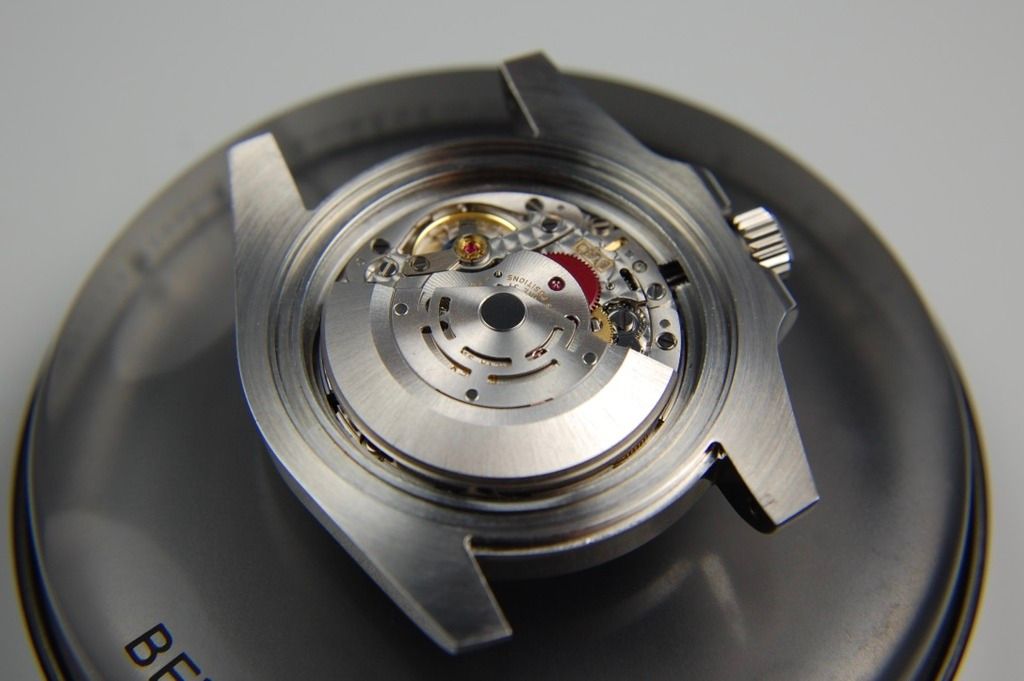
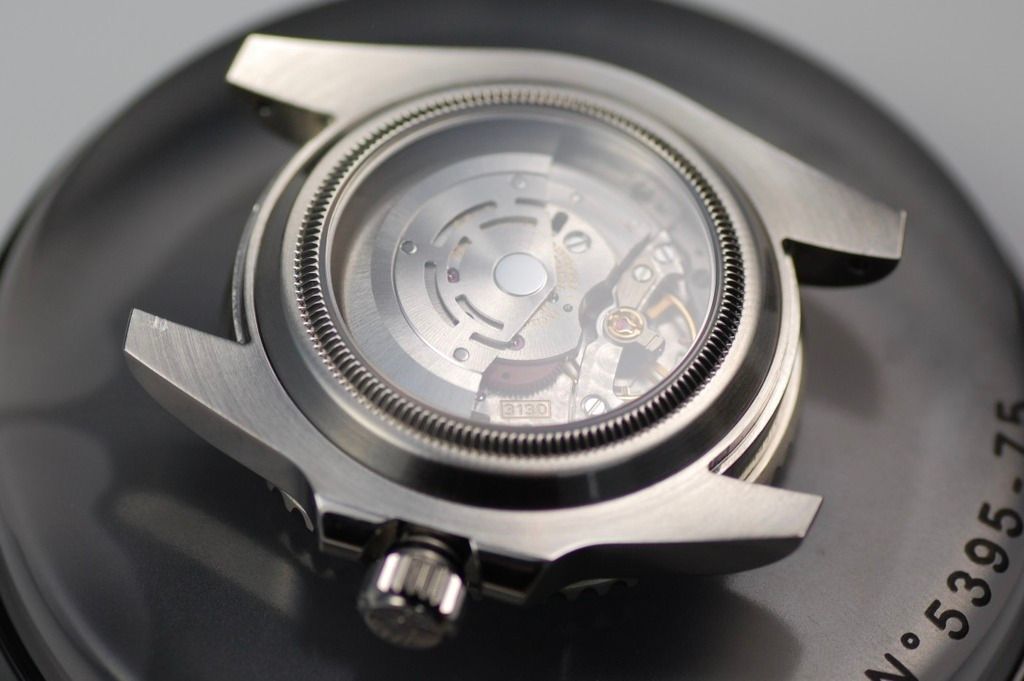
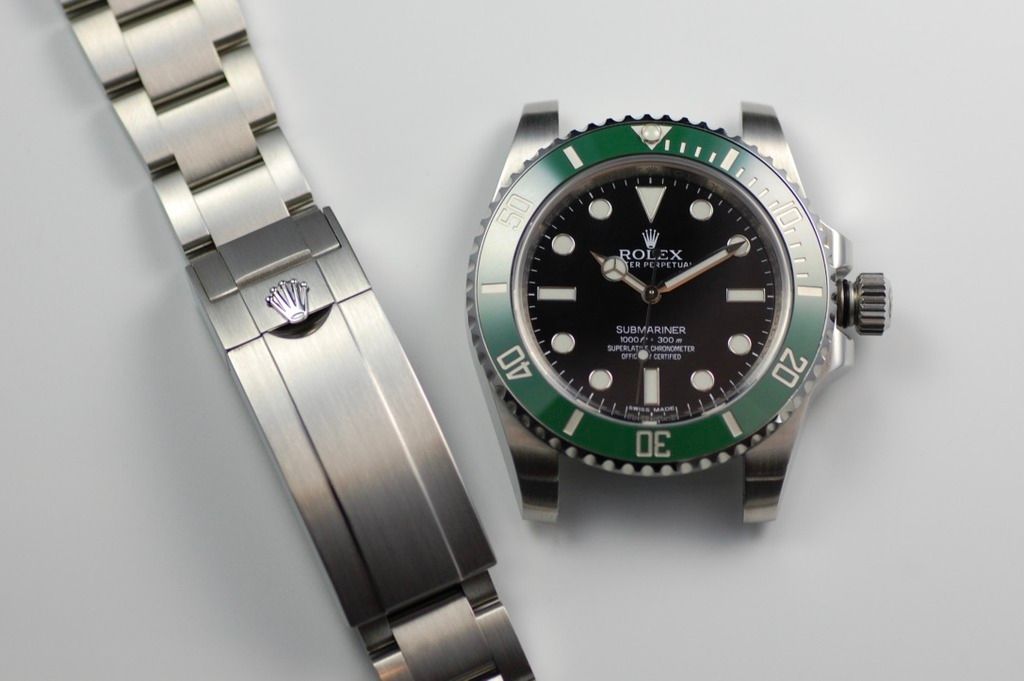
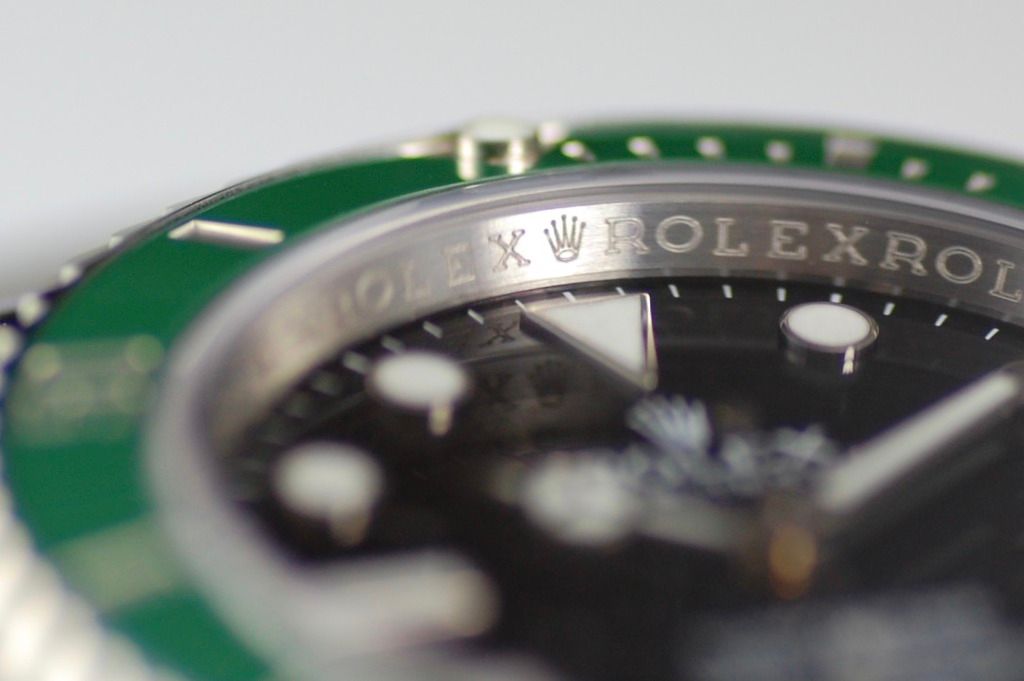
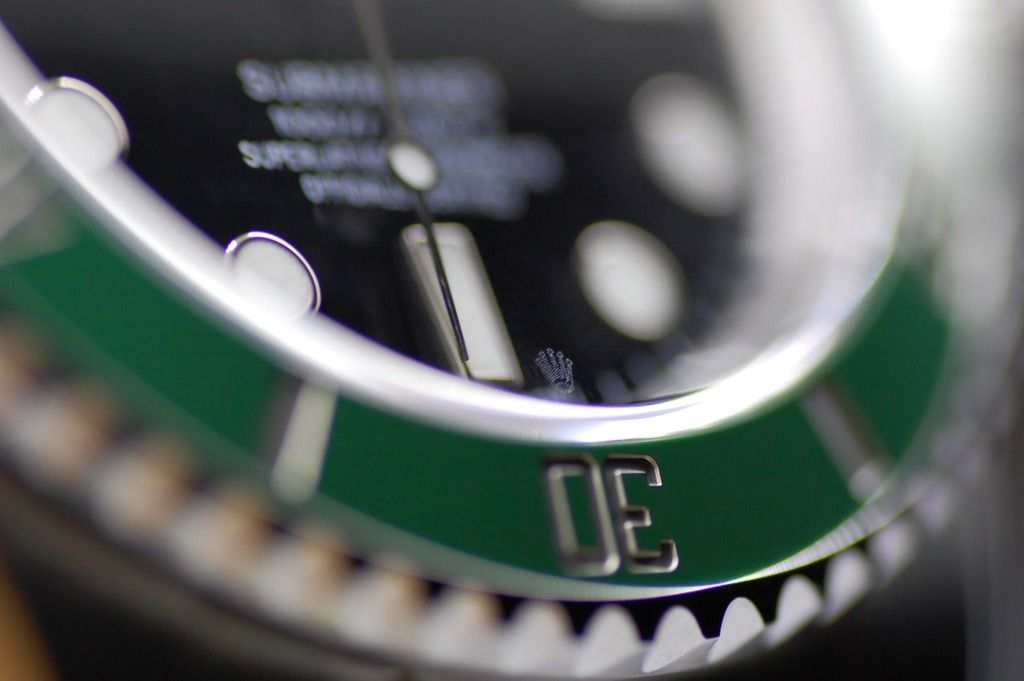
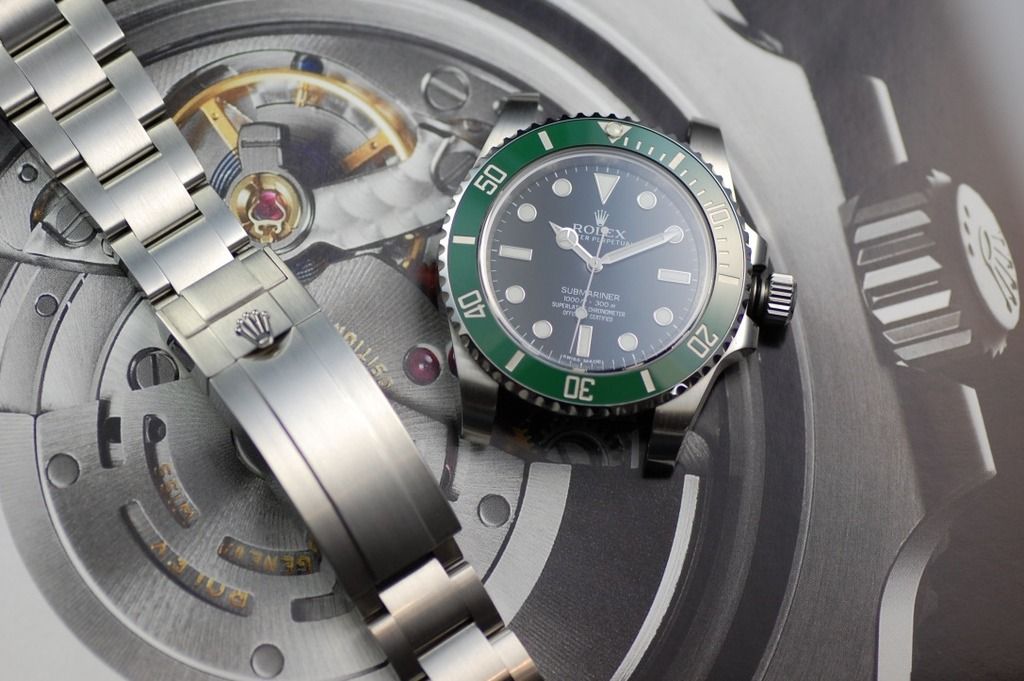
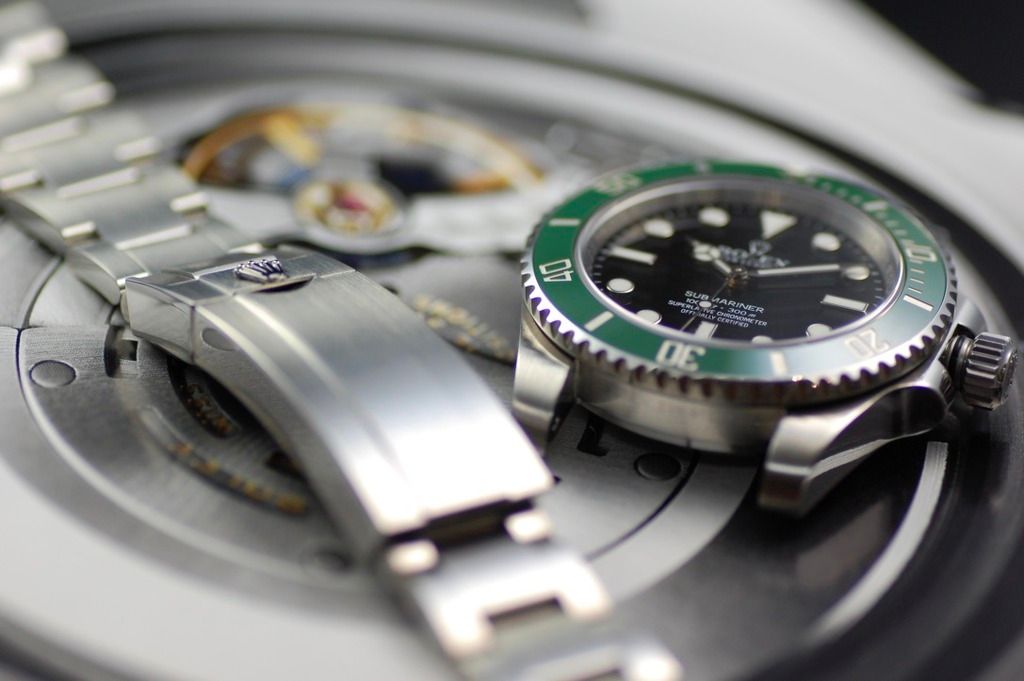
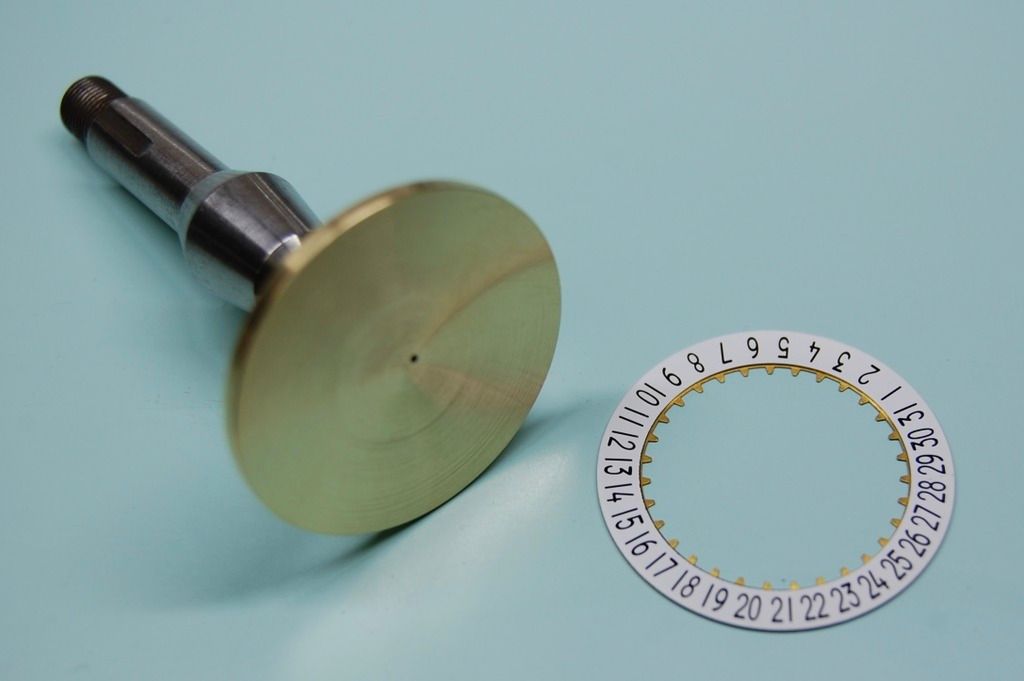
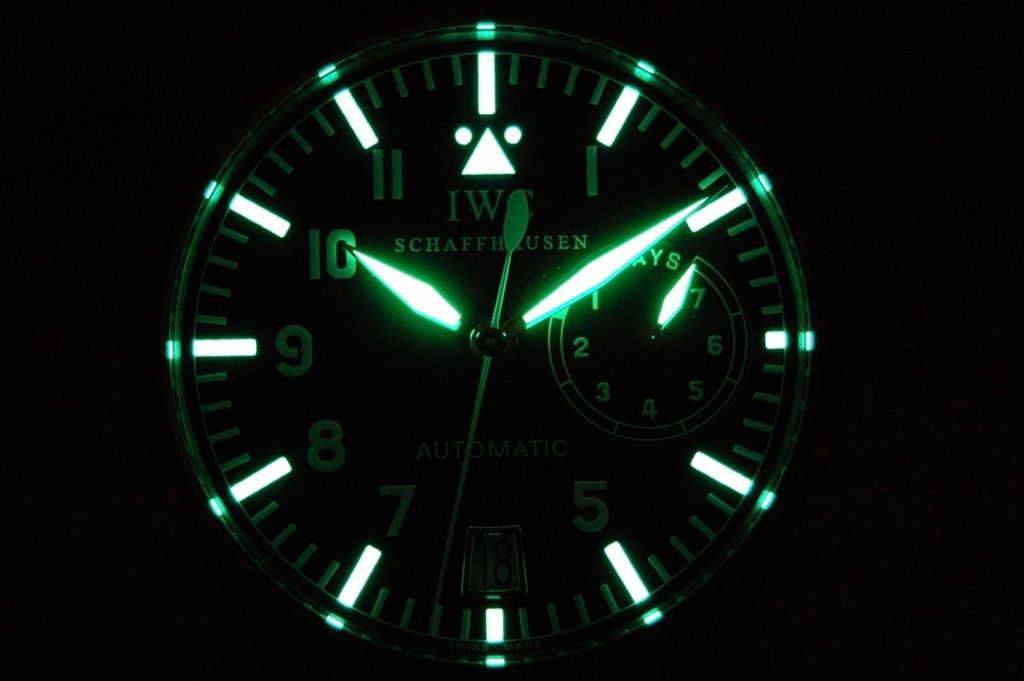
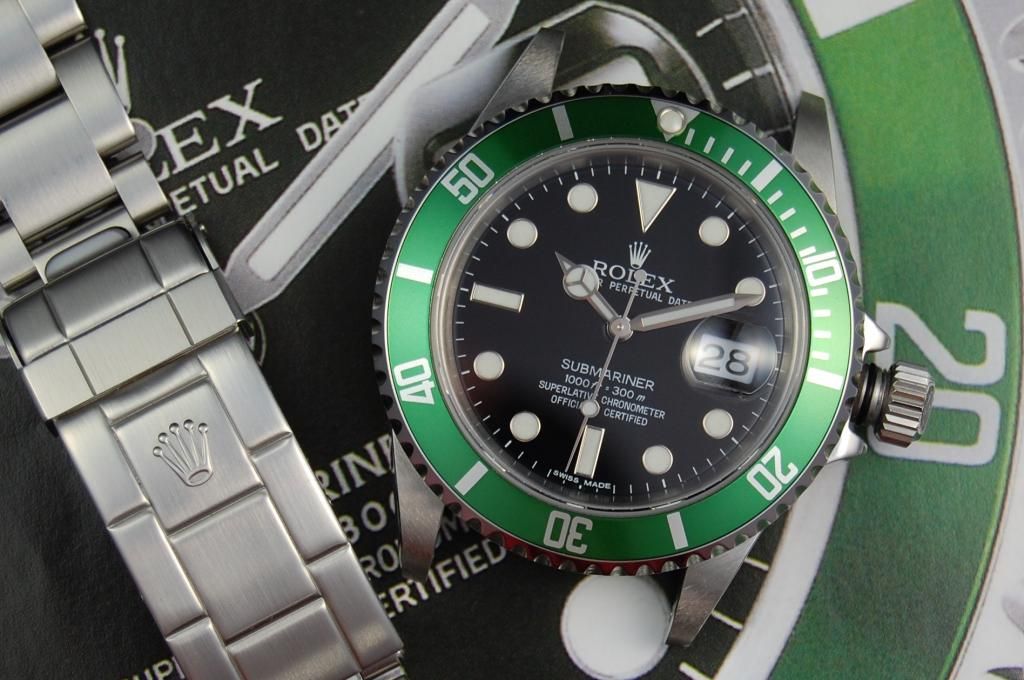
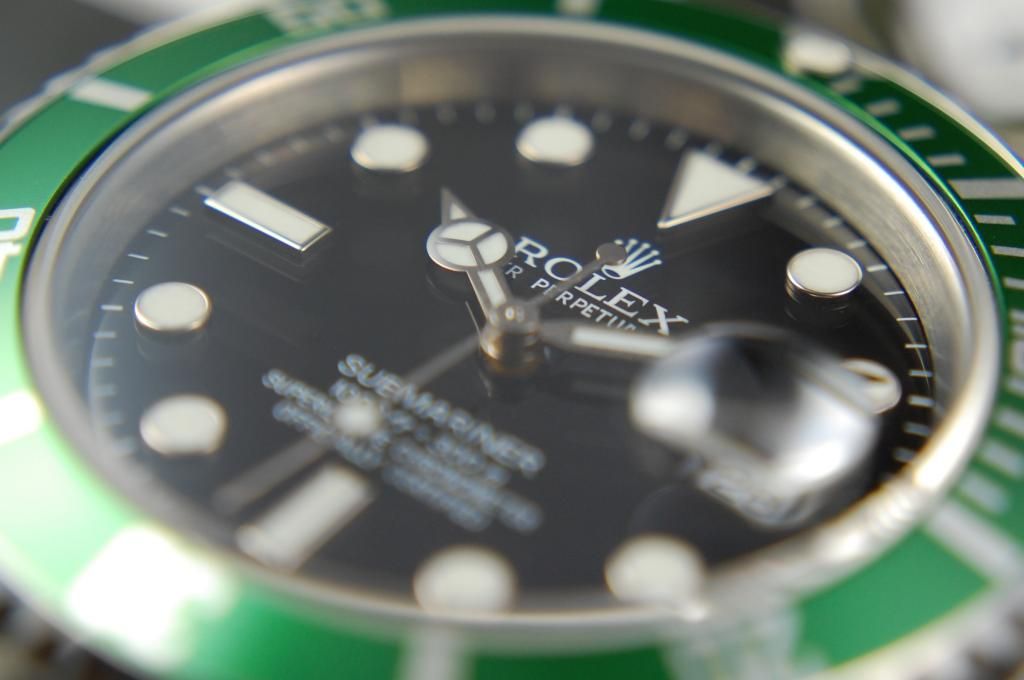
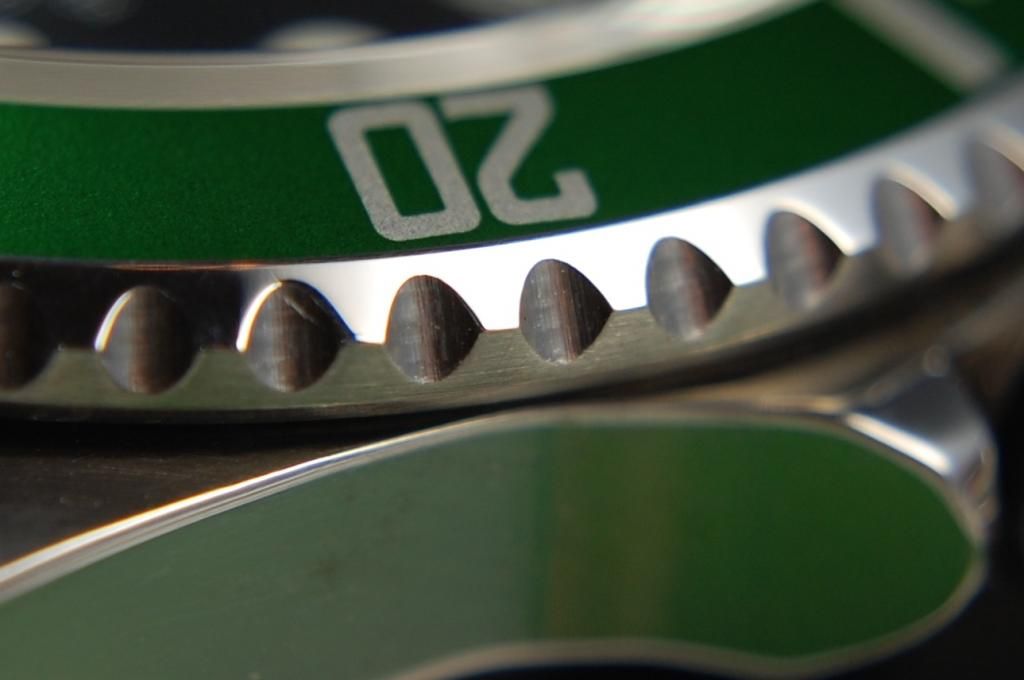
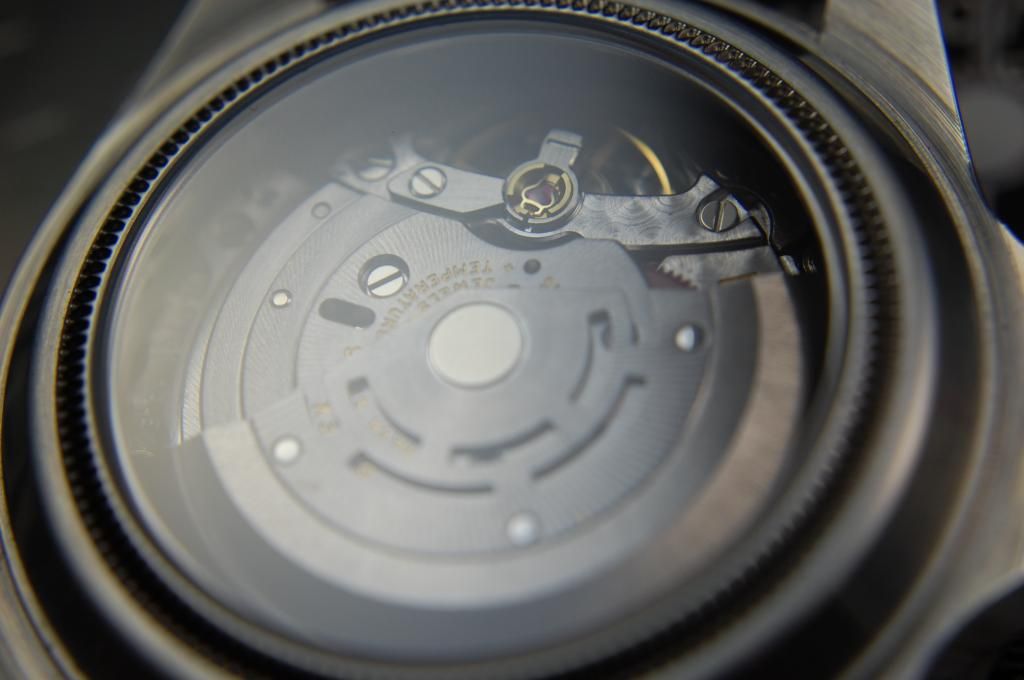
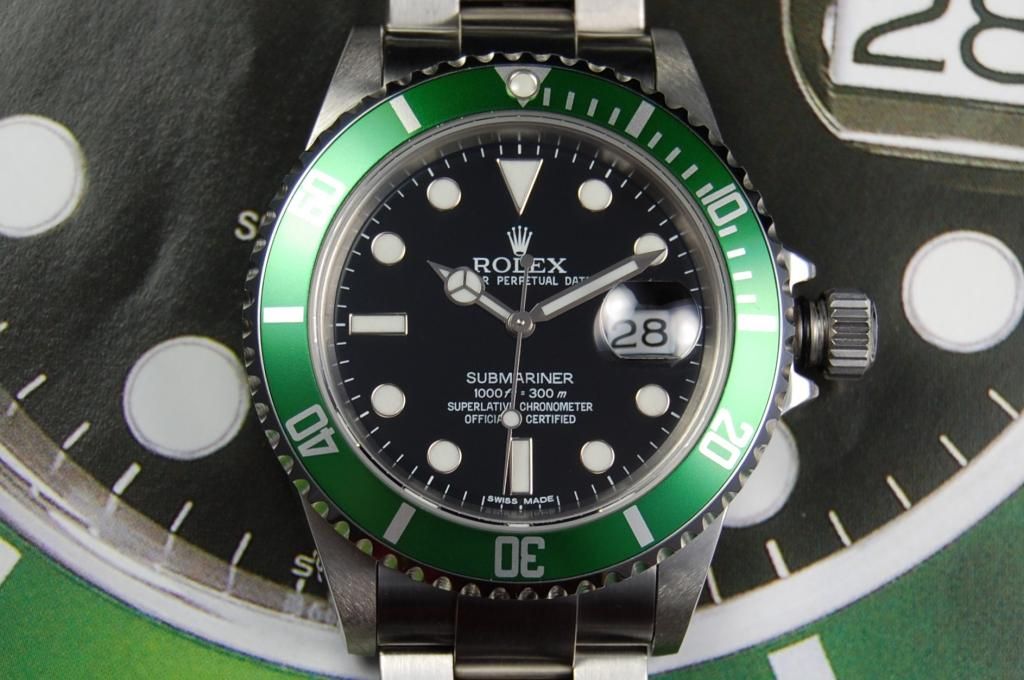
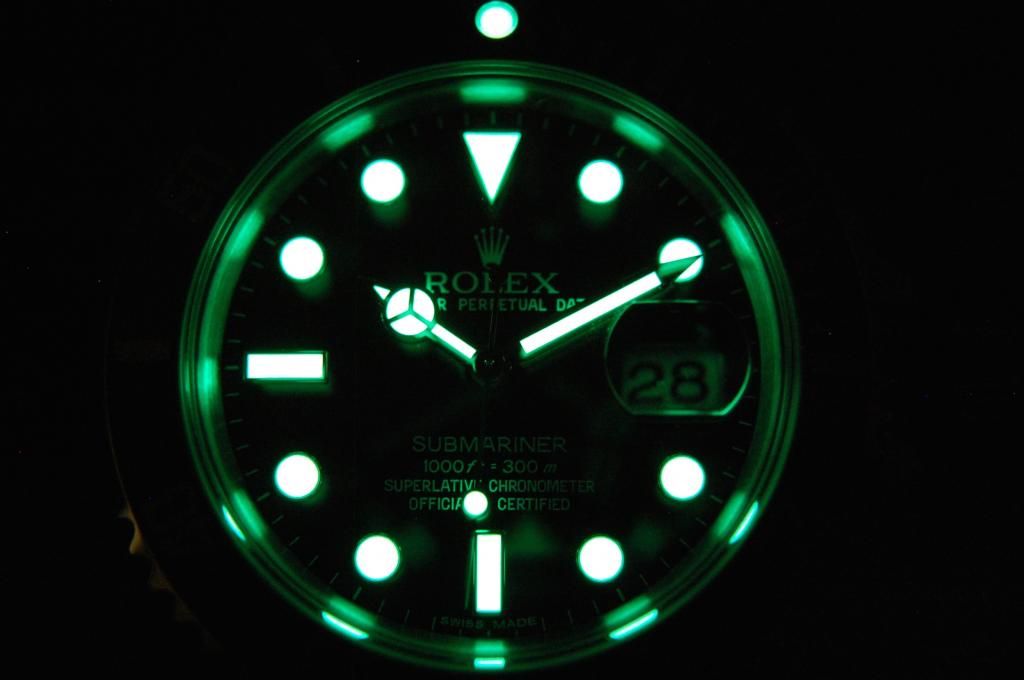
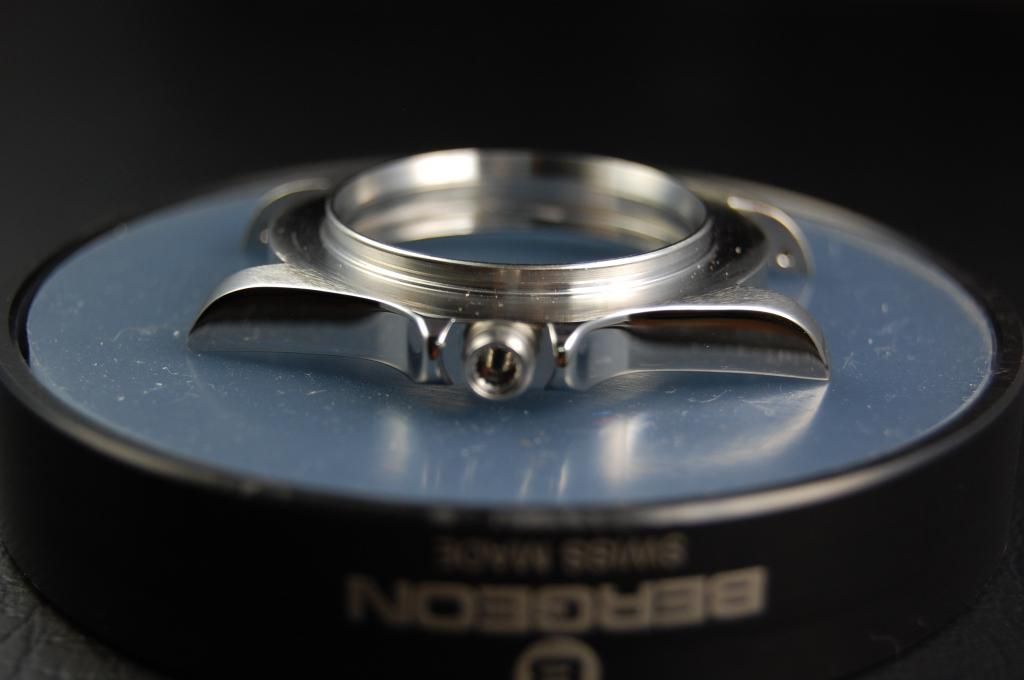
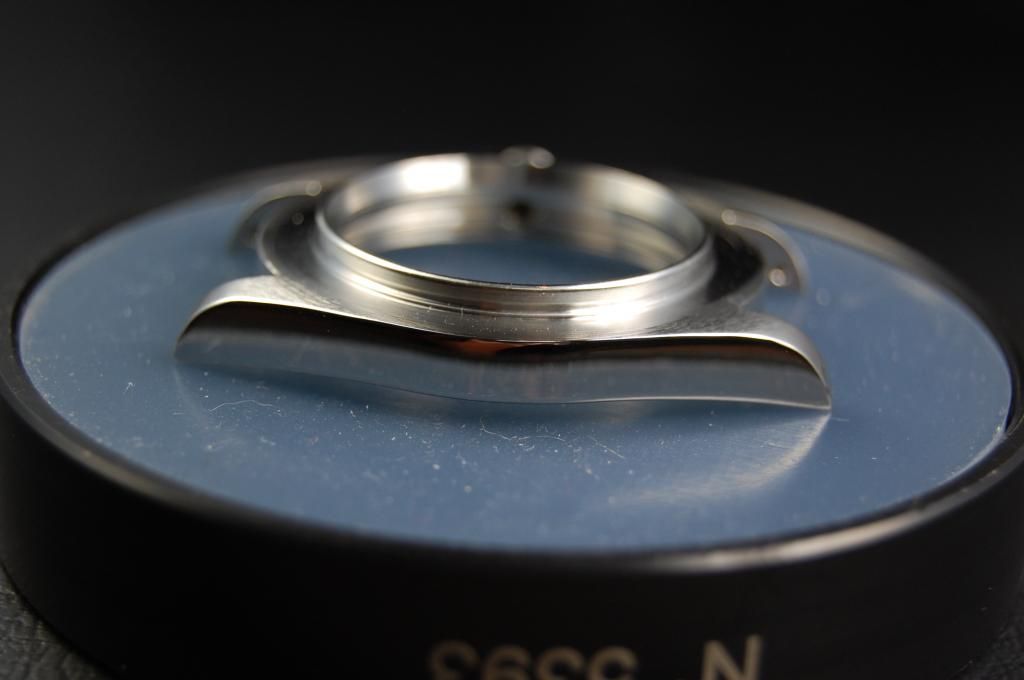
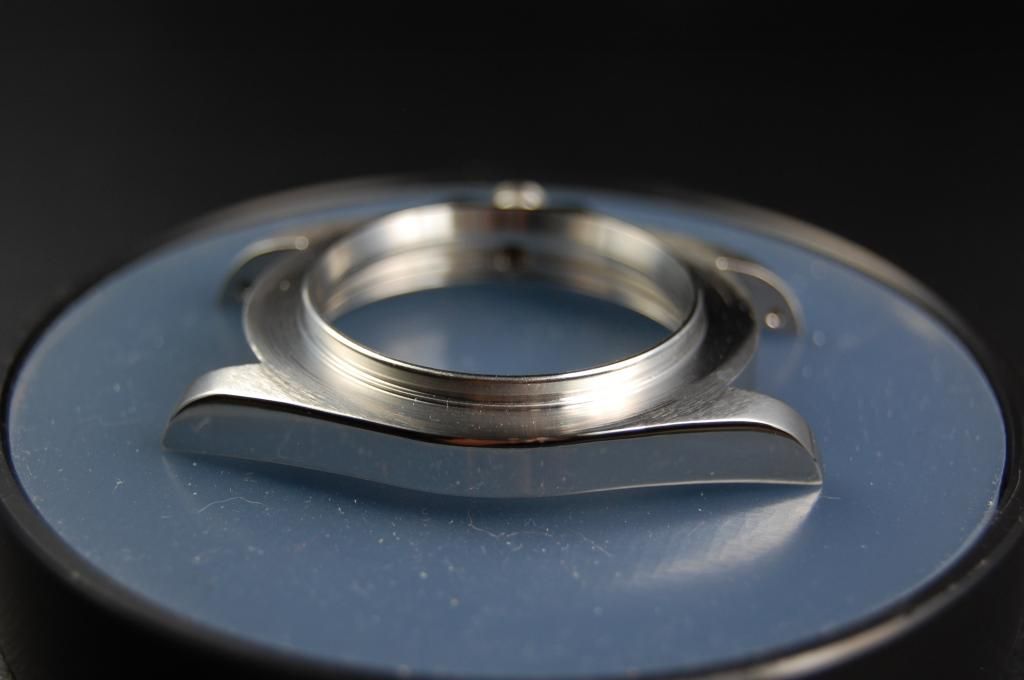
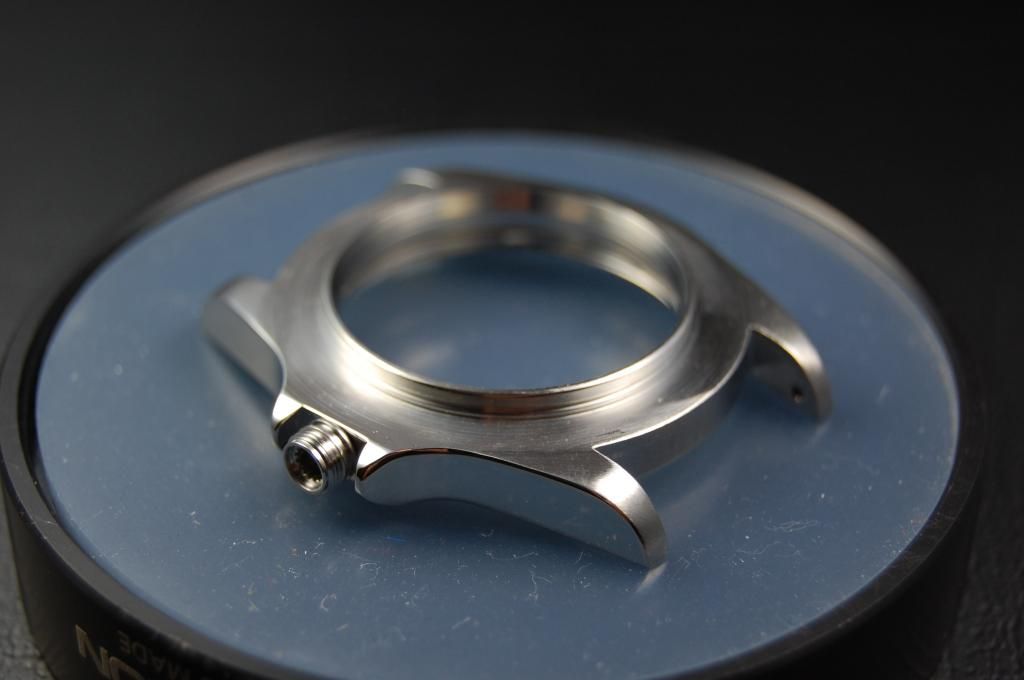
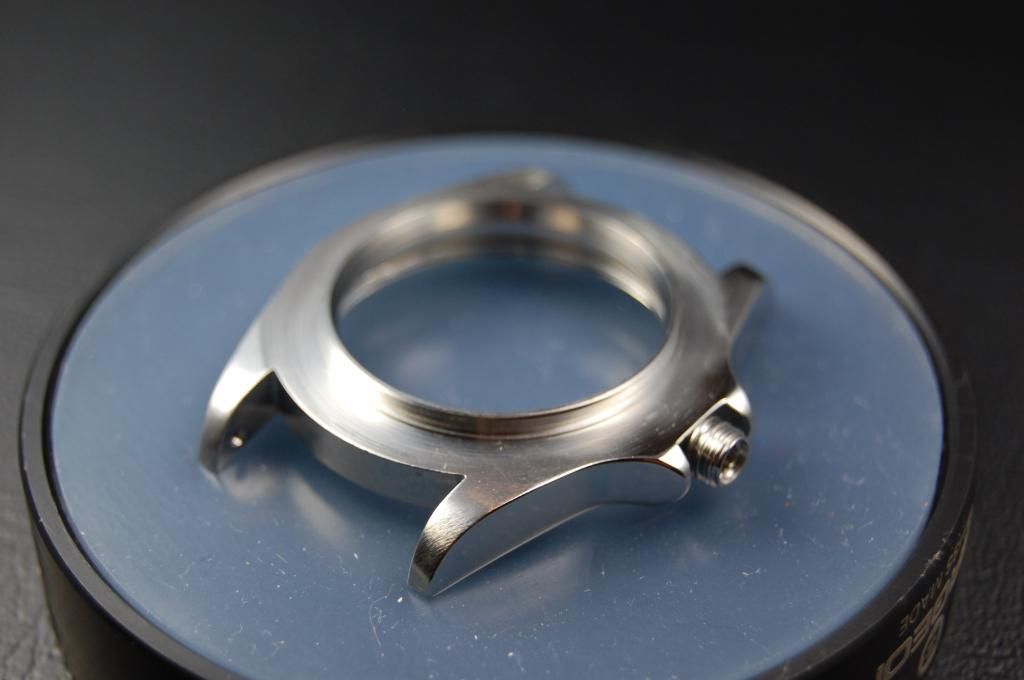
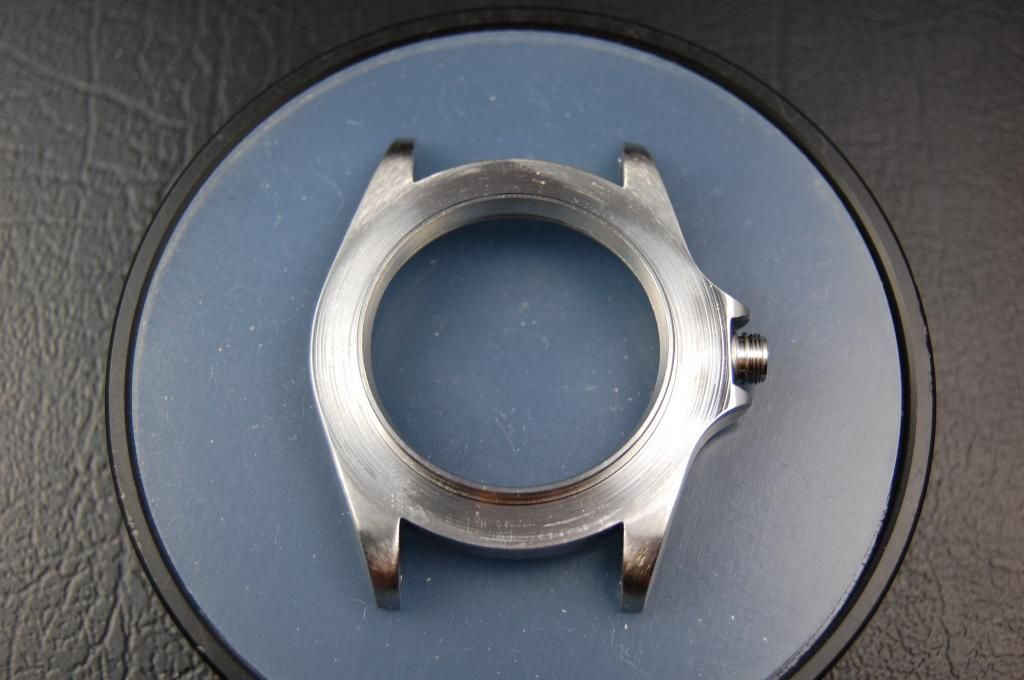
My Franken 114060LV
It has been quite a while since I have posted anything on any forum but thought I would share my latest completed project. I started this one with the hopes of building a nice no date franken Submariner. The hardest step by far was finding the correct case to start the project. I knew that I wanted to use a Noob V6S case for the SA3135 movement and bracelet but finding one proved to be quite difficult. I was lucky enough to finally find one in very good condition. I was initially going to use a Yuki 3135 converted to a 3130 but found a genuine 3130 movement for a very reasonable price, so I jumped on it. I already had the hands so the next steps were finding and collecting the rest of the parts. I was almost finished with the project and was about to finish it when I was offered the chance to buy a genuine ceramic LV insert. I jumped on that one too and so my 114060LN quickly became a 114060LV. I know that there doesn't exist one coming out of the Rolex factory (yet), but have seen other genuine owners adding a black dial to their hulk's to make a 116610LV. But enough of my dribble.....here are some pics of the final product.
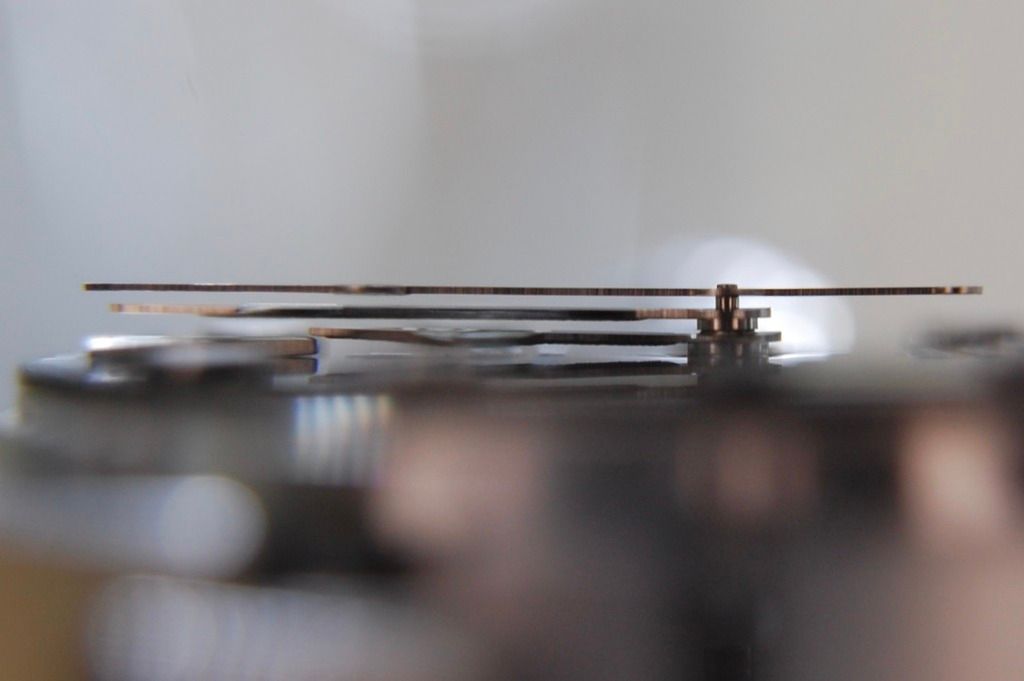
One note I would add is that I would eventually like to add the genuine bezel, crystal retaining ring, and bezel ratcheting mechanism parts. Finding those is the challenge though....
Build List:
Noob V6S midcase, bezel, and bracelet
Preik display caseback
Genuine dial
Genuine hands
Genuine crystal
Genuine 3130 movement
Genuine crown and tube
Genuine green ceramic insert
Genuine spring bars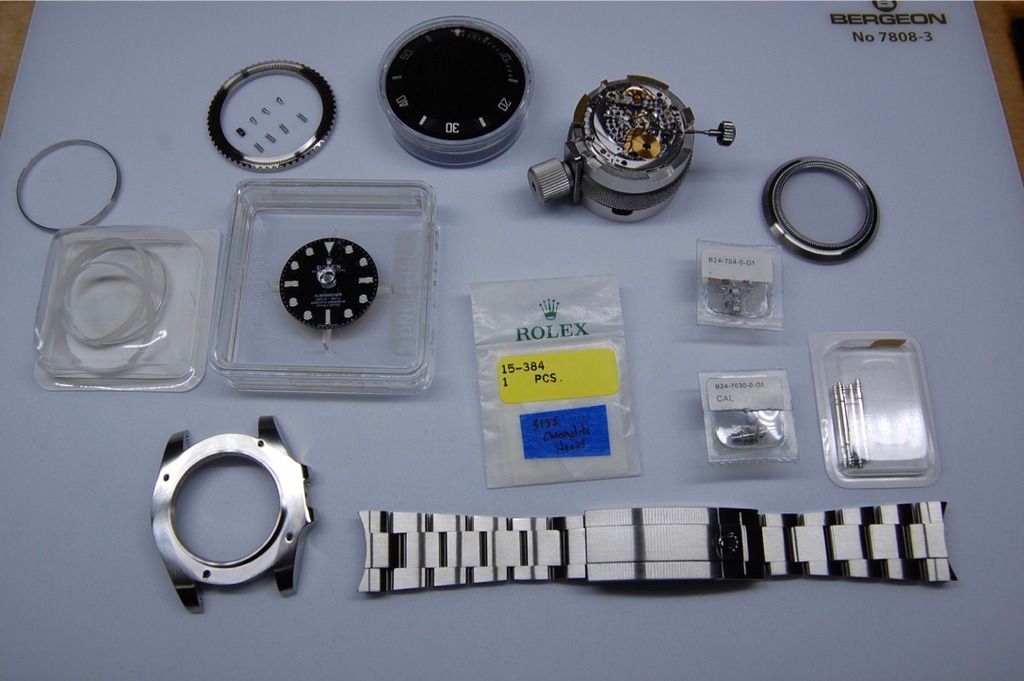


-
 1
1
-
-
Thank you very much gentlemen!!!
-
Hey Guys,
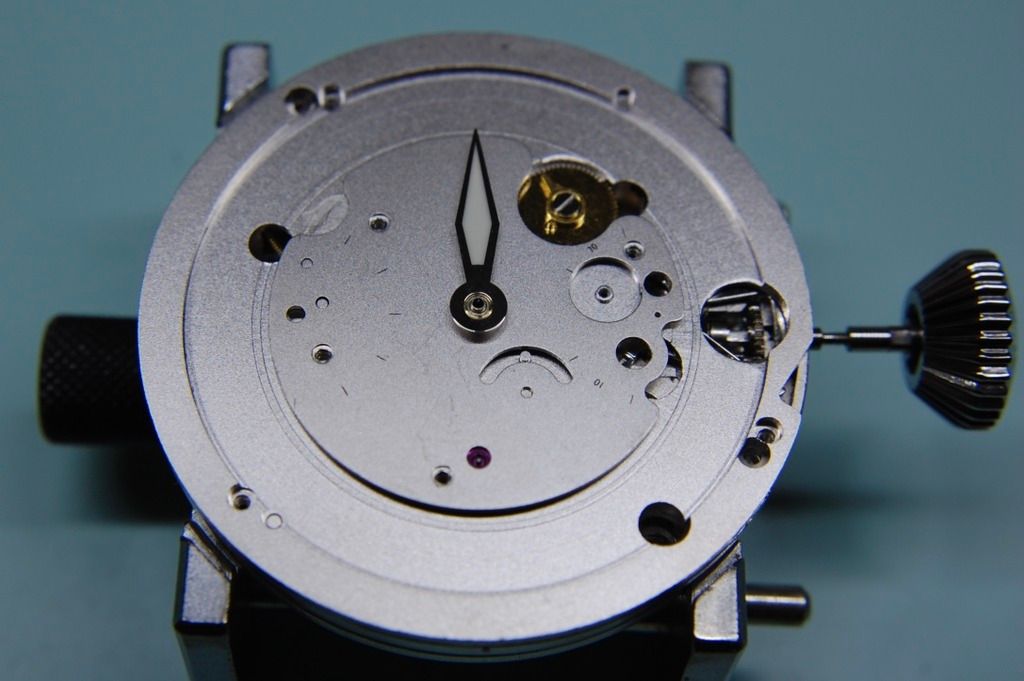
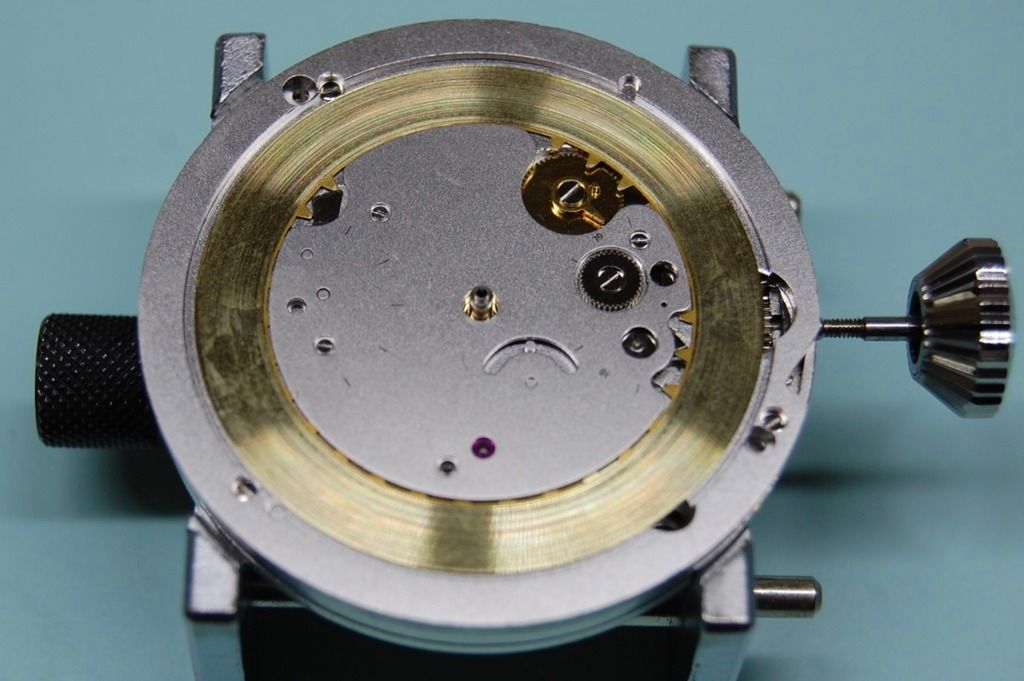
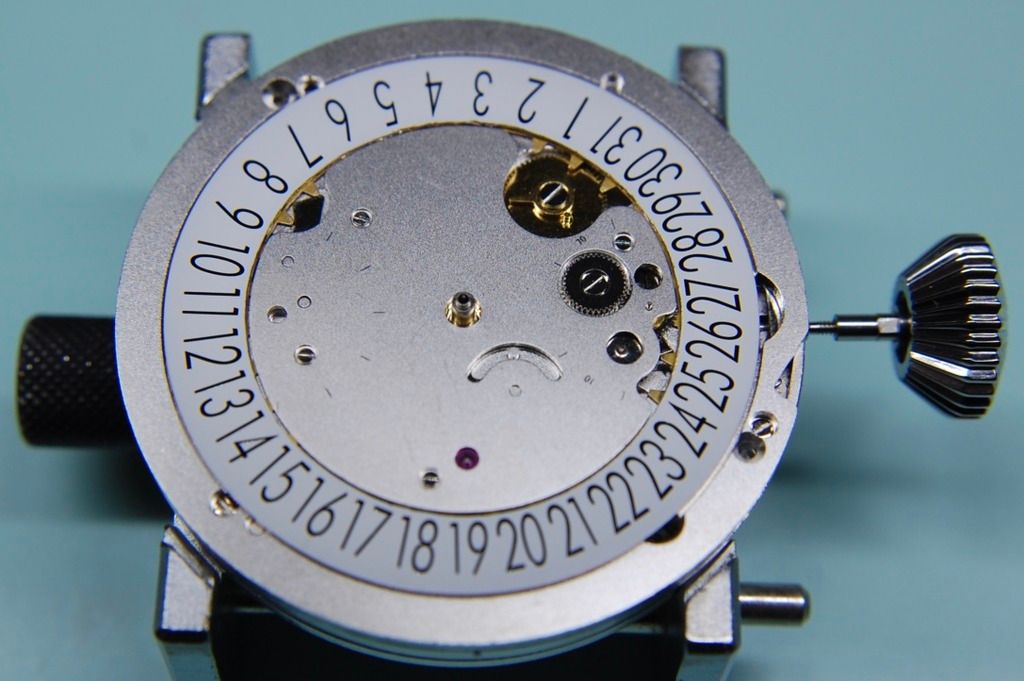
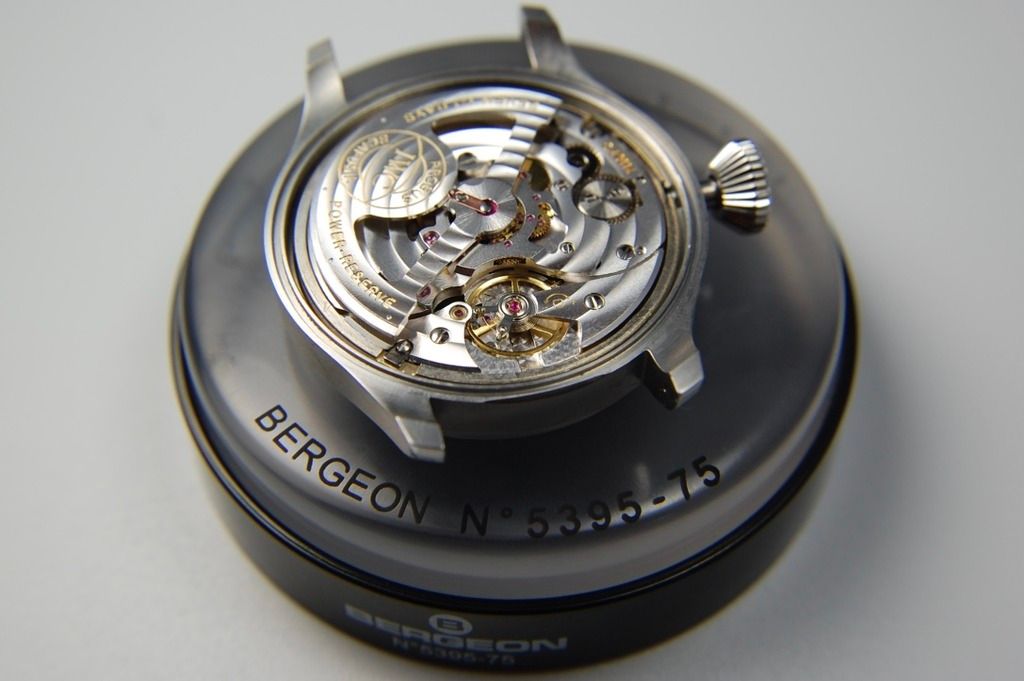
I don't post much on the forums these days but felt that this one deserved a post. Or some pictures at the very least. I feel like I need to say that this build was probably the most difficult I have done in terms of almost every little thing fighting me. The project started a couple of years ago when I ordered the old style 5002 rep without a working power reserve. I then started the long search for genuine parts. I had found all of the parts that I needed and started to work on the old movement to use the genuine date wheel, when I was told to put the project on hold. There were rumors that the factories were working on a new movement with a working power reserve indicator. I waited a while for the dust to settle once they came out to see if the new movement was up to snuff. The initial results were very positive and I was ready to pull the trigger when I was told again to hold off. The factories were working on an "improved" V2 movement. I was fortunate to be a part of a group buy of LPP BP's and was finally getting a working power reserve movement and the project could once again proceed. One note I should mention is that the only difference I can find on any of the power reserve movements I have see is that some have the wheel in the automatic mechanism that winds the ratchet wheel fully jeweled, whereas other just have that wheel riding on a post. Jewels are always preferred in the long run but I wouldn't call the other movements bad at all.
To my disappointment, The new movement would not work with the old style case. The stem position was not in the same place. I was going to use the new LPP case instead since the stem position matches the case tube position, but then I noticed that the LPP case lacks the strap bevels (for lack of a better term) on the back. I decided to tackle that hurdle later once things were further along. One good thing was that the old 5002 caseback fits the LPP case.
Getting the hands to fit also took some work. Mainly the hour wheel. The rep hour wheel is about 1.35mm and the genuine hour hand is about 1.7mm. That was quite a difference and the only option I could see was to make a sleeve for the rep hour wheel to match the diameter of the hour wheel. Once that was done the other hands just needed minor adjusting.
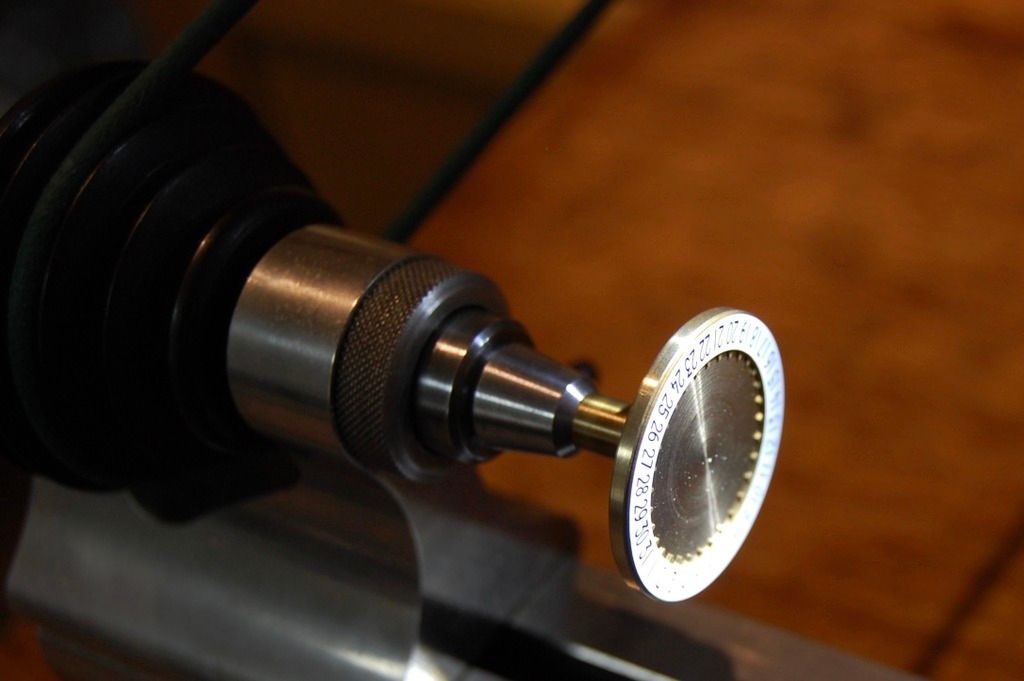
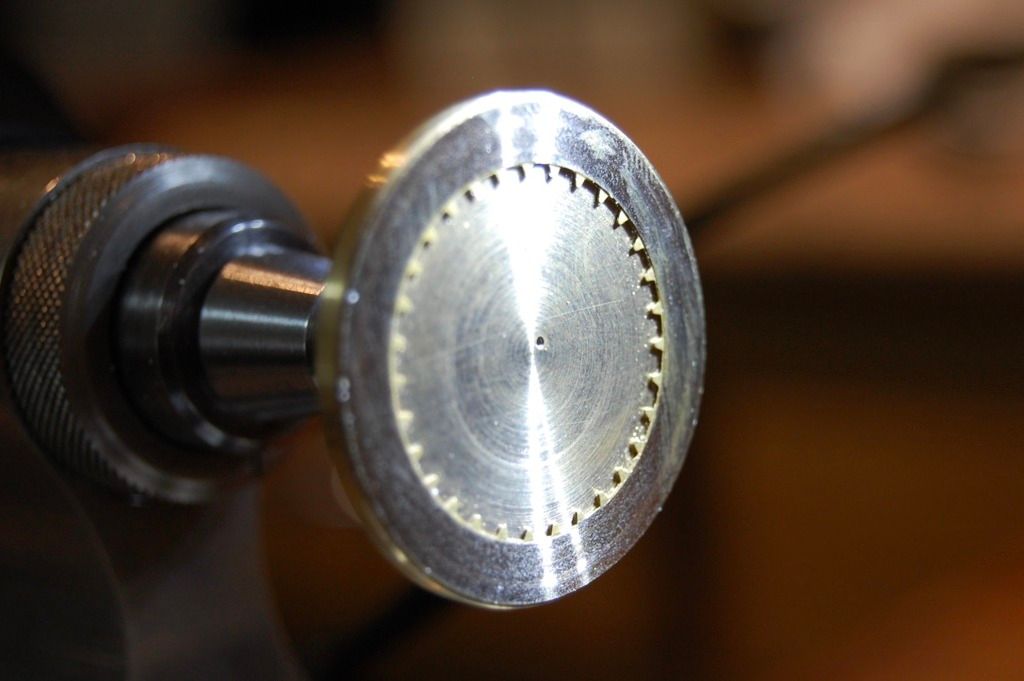
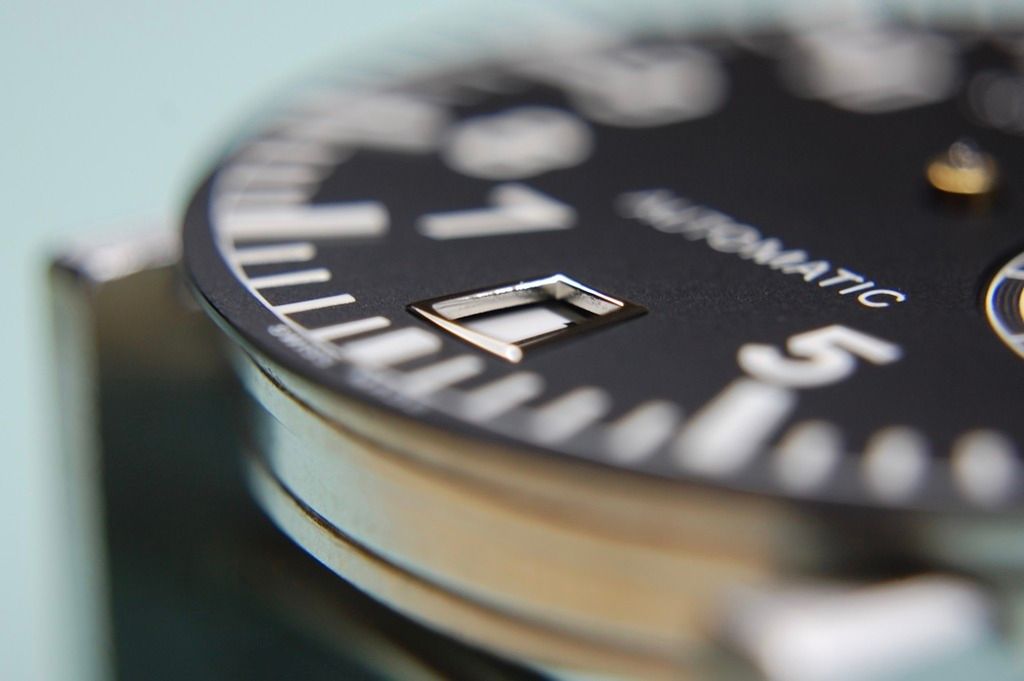
The date wheel was another hurdle and one of the most critical of the build in my opinion. The date wheel almost works with the movement as is but the quickset gear won't work with it. That left me with the option of using it as an overlay. The rep date wheel measured at .5mm and the genuine at.3mm. I needed to reduce the rep date wheel by .3mm so that it would be about the same height when I added the genuine date wheel on top. I didn't have a chuck for lathe that would work, so I had to make one.
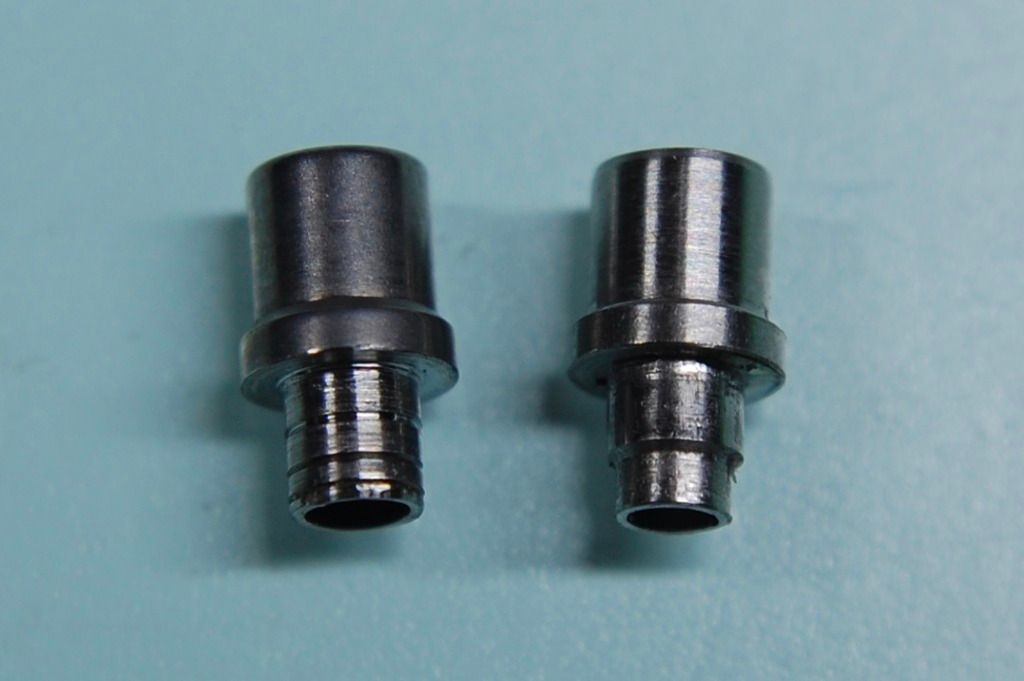
The case tube was another thing that needed to be addressed. The rep case tube was not compatible with the genuine crown. The genuine tube was too long to fit in the case so it had to be modded. The genuine tube must have been coated in something because the only graver that I had that would cut it was carbide. Once I got the case tube cut and fitted to the case I was trying out the crown when I noticed that the stem diameter was not the same. The rep stem had a thread of 1.2mm and the genuine crown accepted a .9mm stem. A stem converter made the stem too long, so I went searching. On a hunch, I decided to try an ETA 7750 stem. By luck, it worked.
Now that everything seemed like it was going to work, it was time to tackle those case bevels. After a few trials I think that I got them close. They aren't 100% but looking at pics of the genuine article, it looks like the rep bevels aren't 100% either.
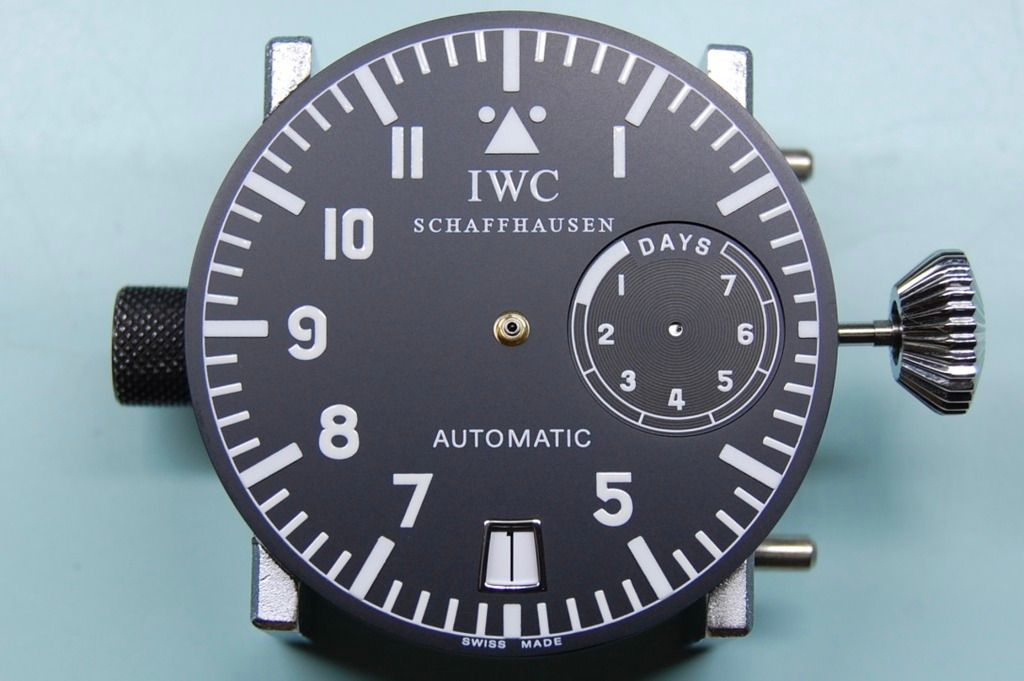
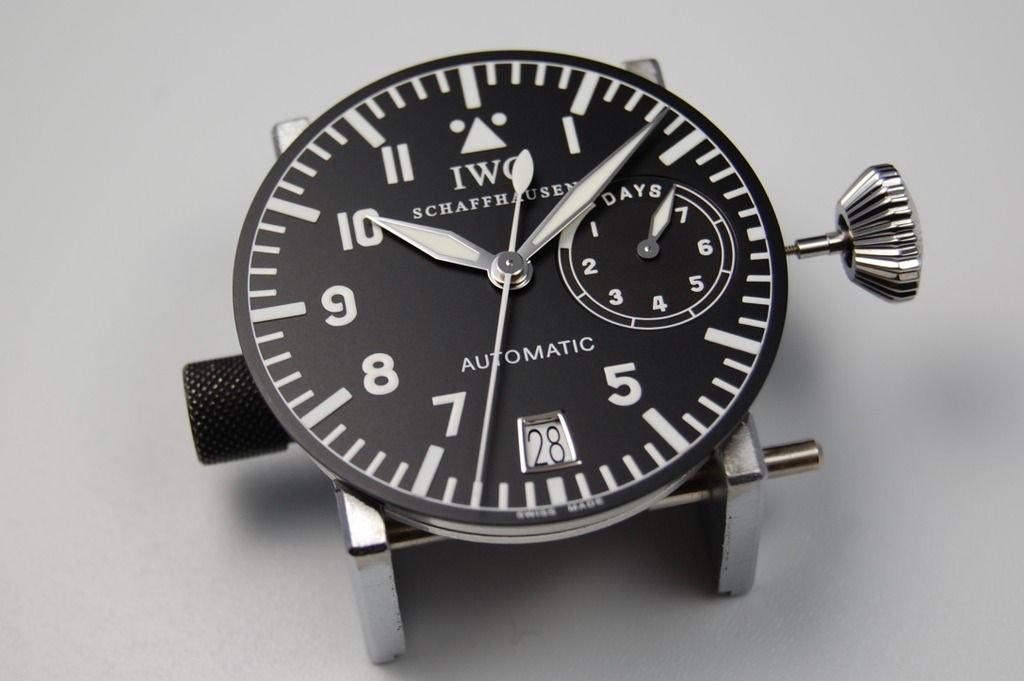
I finally got everything together today and have to say that I am pretty happy with the way that it turned out. So, after a long time I would like to present my 5002.
Build List:
Genuine Dial
Genuine Hour and Minute Hand
Genuine Second Hand
Genuine Power Reserve Hand
Genuine Date Wheel
Genuine Tube
Genuine Crown
LPP Case
5002 Caseback
Genuine Brown Buffalo Strap
Genuine Deployant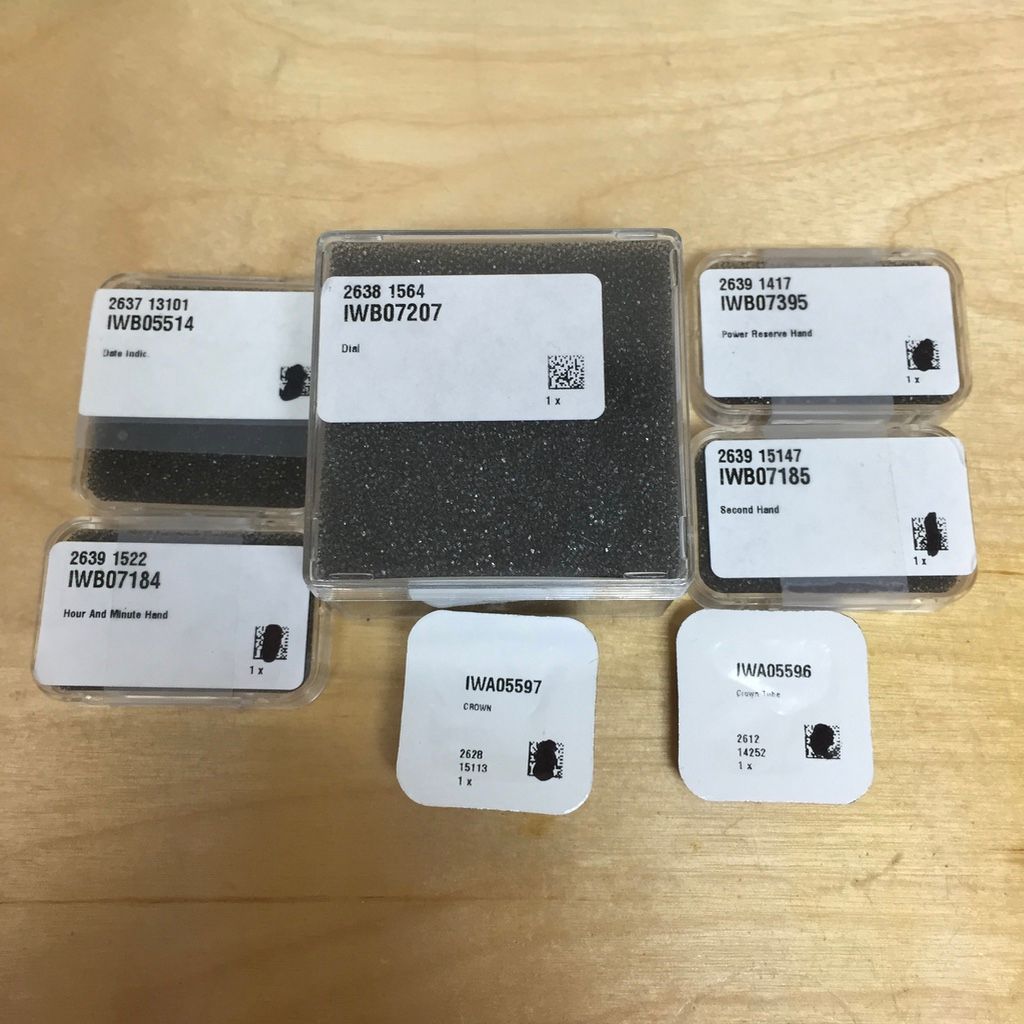
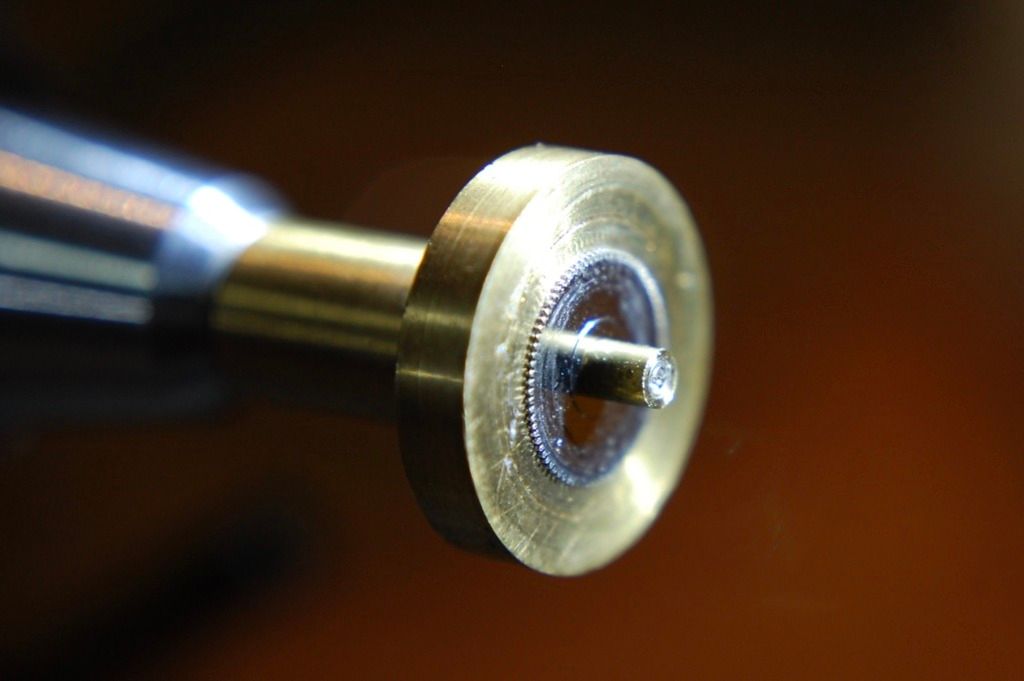
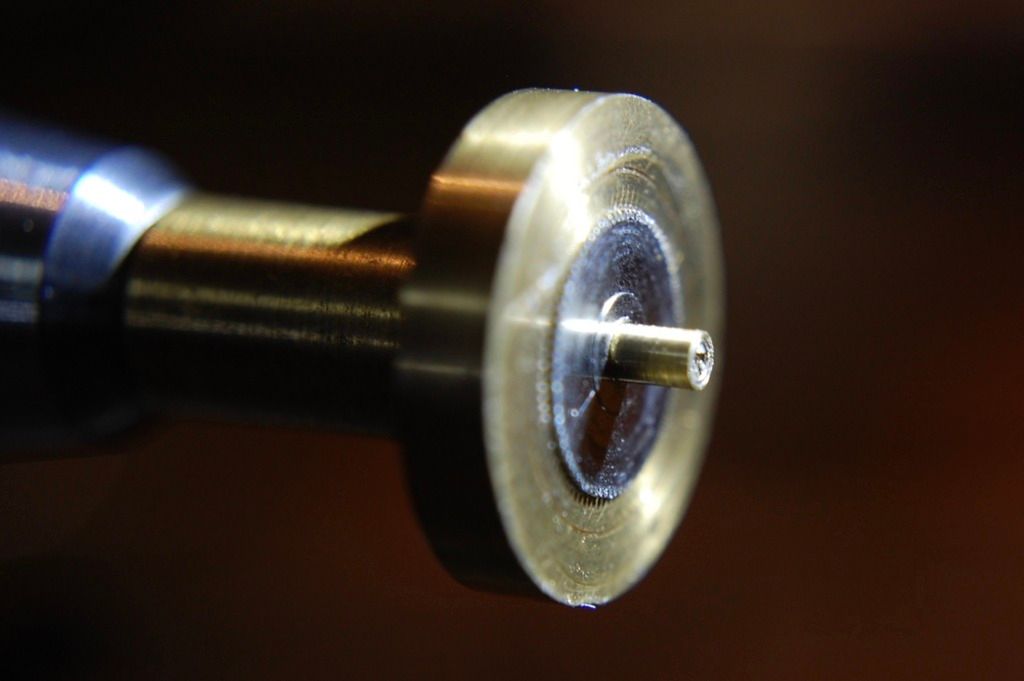
Modded gen tube on the left and rep LPP tube on the right
Genuine crown on the left and rep crown on the right
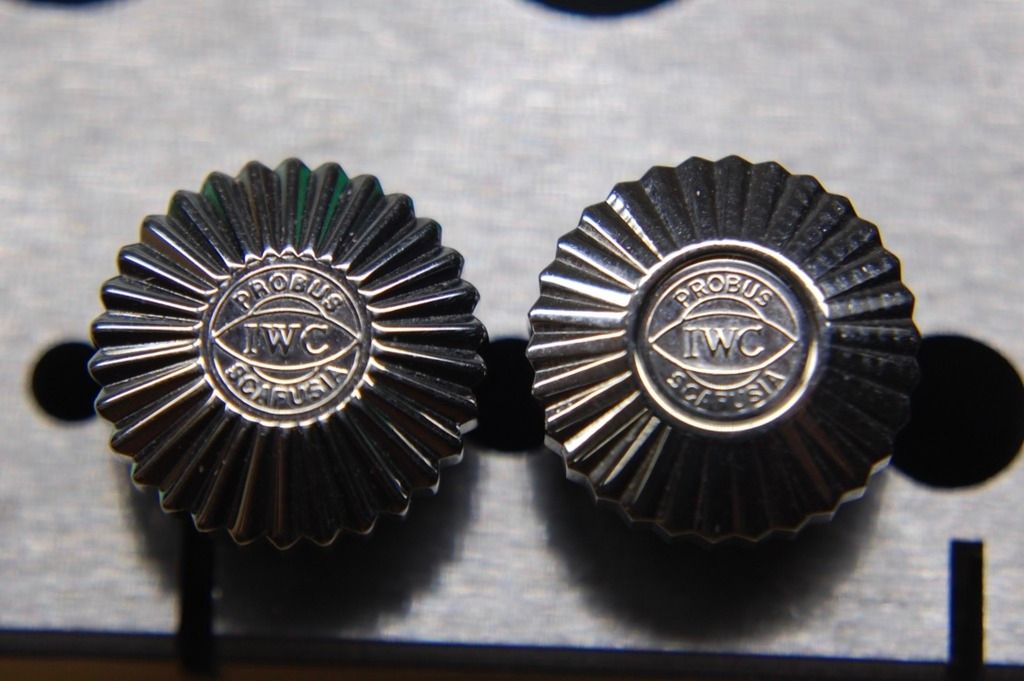
Genuine crown on the right and rep crown on the left
-
3
-
-
That is truly some amazing work!!! You are doing things that many shops could only dream of doing. Major kudos!!!!
-
Your work is impeccable M!!!! You showed off some great skills with this one and solved the problem of the ICHS movement
 Enjoy this beautiful franken!!!!!!
 -
I have always soaked the hands in acetone to remove the lume. This has always worked for me. Even the hands that have the white paint added to the back. It usually either dissolves or comes off in one sheet. I haven't seen it bubble up like your picture. Very curious.
-
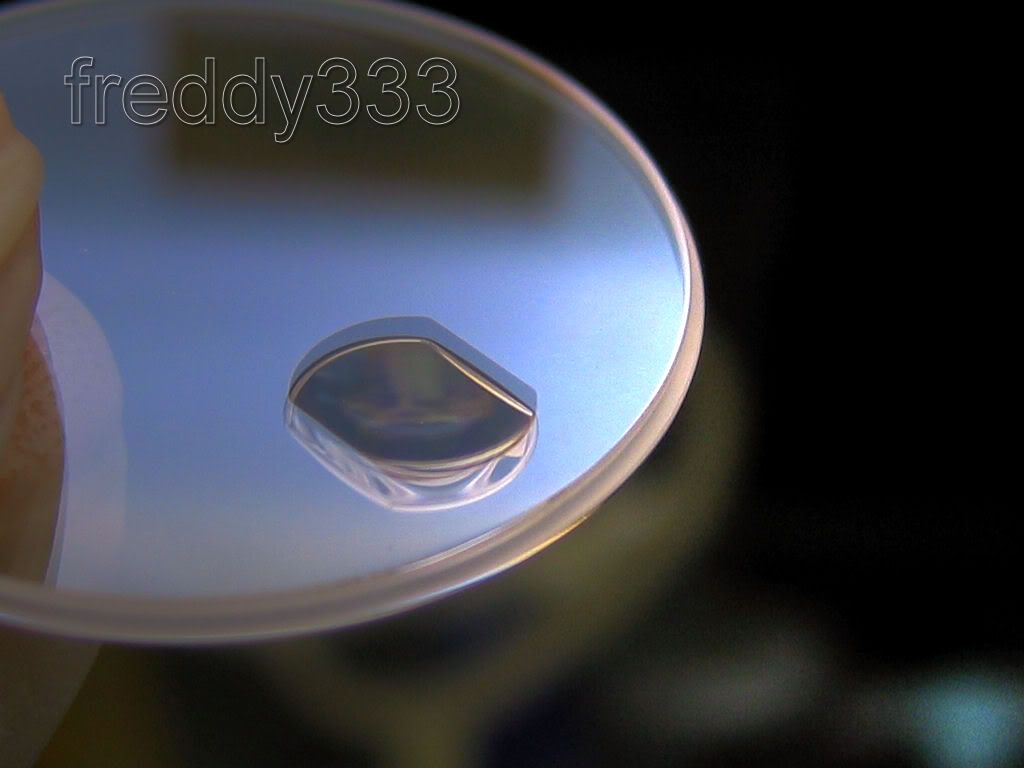
I think there is a coat applied to the top side of the crystal under the cyclops and and coat applied to the bottom of the crystal under the cyclops.
-
Hope he doesn't mind me linking to his picture.
http://i95.photobucket.com/albums/l127/freddydynip/062-2_2__tonemapped1.jpg
-
Yes. Freddy has a great picture showing it. If you google Rolex crystal AR, it will show up in the images. It is way better than I could show.
-
The SubC crystal (25-295-C12) only has AR on the cyclops. It is applied to the bottom of the cyclops and the underside of the crystal where the cyclops sits. This is the same as the other crystal as well. I don't think Rolex has AR'ing entire crystals yet.
-
Thanks so much for the comparison. It is nice to see them side by side. I know I will be referencing it later. Thanks again!!!!
-
Sorry that can't give any tips to remove the insert, but you are right in that Rolex does use a special die that fits the slots in the bezel. Here is a scan showing the die (sorry it isn't super clear). Good luck and let us know if you succeed. Thanks!!!!

-
I also finally got around to taking some halfway decent pictures of the build so here they are:


Here is the build list if anyone is curious:
Midcase: TC
Caseback: Preik Display Back
Bezel Assembly: Genuine
Crystal: Genuine Non-Service
Tube: Genuine
Crown: Genuine 704 Monobloc
Movement: Genuine 3135
Dial and Hands: Genuine
Insert: Genuine
Bracelet: Hybrid (TC V3 endlinks and main link with genuine 93250 clasp and diver's extension)
Before anyone says that I could almost buy a genuine for the parts I used or it was a waste, let me say that I am in it or the build. I like the hunt for parts and really enjoy how well genuine parts are finished and work well together. Anyway, thanks for looking. I can finally scratch this one off of the list
-
I got my Sean case back a couple of weeks ago after being refinished (by Phong) and it turned out really well. I was pleased with it and started my build but didn't like the gap in the SEL when I added the gen bracelet to the case. I tried getting a couple of TC bracelets to fit but they needed a good bit of work to fit properly and I just didn't feel like doing it. So, I decided not to use the Sean case. I had a TC case in my drawer that married up well with the TC bracelet end links, so that is the way I went. I figured you guys would want to see how it turned out after being refinished though. Here are some pics:
-
Okay....so my crystals finally arrived and I had a minute to spend with them. I had an old/chipped 25-295-C2-C1 crystal in my drawer. I ordered both a 25-295-C12-C1 and 25-295-CAR-C1 crystals. Here is what I found when I opened the packages:
25-295-C2-C1
Thickness: 1.8mm
Outer Diameter: 30.31mm
Gasket Ring Diameter: 29.49mm
Thicknes of Top Half: 1mm
25-295-C12-C1
Thickness: 2mm
Outer Diameter: 30.35mm
Gasket Ring Diameter: 29.49mm
Thickness of Top Half: 1.14mm
25-295-CAR-C1
Thickness: 1.8mm
Outer Diameter: 30.39mm
Gasket Ring Diameter: 29.5mm
Thickness of Top Half: 1mm
What is interesting is that all of the gaskets supplied with the new unopened crystals were 2.7mm thick. I don't know for certain what was in the crystal I had since it had been opened a while ago, but there was a 2.7mm gasket left. So it looks like the new 116610 Sub gets a 2mm crystal with AR and is supposed to use a 2.7mm gasket. The CAR crystal has the same profile of the 295C crystal I have. The only difference seems to be a slightly different outer diameter and AR on the cyclops. Here are a few pictures of the the crystals and a comparison of the 295-C12 and 295-CAR.

25-295-C12-C1 Crystal

25-295-CAR-C1 Crystal

Comparison of the two (C12 on the left and CAR on the right)

This puts a few questions I have had to rest (at least for me) and I hope that others might find the information useful. Thanks!!!
-
Wow! That is a good bit thicker. I measured the typical ones that I have and they are about .88mm. You should try the bergeon 6825 spring bar tool. It isn't cheap but I did notice cheaper versions on eBay. It compresses both sides at the same time and allows you to place the entire bracelet on the case at one time. It takes a little getting used to but works great. Just make sure you get the fine forks for it, otherwise you will have to file them down to fit the slot in the bracelet.
-
Unless it is a special movement, I always pull the stem out to the time setting position before removing the stem. This locks the sliding pinion in place and is less likely to wander (although there is no guarantee). I will sometimes press the button again if the stem isn't going in easily. I also give it a gentle wiggle when reinserting to make sure the square part of the stem is going into the square cutout in the sliding pinion. Good luck!!!
-
You can find them in watch material houses, eBay, or amazon. I bought one from amazon but the silicon is way too sticky. I bought one from one of the material houses and it was this exact one:
http://aeroconsystems.com/cart/o-ring-speed-lubricators/model-2.5-747-speed-lubricator/
It works well but will dry out over time. If you don't need it often, you are better off with a sealed tube or tub of silicon.
-
Thanks for the measurements automatico. When I get a free moment, I will measure the 25-295-2 crystal I have to see if it matches yours.
-
You can use a speed lubricator that has two foam pads impregnated with silicone grease. Just throw the gasket in and give it a twist.
Some also use fomblin to lubricate gaskets and well as the case threads.
-
My R20 stops in 2009 and doesn't have the 114060 listed. It lists the 14060M having a 25-286-1 crystal. I also looked online and came up empty. Sorry I can't help more.
-
Thanks guys! It is almost like opening a can of worms. CAR cannot simply denote AR on the cyclops because both the 116710 and 116610 have AR on the cyclops, but have different crystal numbers. The C2 gaskets I have aways used and seen in the packaging have been 2.7mm. C1 gaskets have been 2.3mm. You may be onto something with the different thickness in crystal though. I looked in my parts drawer and have a chipped crystal that is 29-295-C2 but it is opened. I will report back when I get the others if I find anything out.
I don't know if my R20 has the 114060 but I will look. Thanks!
-
Hey Guys,
I was wondering if anyone has any information on the differences between these crystals
25-295-C2 (16610 etc)
25-295-C12 (116610 etc)
25-295-CAR (116710 etc)
I was always under the impression that 295C crystals were the same except for the addition of AR on the cyclops, and that the gaskets used were the changing factor. I ordered a C12 and a CAR crystal to see what was different but was hoping someone had something in the meantime. Thanks!.
-
That is interesting. Thanks Live. I was under the impression that the only difference in the crystal was the use of AR on the cyclops.


My Franken 114060LV
in The Rolex Area
Posted
Thank you very much gentlemen. It is nice when a project comes together without too much fuss.