

Toadtorrent
-
Posts
5,230 -
Joined
-
Last visited
-
Days Won
3
Posts posted by Toadtorrent
-
-
Pickett
-
Don't have pics to post...but it's been unseasonably warm here...so my wife brought home a little of this:

We mushed it up with a little of this:

Juiced one of these in each glass:

Added a jigger of this:

...splash of this to break the monotony:

Cassis
...half a dozen of these:

...pour in a little of this:

...do this:

-
Good stuff Tim. I have yet to try a lume job. I'm getting psyched for it. I'm thinking of trying a cheapo product first but shudder at the thought of what Zig would say!!

-
How did you get the dial to change from Black to Silver to Black again

Ask Ubi...it was his dial. It magically appeared in the mail (THANKS AGAIN!!) and more magic happened.
-
Just got a line in on some NICE sushi coming into Toronto...300 lbs of the GOOD stuff (not for restos but for gourmands). Nice!!
On that note:
BELLY (as in fatty tuna)
-
Thanks Ubi and Zig!!! I wasn't sure if I got the parts named right...glad it makes sense!
-
Otoro
-
Hi folks,
My usual preface: I am not a watchmaker...but a hack. There are some things I'm going to do that a watchmaker would shudder at. There is also some dust on the pics presented that would make Pugwash, Zig and others puke. The lighting on the pics is terrible...sharpness is bad...composition terrible...yada yada yada. BUT, I did do this work inspired to make a tutorial to help others out including my bud HackR who is having some keyless works problems right now.
I was originally inspired to do this by Ajoesmith who's tutorial on the Replica Collector site gave me all the info I needed for the subdial freezing.
The Keyless Works info came from a combination of the ETA 7750 tech guide as well as some other tech docs I have kicking around.
Thanks to RWG...the place to be, I was inspired to go the next level in watch fixing (beyond changing straps and sizing bracelets). By the way, you'll see 2 different watches used in this tutorial because pics the best pics were found using a combination of documented efforts.
Without further delay...excuse the crappiness...and lack of prose...we're into the business lickity-split. Oh...and yeah...my fingernails need clipping...useful for peeling dial strips though.
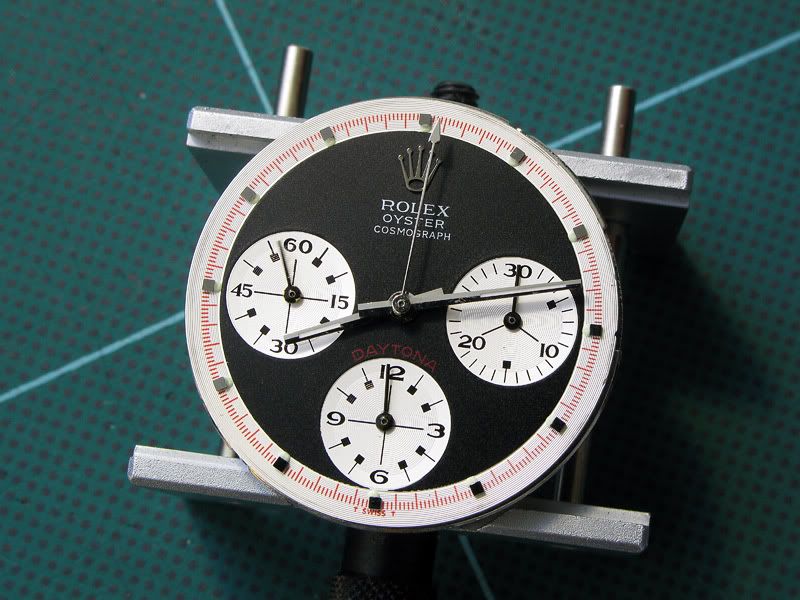
MOVEMENT: Sea Gull ST1902 (aka Venus 175, Lemani Manual Wind)
PROBLEM:
- 6-o-clock subdial on the ST1902 is mated to the hour wheel instead of being a chrono totalizer function
- Crown would not insert properly or wind movement
- Movement would not run
SOLUTION:-
- Freeze 6-o-clock subdial
- Check keyless works
-
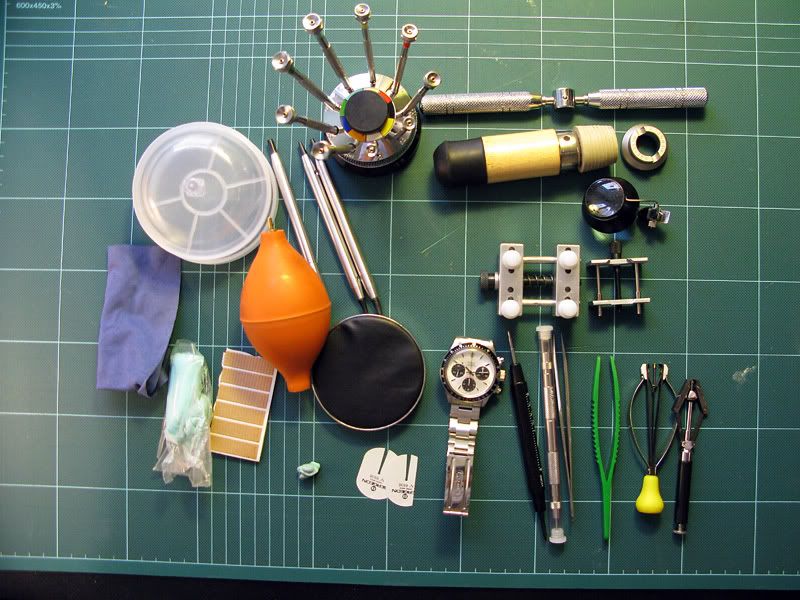
Tools Used
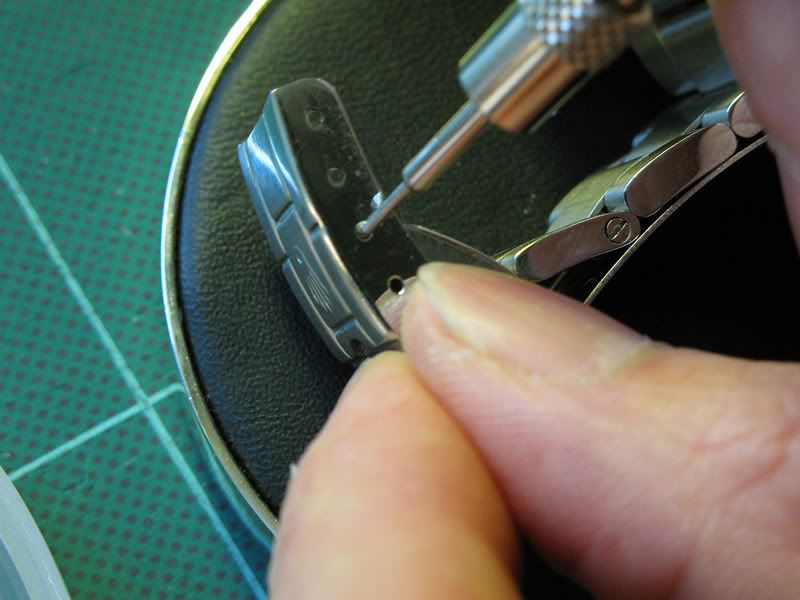
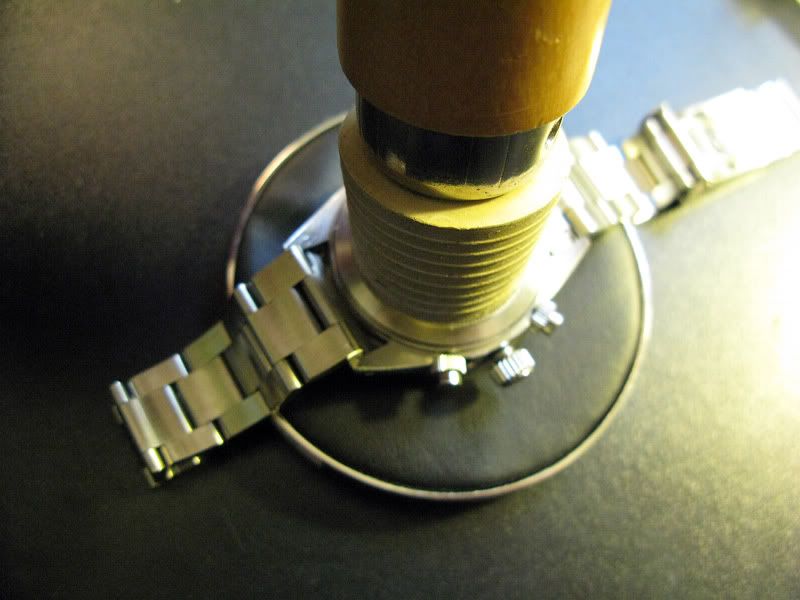
Open Bracelet
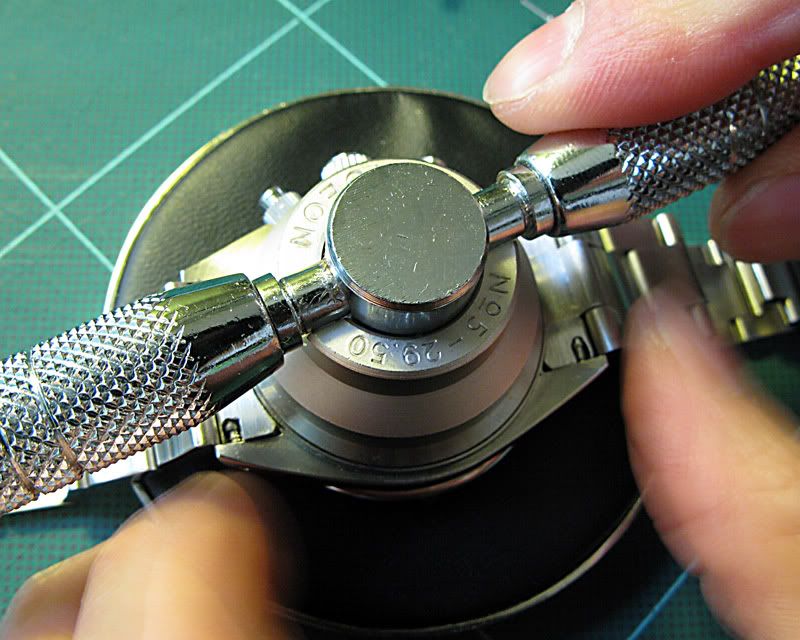
Open Caseback
To open the caseback, I use a cheap Rolex caseback kit I picked up plus the Bergeon 29.5mm die purchased from H.W. Perrin in Toronto.
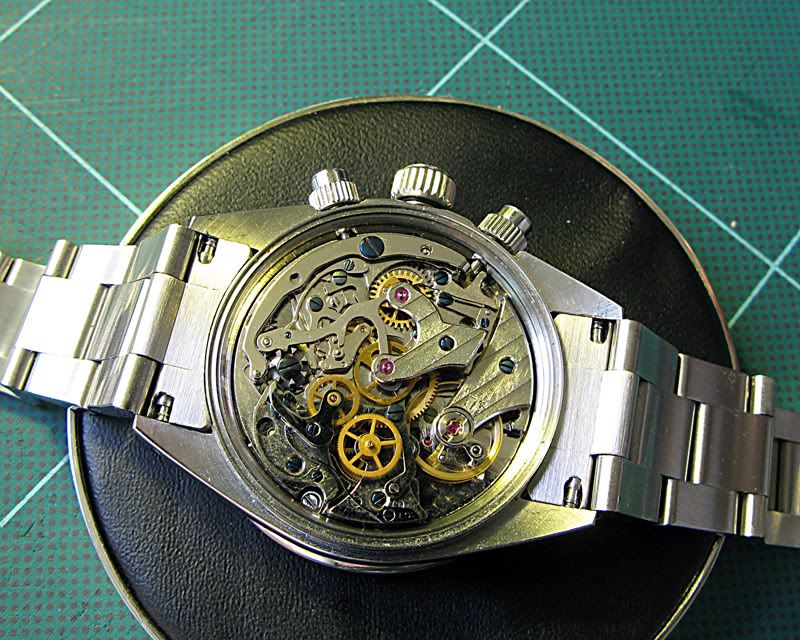
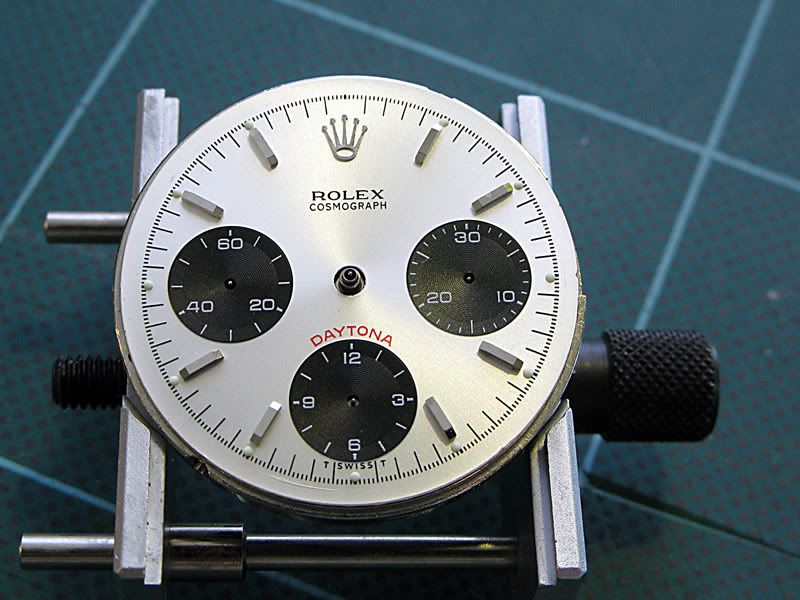
The Movement...lovely!
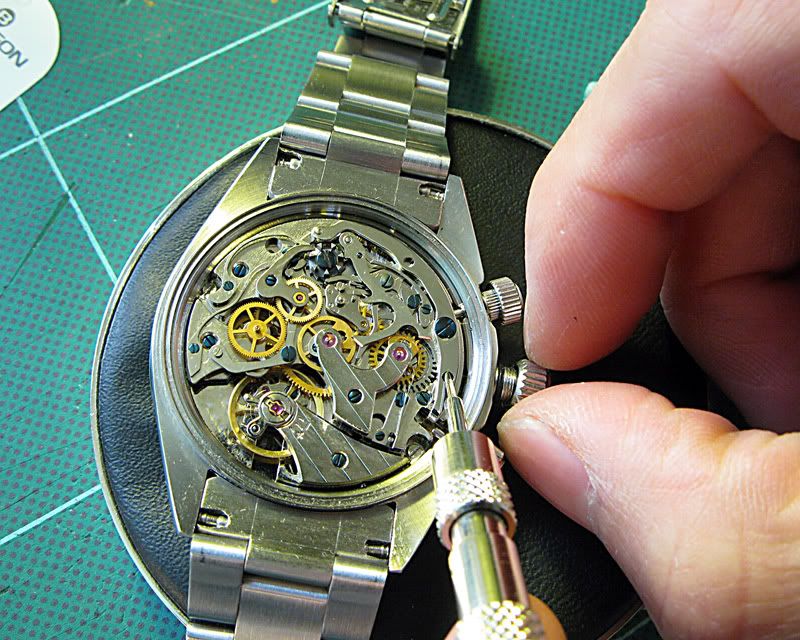
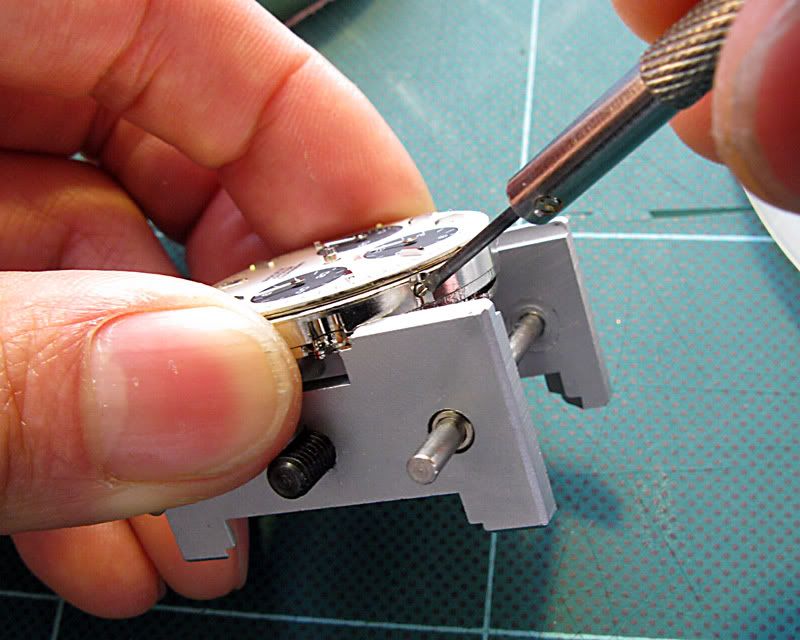
Remove the Stem
With the crown unscrewed and in the winding position, I use my springbar tool and depress the stem release button gently, while turning clockwise and pulling out the crown.
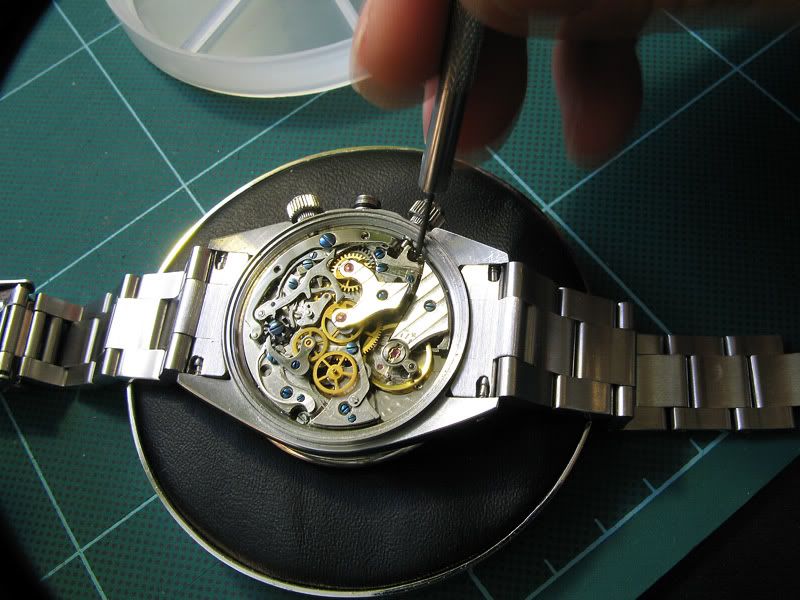
Remove movement holder screw #1
Remove movement holder screw #2
Remove both movement holder tabs

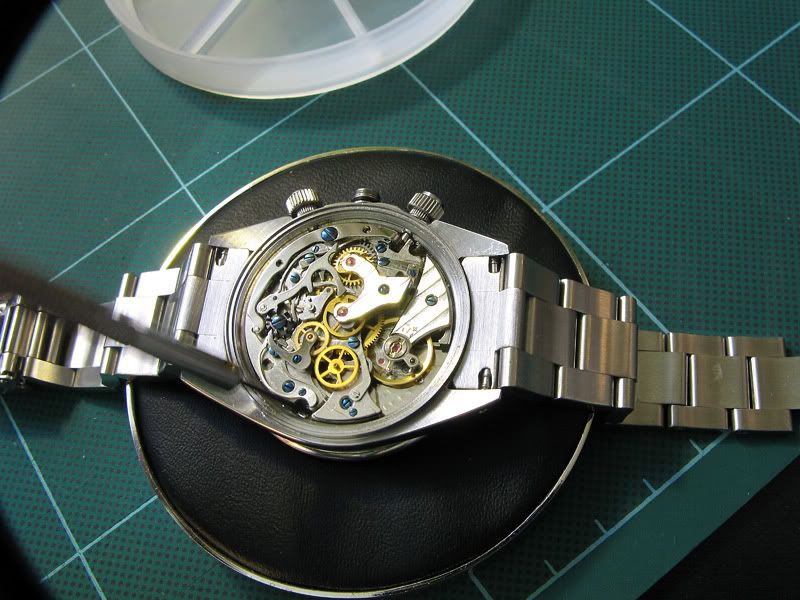
Remove the movement gently on a decasing pad
Mount movement in movement holder...note chrono second hand is not pointing at 12-o-clock
NOTE: 6-o-clock subdial hand is already frozen and sort of reset already (not pointing right at 12-o-clock in the pic...it has since been resolved). On the watch "out of the box" it will be parallel to the hour hand so it can look kind of funny as none of the other chrono functions will be running but the 12 hour totalizer is pointing to the hour of the time unless it's frozen.
Sea Gull had talked about making a true 3 register chrono function ST19, but have yet to do so.
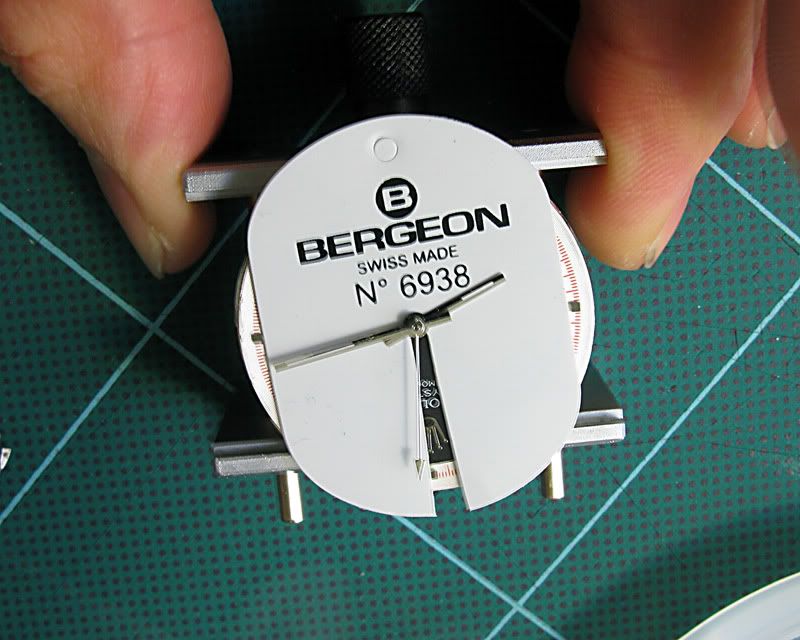
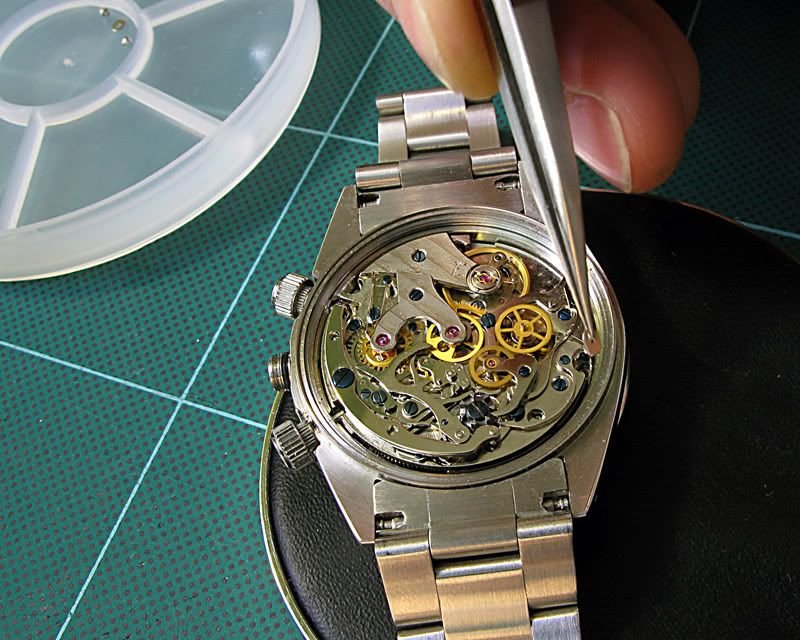
Install Bergeon 6938 dial protector
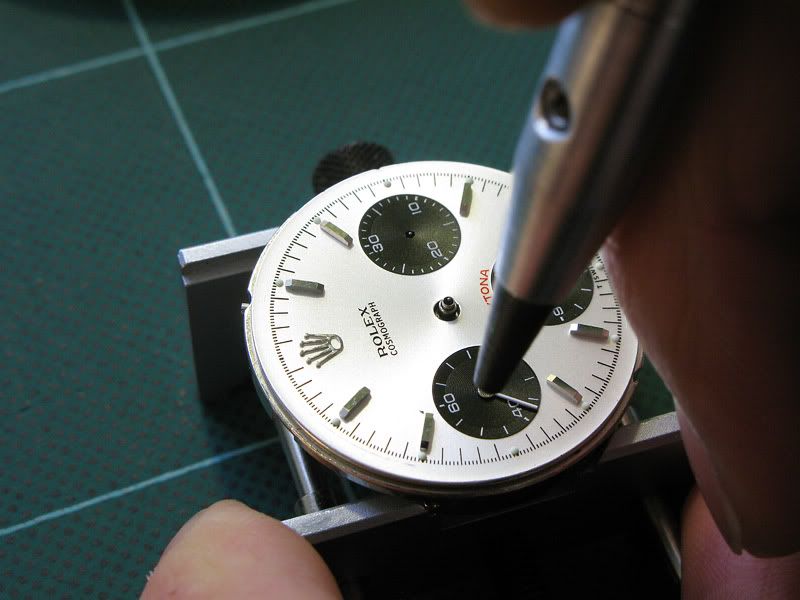
Use Bergeon #1 hand remover tool to remove the chrono second hand (or use a generic cheapy)
Chrono second hand off
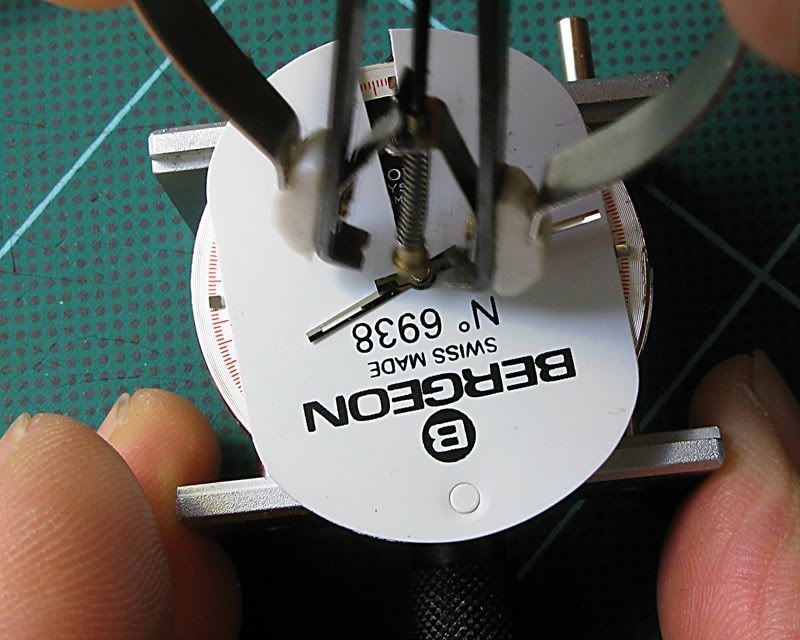
NOTE: Dust on dust on dial protector. This is to ensure similar conditions to Chinese assembly plant to make sure the movement operates properly as per factory conditions and specs.

After removal of the chrono second hand, remove the minute and hour hands using the same tool. For the subdial hands, you will need to use a carefully dressed hand tool (i.e. filed) or a Bergeon #6 I believe (I don't have the #6) because the small hands are pretty tight to the dial so you need thin claws on the puller to grab the hands effectively.
Hands off
Unscrew dial feet (2 sets)
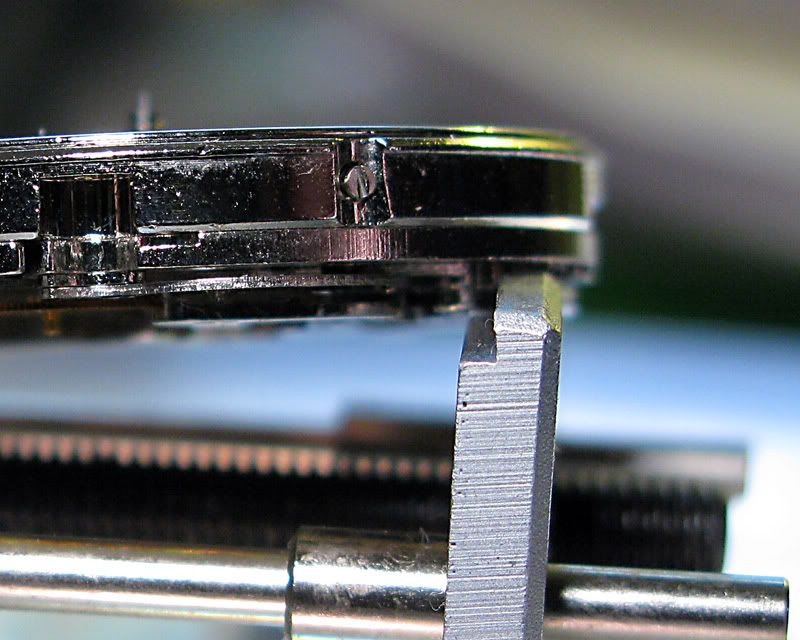
Dial feet screw
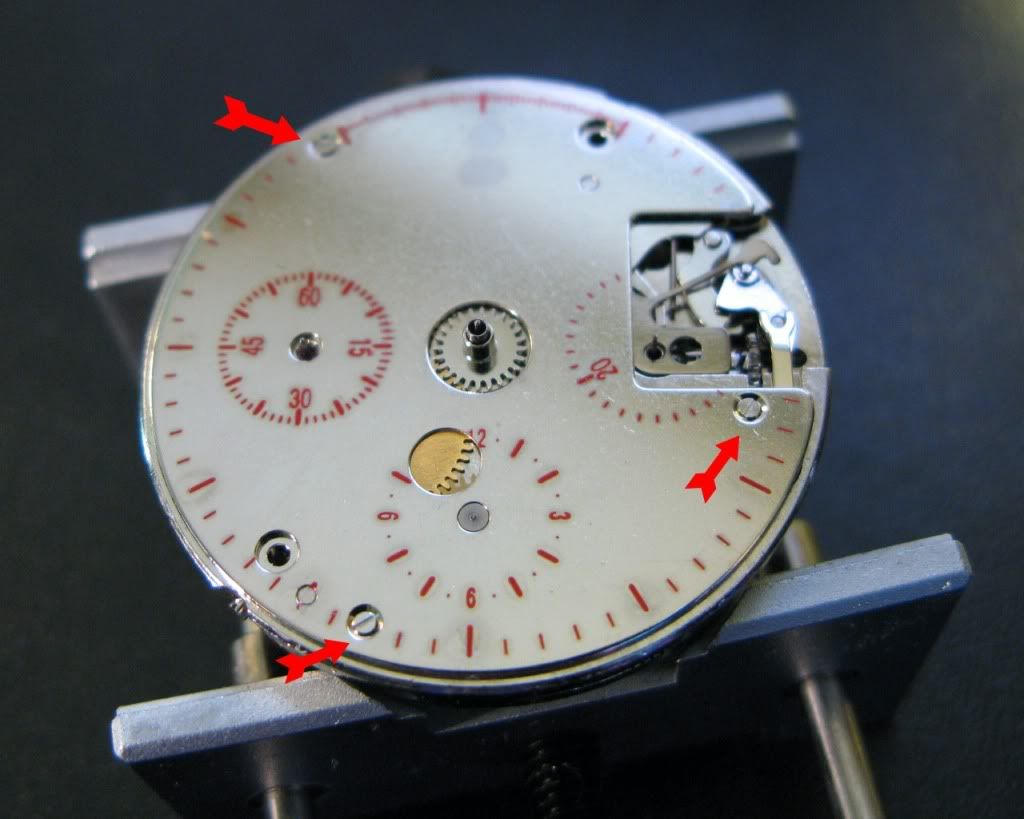
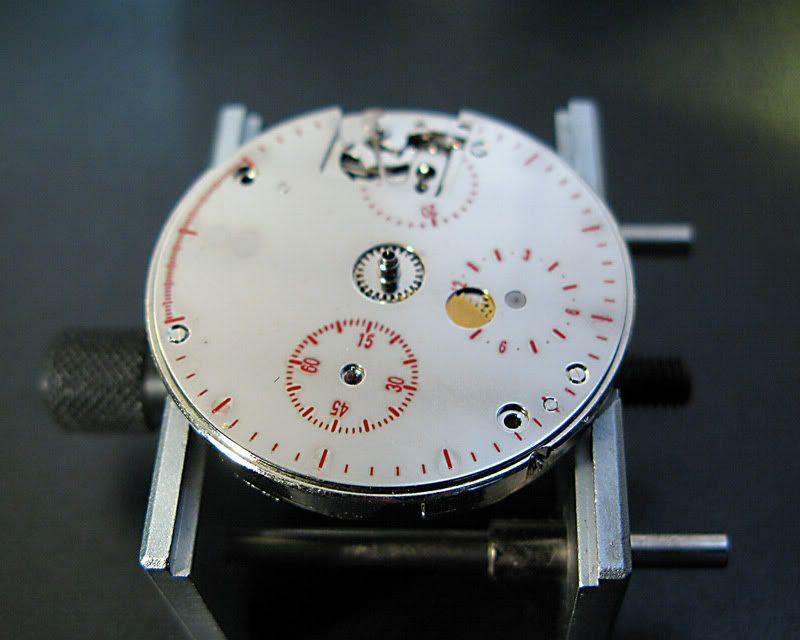
Dial removed reveals cover plate
Arrows indicate cover plate screws that need removal.
Screws removed
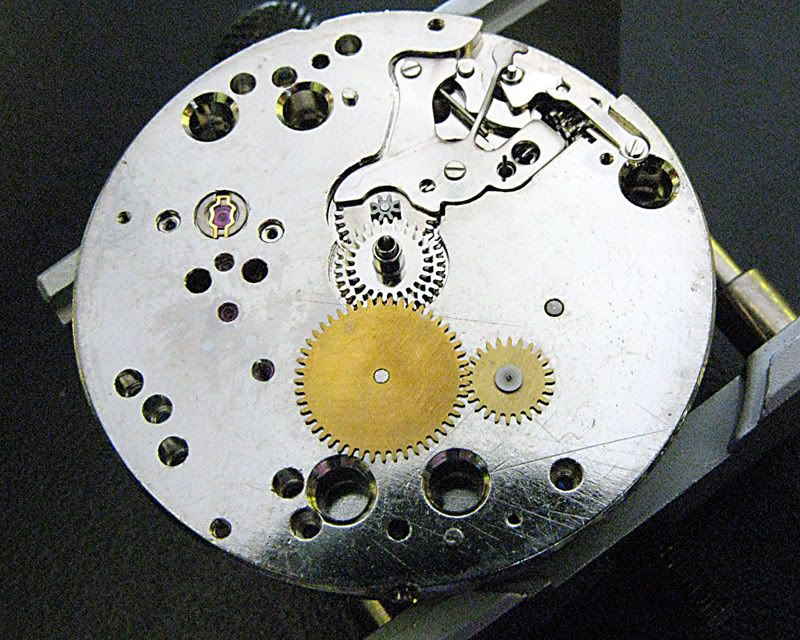
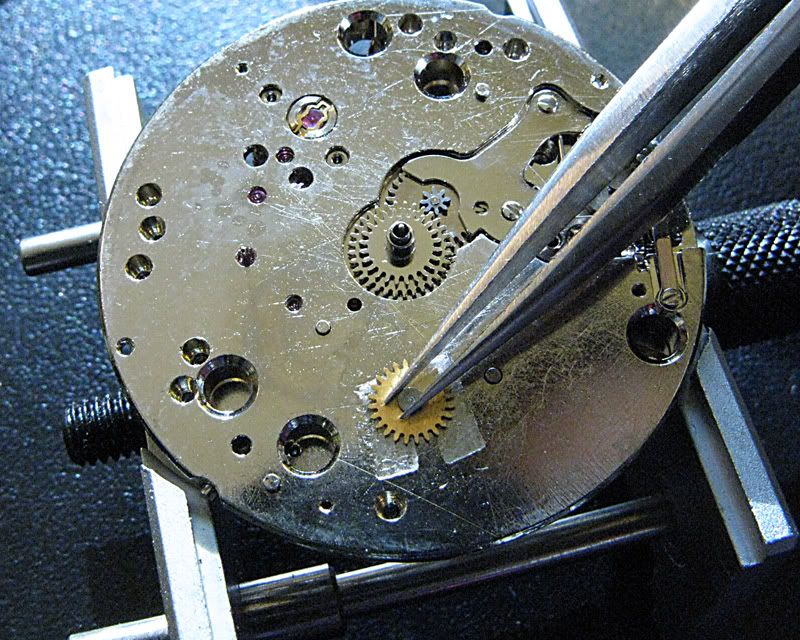
Cover plate removed
Note the faux chrono 6-o-clock subdial is in fact merely hand attached to a wheel with a pinion connected to an intermediate gear that is connected to the hour wheel.
To Freeze the Subdials: These 2 brass wheels are merely removed with tweezers as the cover plate holds them in place.
Wheels removed...not grease / wear marks
Add dial strips where the pinion wheel sits
Stick pinion wheel into dial strips (or use dial dots...whatever)
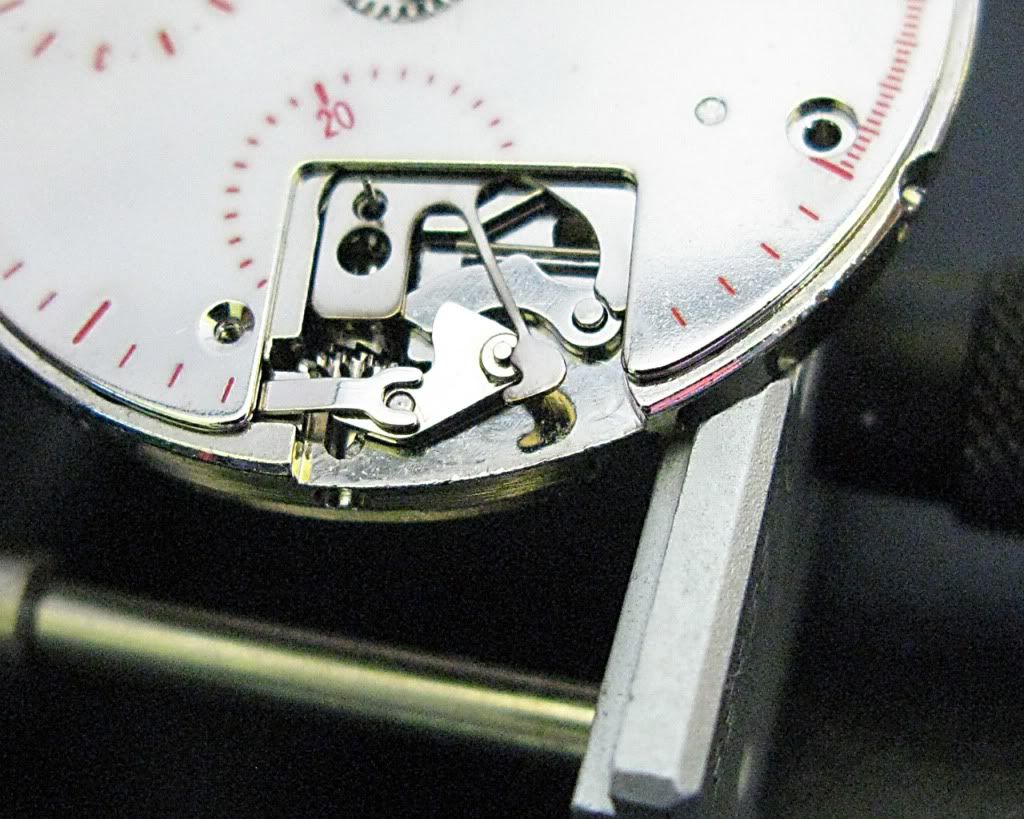
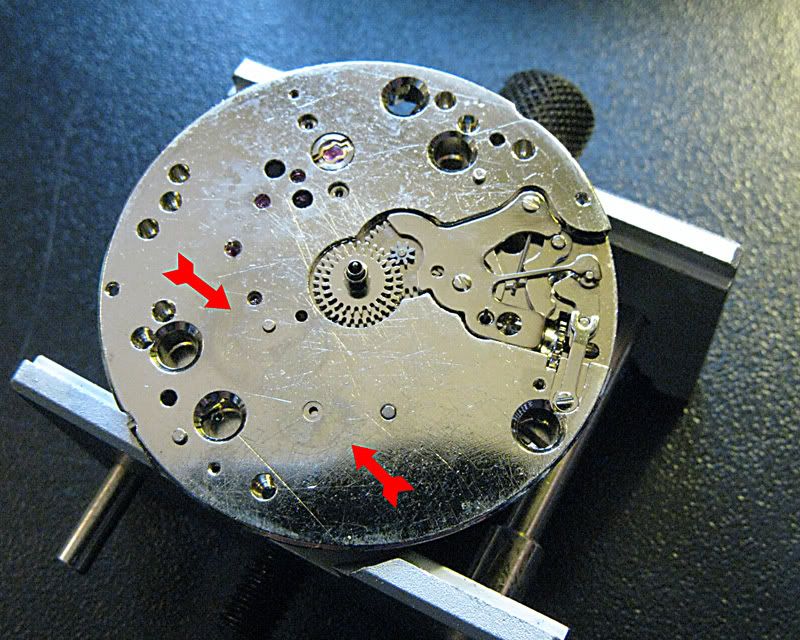
Note buggered keyless works
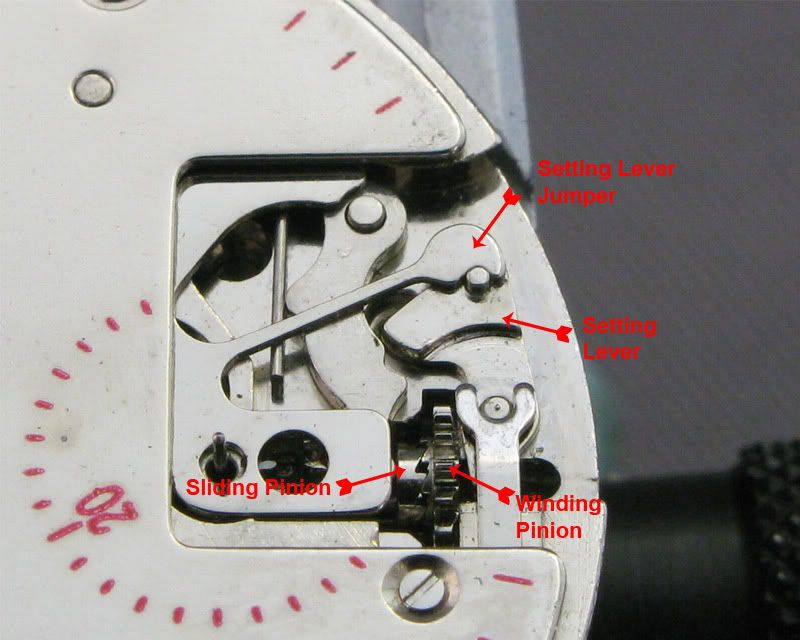
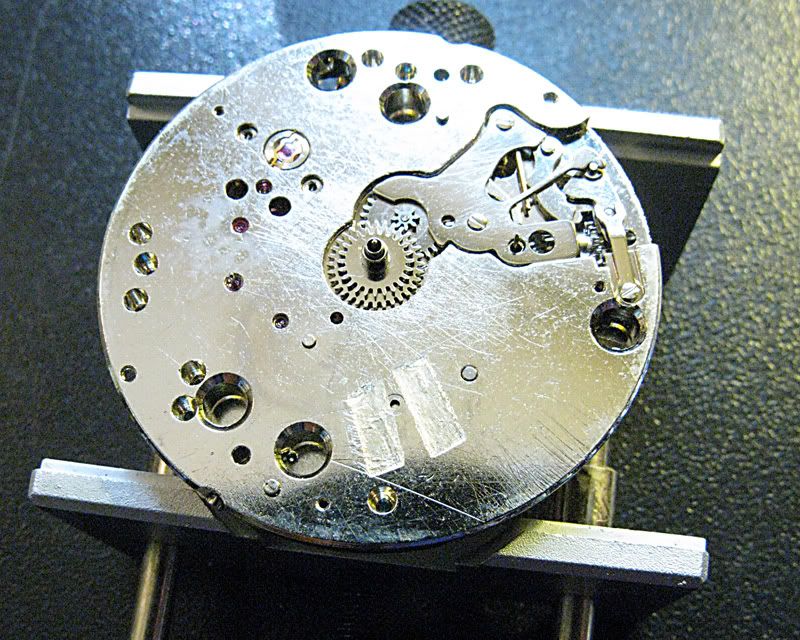
Proper Keyless Works
If you note 2 pictures up, the setting lever jumper is not correctly hooked onto the setting lever. This likely was caused from pulling the stem out in the time-setting position and popping things out place. You can also bugger the keyless works by pressing the stem release too hard.
To reset the keyless works, merely hook the setting lever jumper back on the setting lever post.
I also had the problem that the winding pinion fell out somehow. To put this back in, use a screwdriver or springbar tool to push the spring loaded sliding pinion to the left, and drop the winding pinion back in place so the teeth on the face of the winding pinion mate with the teeth on the face of the sliding pinion.
Easy peasy.
Once the keyless was reset, everything worked properly. I was able to reinsert the stem properly and proper function allowed the movement to run again instead of being locked in the time setting position. I was lucky!! On other movements (not the ST1902), you might have to re-position the yoke between the winding and sliding pinions to reset things.
Put the cover plate back on...and install the screws.
Screw back on the dial using the dial feet as guides...or mount using dial strips / dots if the feet break off or you change to another dial without feet. 3 register movements are easy as you have 4 small reference pins to ensure proper centering of the dial. Movements with date functions help as well...but can be a bit finicky to centre still.
It is harder to center the dial on movements without dial feet when you don't have additional registers and will have to use dial hour markers lining up with stem insert holes or other movement references to ensure proper centering.
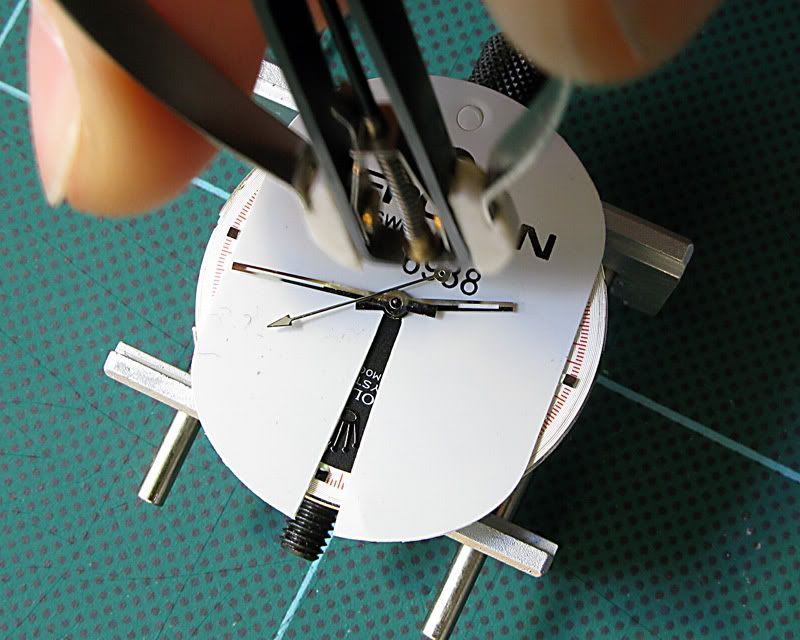
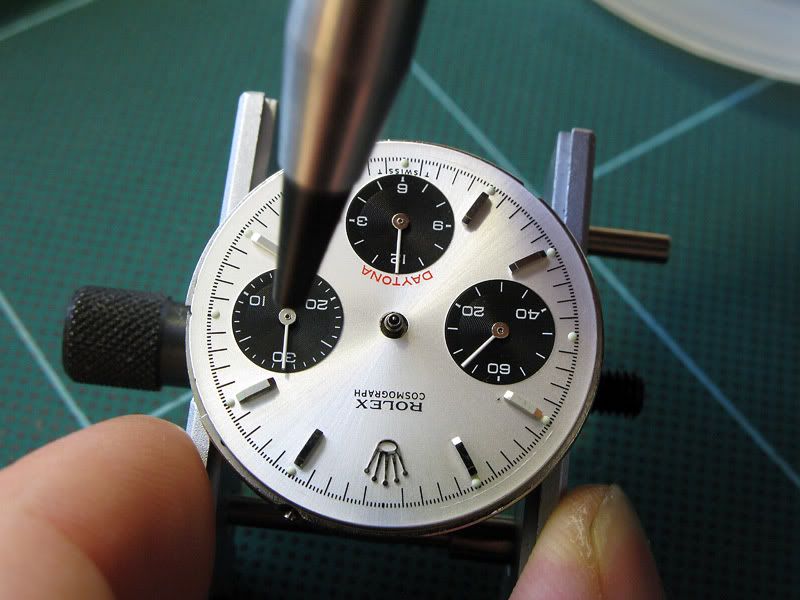
Dial back on
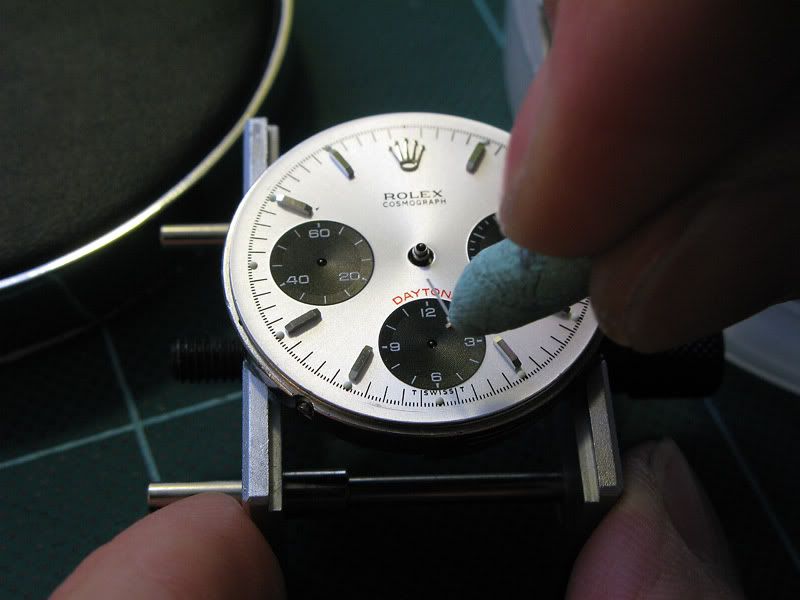
Mount running second hand
I use Rodico to pick up the hands.
Use hand pressing tool to mount hands.
I used JMB's great hand tools from THIS THREAD.
Do the other subdial hands
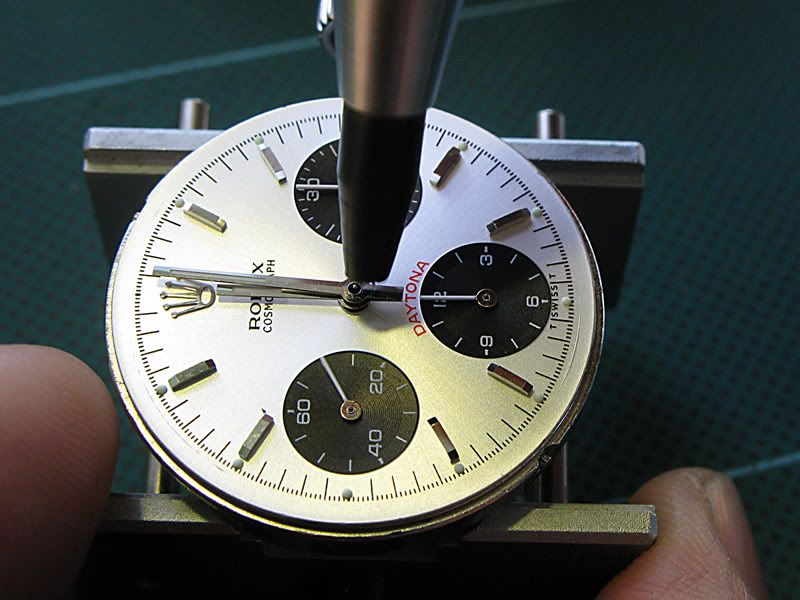
Mount the hour and minute hands
The beauty of mounting the hour and minute hands on a movement WITHOUT a date feature is that you don't have to worry about the position of the hour and minute hands as they can be manually set when setting the time with no "rollover" coordination with midnight to worry about...so just plug them in, set the time and go!
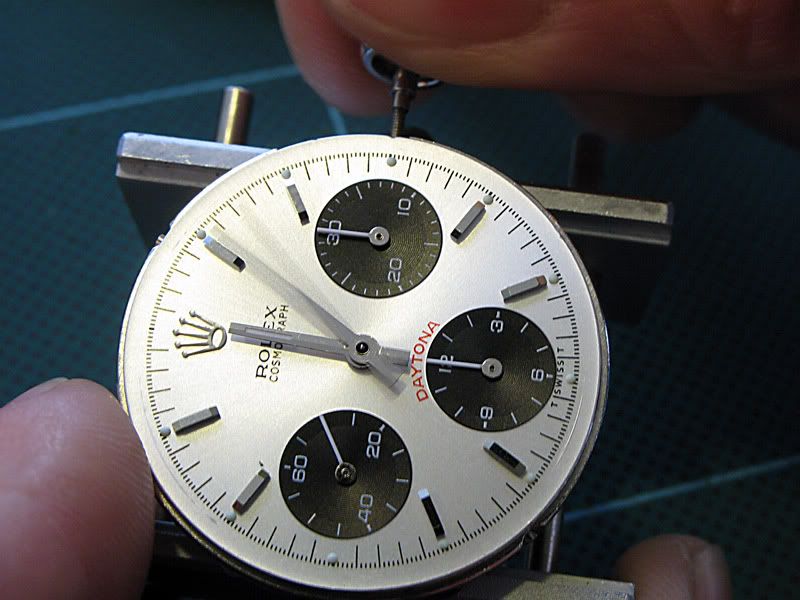
Check for hand clearance
If the hands are pressed too deep, are not parallel to the dial surface or are bent, they will hit each other. you may have to try and level out the hands with your hand pressing tool or try and straighten the hands if they are bent.

Mount the chrono seconds and admire your work
NOTE: The chrono seconds hand does not mount around anything, but has a post that fits inside the pinion. This is best positioned through a loup using Rodico and then pressed once centered correctly.
As well, you'll see the chrono second hand is properly pointing to 12-o-clock. This is a bit finicky to get set properly and WILL take a bit of trial and error so keep that loupe and hand puller handy!!
ANOTHER NOTE: When installing the chrono second hand, you should make sure the stopwatch is not running, and that the chrono reset pusher has been pushed otherwise you will find your perfectly centered hands are NOT pointing to the top after you install everything.
Re-case movement
Put back in movement holder tabs and screws
Re-insert stem
Blow off dust...Rodico off finger prints, oil and grease. Grease gasket
Re-install caseback
I find the rubber tool is easier to handle for re-installing the caseback.
Re-install bracelet
Would you believe I forgot to take final pics of the watch? Whoops!!
Hope you found this useful. Good luck...and let me know of comments questions, or things I should have done.
-
 1
1
-
... but can anyone confirm the hand size (fit) of the Speedy Moonwatch sub-dial hands - are they the same as the ETA 7750?
It depends on which version you have. There are quartz versions, A21j, Seagull ST1902, and possibly even a modded A7750 version (not sure on the latter though). All different hand sizes.
-
That looks awesome. OK...must do the Chief...must do the CHIEF!!!!
-
-

Remembrance
-
Andreww...did you see the gen silver coin one at the Eaton's Centre? It's beautiful I think. I've been tempted to get this one.
-
Welcome to the club. I don't have pics...Zig's are gone from his thread on mine HERE.
I love it. Glows like a torch!!!
-
Wow wow WOW. Big congrats. Great to see a new member win something like this and post back!!! Great stuff...now go out and spread the word why people should support this place!!
Wear it well...it looks fantastic.
-
-
I'm in Canada...so I go to Zig. Sorry.

-
If this is the Swiss movement as a UPO by name is...yeah...could be a simple servicing thing that needs to be done. Any watchmaker should be able to do it. It's the chrono movements that are trickiest...which luckily, this is not the case.
If it's the UPO Lite...then a movement swap will be in order...servicing and repair not being practical.
-
Very nice!!!
-
Look for the threads by Ubiquitous. His cost 1/3 to 1/2 of the cost of a gen...but includes all parts visible being gen so it is indistinguishable from the gen. Internally, it uses the El Primero movement which is accurate to the gen as well...so technically the same as the gen, but with a different branded rotor. I believe his were 16520's (gen dial, hands, Movado/Ebel branded gen movements, pushers, crown, tube, bezel, bracelet, etc).
-
Welcome to the RWG. Your friend only gave you half the truth. The is the most often asked question around...and is not quite the simplest answer to give...too many factors to consider what is the best. The best will involve too many genuine parts to list and will cost you upwards of 50% of the cost of the real thing. If this is not feasible...you'll have to reconsider what is best.
Take a look in the Rolex section for reviews on the WM9 Submariner...and look at the Noob Guide linked in my signature to get you started about what to expect and how to determine which is the "best" watch.
-
Fantastic!!! Very nice to have a PVD option Zig!! Big Congrats Lani. I like to think of it as partially mine now...as it's still in Canada I assume.

-
Brutal ride you are going through. We're rooting for you here!!
-
Very nice...gotta find a troupe for my son!!

My Oldest Genuine Vintage
in The Rolex Area
Posted
Very nice. I've seen a few seconds at 6 Rollies in auction catalogues. I'll see if I can find some reference pics for you when I get home.
Very nifty!! It's been said before...love the crown.