
Mendota Explorer
-
Posts
1,235 -
Joined
-
Last visited
-
Days Won
1
Posts posted by Mendota Explorer
-
-
-
Whenever I use the Tapatalk app to view the forums I get ads. Never while on my computer, though.
-
You are correct, sir! I had my movies mixed up.Goldfinger.


-
The famous scene with Bond wearing the watch while checking the time with his lighter (in a white dinner jacket while his bomb detonates) was in "From Russia with Love."
-
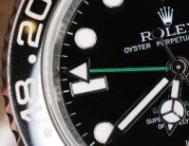
I love that dial!!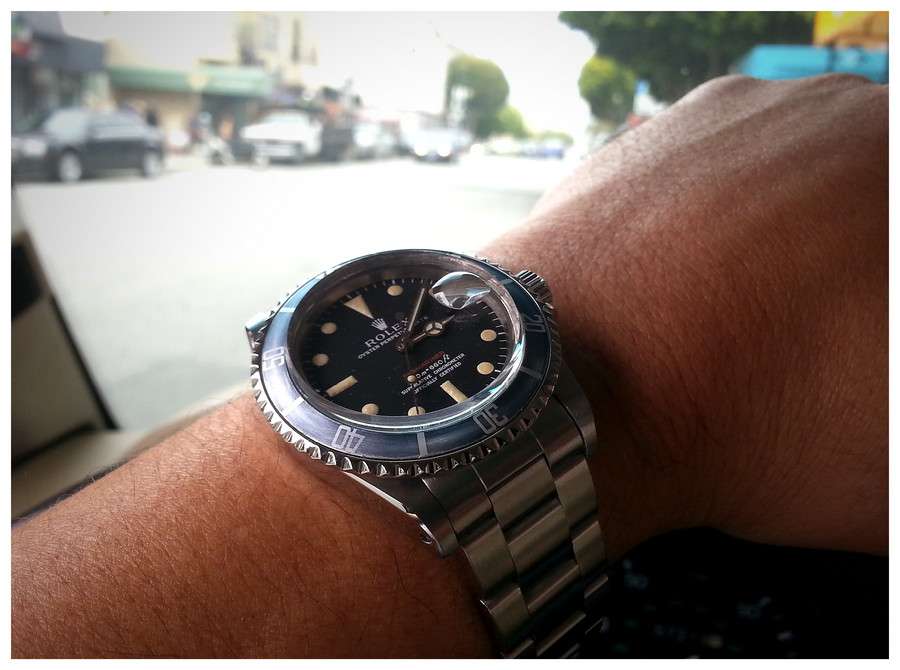
-
-
LOL, wow. So even gens need to be finessed and fiddled with to get everything to line up correctly, and the name of the game is to simply get the springbars into the lug holes. I had no idea. I guess the introduction of the SEL for modern pieces really changed the game in terms of how things all fit together aesthetically going forward.
-
I'll keep at it. I'll also read that thread you guys shared. I'm sure it has great tips that are directly applicable to my situation.
Out of curiosity, do gen end pieces also present issues for gen watches or do they all just magically fit together? That's the image I have in my head, at least.

-
Aaaaand done! Thanks for the tips, fellas. I ended up laying a plastic ziplock bag over each of those endlink tips that were protruding and then I used the tip of the needle nose to push down on each one until they were at the level of each lug. I fixed the issue and my bezel works the same as before. I think these look way nicer than my Puretime ones ever did.


-
Ok, here's my problem now. I finally got both links seated (I think) but now the pointy edges of the top sides are riding up above the lugs. First of all, it looks sloppy. But second, when I put the bezel back on it is so tight that it won't even rotate. Here's what it looks like:


Any suggestions? Is this where using the sandpaper comes in or where Nanuq's pencil or table idea comes into play? I'd much rather have the bottom edge hang down but that isn't happening.
-
That is the perfect base watch. In the Tempus Machina specifications list, they flat out say they use the 114060 as their base for this, and then they machine the sh#t out of the case to make it thinner, remove the crown guards, add chamfering, lugholes, and alter the profile shape.
-
 2
2
-
-
Thanks for the tips, guys. I am so frustrated with these tiny pieces of metal. Man, they are a beeatch to work with. I finally got one of the ends to fully seat the spring bar, but now the top side edge of the end link is sticking up over the lugs. grrr. I'd much rather have the bottom side of the link stick farther down. I just don't seem to have much control over which part of it opens up when I'm using the pliers, though. It seems to be opening the top of the clam shell.
Oh well, my main objective right now is to just get these little bastards to connect to the watch and fully seat the spring bars. Once I have them both fully seated, then I'll snap a pic of my destruction and see if there are some insights into how to clean it up. Maybe that involves using the sandpaper method, or somehow bending the top edge back down? Why is it so much easier to open up an engine and change spark plugs, or remove and replace computer or home appliance parts, than it is to fiddle with these little tin a-holes?
For what it is worth, I learned that I had to remove my bezel in order to monkey around with this. The first few times I was working on it the bezel flipped off, so I just set it aside so it wouldn't get in the way.
-
This is beautiful work! I love it. I think an old pistol case would be perfect for me.
-
Use some needle nose pliers and it does not take much. Just bend the tab on the underside out a hair. You should be able to hold it by hand and bend the tab. If not mount it with some smaller spring bars on an old case, then slip a screw driver between the case and tab on the bottom and lift just slightly, that will open them up as well.
Cool. Thanks for the tip! I'll give it a try shortly.
-
So I'm looking at my end pieces and how the heck do I open them up without scratching or ruining them? The stainless is a bit sturdier than I expected, for being as thin as it is. I suppose they aren't made of tin or aluminum!
What tool would work best to open the link a little bit?My only concern about bending the springbar, versus opening up the link a little bit, is this is my only set of 2mm bars. They of course work just fine with leather.
-
The 6538 HR that I got in the raffle had a domed sapphire. It was pretty damn nice, the dial on this one is nicer... but not like $24,000 nicer. Even with a genuine Rolex movement you can pick up for $2,000.00 -
Or, instead of going gen movement, get the Helenarou parts but then get a Yuki 3135 and have Misiekped service the movement so it's running like a top. If Helenarou has a red depth dial, that would be a great overall combination of parts and the Yuki 3135 would be purring like a kitten under the hood. I wonder what hands you could use with it?
-
Sage advice already given, done this quite a few times now with new end links
 battle to get them done first time but great afterward
Great advice, indeed. Never even thought of that. I can't wait to try it. In theory, that would mean I could get my Puretime endlinks to fit and actually work, but these WSO end links really have a much nicer shape and overall appearance to them. No question about it.
-
pry the endlinks open a touch to get the spring bars closer to the case if you know what I mean.. Even gen endlinks sometimes take a bit of work to get in the first time, or if they've been squashed over several years...
Great tip! I'll try that when I'm back at my desk. I didn't think to change the shape of the triangle formed by the top and bottom sides. I'll report back.
-
My WSO 580 endlinks arrived and I am trying to get these to fit with my Puretime 1680 case and gen spec bars. Here is my problem:
The end pieces accept the bars just fine, and when I install them it feels like the tips of the pins are engaging with the interior chamfer of the lugholes, but for the life of me I cannot get the pins to engage further and fully snap into the actual hole.

This is a much better fit than my original Puretime endlinks, which didn't even allow the tips to come close to the holes, but it still isn't acceptable. The underside of the WSO endlinks also fits flush against the underside of the case, whereas the underside of the original Puretime endlinks was angled. Overall the WSO looks like a more professional and well designed fit - cleaner.
Is there something else I should be doing with these? I have tried pushing on the ends to try to get them to engage. I have tried pushing towards the case while wiggling, I have tried pushing up and down, and from different angles.
Am I missing a simple step here?
 Do these need to be bent or sanded?
Thanks!
-
Great idea. I really should connect with Matt. Thanks for all of the comments guys!
-
Thanks for the info. I appreciate it. Is the movement so small that the little rotor can't keep up with the winding? Good insights about the issues with these. It is good to be aware of this.
-
Ha ha, I hear ya loud and clear. I've been having one of those days myself!I meant to write service inserts, had just been reading over dial stuff so the word must have been on my brain
 .
.So I'll restate
Where would you suggest for finding a service insert for that price?


-
1
-
-
Really? Hmmm. Very interesting possibilities.The dial is nice. I sent HR a message and they have all of the parts(domed ARd Sapphire and all) except for the ceramic insert.
E

-
I think you may have misread. He wrote service inserts, which means the bezel insert. That's not for the dial.


Wristies 15th June
in General Discussion
Posted
Wow! Nice watches today, fellas! The vintages are taking over the roost.