
marlin22
-
Posts
309 -
Joined
-
Last visited
Posts posted by marlin22
-
-
UPDATE:
Here is the balance [censored] engraving I just finished, seen next to some gen Rolex type 1 movements I can see I did a little more than I needed to. I will remove the smaller indices and make the letters bigger. R&D is the best part of the whole build, slowly seeing things fall into place is priceless.....
Very close now, just waiting on more moments to arrive and maybe sometime next week I'll have some up for grabs.
-
OK, I've been perplexed with this whole CDG issue since I was bitten by the vintage watch bug. So after a great deal of R&D I think I am finally getting it down. My intent is to decorate the 3602s with the engravings then CDG finish, then either nickel or rhodium plate. I think vintage watches are better and more accurate if nickle plated. I might also be able to fix the engraving issue with the 3601 if I can touch up the bridges with the CDG. This is just me thinking out loud, doesn't mean I can do it, but I wanted to share the progress with everyone. Here are some pictures.Here is a look at other tests I've done to get a feel for spacing and different finish textures
 Here is one that is getting very close to what I want, it is unfinished brass. Next I will do a quick nickle plating on it to see how it looks.
 Here it is with a quick and dirty nickle plating.
 It still needs much refinement but it is definitely a step forwards.......Confined it will work on the 3602 bridges, here are pictures of a set of badly worn down set of bridges I was using for testing the engraving. Can't wait to try it with some untouched bridges!! Have a few coming so once I receive them I'll go to town and post the results.

-
Beautiful, love those engraved bezels!!
-
Well after a great deal of R&D here is the prototype. This is the 3602, I shaved down the bridges to remove the Russian engraving and added my own. Then gave it a quick nickle plating. I need to refine how I shave down the bridges so as not to go so deep and need to work on the brushed bridge finish. I probably will not be able to remove the Russian text on the CDG movements, but I will try some different things I have in mind. Sure wish I could find a way to do CDG, anyone out there know what kind of bit is used? Here are some quick and dirty pictures.


-
 1
1
-
-
UPDATE:Getting the alignment down, this is the latest practice run and it looks like it is coming along. Text isn't perfect because I did it at a higher run speed but once I slow it down the text will be much better defined. It is a slow process but it is moving forward.

-
Hi everyone,Some months back I was approached by one of the forum members to build a series of watches for him and some of his friends. After quite a bit of collaboration between all the parties involved we have come to the prototype stage.The watch started off as a PAM 375N, I bead blasted the brown PVD/DLC coating off and left it with the bead bast finish. I put in one of my all Asian movements in it with the ETA markings and put on some custom engraving on the case between the lugs with the series name on one side and the XXX/007 on the other. It's the first prototype so some changes will be made to the next watch.Did notice I screwed up the paperwork it is suppose to say "LIMITED EDITION" not SPECIAL EDITION, my bad easy fix.Please feel free to comment and let me know your thoughts..


 The engraving work, still looking into different techniques to use to get the engraving deeper. The engraving turned out to be a great deal harder than I expected it to be specially on a curved suface, but will continue to perfect it.


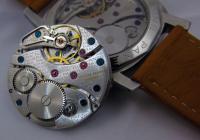
 My all Asian movement, everything you see are Asian parts moded to look gen. If you look closely under the balance wheel you can see the ETA markings I have that engraving perfected.


 Thanks for looking........
 -
Beautiful work!!!
-
-
Awesome work, is case engraving possible with this setup?
Working on that next for the 036 and others, also want to as you about this movement is it found in Pre-Vs, if not what models if any? I might want to try this as well if they are in any Pams.

-
Thats a lot of work going on there mate..well done....

Its nice to know that there will be another option on remarking the plates on the Molly.... that looks like the font size for the Spiral Breguet would it not have been easier to go with the smaller fonted 'Rolex' with the '17 Rubis.Fab Suisse' only rather than try the Swiss Made and 17 Rubis and Fab Suisse etc? I just mean there must be less work that way ...
I suppose it goes on what your looking to use it on of course is it for the 3646 or is the case irrelevant? And if so which one mate...Tell us your plan
:) 
Great work ..look forward to the next thread update
Pete, I am taking on the hardest first, from there it's all down hill. Below you will see what I am after with this one.


When I am done I hope to be able to do all 3 of these variants, but it's going to take time.

-
Here is the progress of the engravings on the Molly. Happy with the font size, but not with the alignment, need to continue to work on that.R&D progress is slow, but once perfected should be much faster. Still need to add more text to the bridges "15 RUBIS" and more.


-
Beautiful!! That case make it just pop!
-
Nice! What are the specs?
Same specs as my 111 plus now I include ETA markings on all Asian versions. Superlumed dial and hands.


Sent you a PM with more info.
-
Wow that is a great summer watch, and fantastic photos! The 113 has been on my list for a while - where did you get yours?
I build them.
-
Very very very nice!!! I assume the dial is Gen? I see recessed sub dial.
All parts are rep.
-
-
Hi Everyone,I've been getting lots of questions about the white faced PAMs like the 113 and 114, not to mention I have always liked the look and been patiently waiting for the chance to build myself one and offer it in the future, so here it is. This is the All Asian version now with the ETA marking on the main plate with running serial number.Get your modems ready and enjoy the pictures......


 Thanks for looking............
 -
Completed and now available on all my Asian builds with running serial number.


Gen

Moving on to vintage movements and case work next...
-
1
-
-
Beautiful!! Great pictures as well...
-
I want to buy a new fully modded PAM 111 N Noob V3 directly from a well know watchmaker with the following modifications:
Incabloc Y shape fix ,
Longer swan neck screw replaced ,
Swan neck end side shaped ,
Swan spring shaped ,
1st to 3rd wheel brushed ,
Crown wheel & rachet wheel polish works (Asian parts) ,
Cannon pin flatten & polished ,
Movement serviced & regulated (+1/day now) ,
Water resistance mod works & testing to 5ATM .
Are these modifications worth the total investment of $800 (incl.watch)? The Noob V3 is already a very good rep, which i want to buy for my collection, and i want to know if the mods are really adding value to the watch.
I know they are improving the quality of the watch, but is it necessary?
Is that price for a Swiss modded watch or just Asian?
-
Check the link below, expensive but it is sapphire not mineral and it won't scratch.
http://www.ebay.com/itm/310304825568?ssPageName=STRK:MEWAX:IT&_trksid=p3984.m1423.l2649
-
More refinements needed...

-
Marlin like that look quite a bit, mind if ask method to achieve?

Sorry Duh radium burn, Ok now I guess I have same question!

Here is the thread that inspired and gave me some education on how to begin dial painting: http://www.homageforum.com/viewtopic.php?f=42&t=8106
-
UPDATE:For those of you keeping up with the progress, here is a pen test I just preformed. I loaded a ball point pen into the collet and ran the CAD/CAM program script I put together. Please note, the ball point on the pen is still too large in diameter to print the characters correctly so it bundles them up. The lines to be engraved on the characters need to be .2mm or 0.0078 of an inch thick in order to achieve the desired effect. but it seems the size is correct and from the little I can make out the characters and font seem good. I am waiting on some micro end mills, micro diamond tips and micro profilers and hopefully some time next week I can try this on a movement.
 On the left you can see another test I ran with the fonts being too large to look correct, however you can distinguish the numbers better.
 To be continued........
-
1
-


My first 3646 Brevettato build
in The Panerai Area
Posted