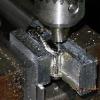
jmb Posted March 18, 2010 Report Posted March 18, 2010 The last detail, other than possible insert bleaching, needed on the Maxi No-Date experiment was to ditch the plastic movement spacer and come up with a suitable alternative. Since this was a no-name case of dubious heritage I knew nothing would probably be available "off the shelf" so a few measurements and sketch later the chips started flying. I chose aluminum to machine the spacer from as I'm basically lazy and I didn't have any brass laying around. A scrap was first turned to the correct OD and a hole drilled through: A boring bar was attached to the lathe and the drilled hole was then bored to the proper ID to accept the ETA 2836 movement: After measuring the case as best I could I figured (guessed) that the ring should be about .070 thick. I then beveled the edge of the work with a file and sliced off a .070 thick chunk: I then de-burred the piece and tested it in the case with a dial blank. I was hoping that my "guess" would result in the edge being about in the middle of the "groove" and that's about where it would up so I was happy: I then used a round file to put a "notch" to provide clearance for the stem: I dropped in the movement/dial assembly and then inserted the ring. It fit nicely! I then installed the retaining tabs and the job was finished without incident (for a change). Job finished - the Maxi markers just sort of jump out at ya... The re-shaped CGs look a lot better than "stock". This is one detail I can't figure a good reason for the factory not getting right. It would be so easy... I'm happy!!! This little beater has had a long and interesting journey.
redwatch Posted March 18, 2010 Report Posted March 18, 2010 The skills on this community never, ever, cease to amaze me! Nice job J!!! Thanks for taking the time to post the "play by play" as you did this. One of these days I am going to learn the art of working with metal and lathes! Nice to see you putting my old movement to great use!!! So glad it all worked out for you! It's a definite keeper that one!
Nanuq Posted March 18, 2010 Report Posted March 18, 2010 Very nice!! Want another challenge? How about making me one of these out of brassy "white copper" like the original Submariner bezels? C'mon, I dare you! (and will be forever in your debt!)
jmb Posted March 18, 2010 Author Report Posted March 18, 2010 Red, thanks again for the movement and hands, it made the project a "walk-in-the-park" compared to what kind of grief I normally encounter! Nanuk, it would be an interesting project if I had a pattern and the proper material...
Nanuq Posted March 18, 2010 Report Posted March 18, 2010 "Pattern" I got ... I'd just send you the bezel. As for the material, it doesn't have to be genuine "white copper", whatever that is. All the bezels I see online just look like hunks of brass to me, with some kind of silvery coating that's mostly worn off. Does that ring a bell? I wonder if a masterfully machined brass bezel could be coated or something?
jmb Posted March 18, 2010 Author Report Posted March 18, 2010 Isn't that how the old cheapo reps were made, plated brass? At least that's what I've read... I wonder if electroless nickel followed by buffing to the point where some of the brass shines through would produce the effect you are describing
FxrAndy Posted March 18, 2010 Report Posted March 18, 2010 I need a lathe, i have been meaning to get one for years, Good work J
jmb Posted March 18, 2010 Author Report Posted March 18, 2010 Thanks, Andy. Not sure where you are at but I think Harbor Freight has a small 7 x 10 lathe on sale right now which would be about the right size for making small parts like this. Someday I'm going to get one of those and do a CNC conversion on it...
FxrAndy Posted March 18, 2010 Report Posted March 18, 2010 I am in Germany (well basel right now) those small hobby lathes have real crap tolerances from the ones i have seen though, i know that can be worked with but they just feel cheep, and every time a nice vintage quality one cam up i have not had the cash
jmb Posted March 18, 2010 Author Report Posted March 18, 2010 The cheap Chinese lathes leave a bit to be desired "out of the box", but with a few mods can work rather well. And, we are all about modding, right? I have modified mine with a quick-change tool post, a variable speed 2 hp DC motor and controller, and beefed up the compound mounting plate.
jmb Posted March 18, 2010 Author Report Posted March 18, 2010 A Modded Rep Lathe! I don't really know if it would be a rep of anything but some machine tools sure look like reps.
FxrAndy Posted March 19, 2010 Report Posted March 19, 2010 I may be buying an Austrian precision lathe in the morning
redwatch Posted March 20, 2010 Report Posted March 20, 2010 I may be buying an Austrian precision lathe in the morning Ohhhhh.......post some pics if you get one!!!!
Recommended Posts
Create an account or sign in to comment
You need to be a member in order to leave a comment
Create an account
Sign up for a new account in our community. It's easy!
Register a new accountSign in
Already have an account? Sign in here.
Sign In Now