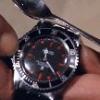
Jetsons Posted April 27, 2006 Report Share Posted April 27, 2006 (edited) These 316L cases are tough! The process of drilling the side case holes, bracelet plus polishing wasn't exactly a walk in the park but well worth the effort. I'm finally rid of the darn skinny spring bars! Rolling up the sleeves: I used a rotary tool (Proxon), SnapOn cobalt bits (#56 & #57-smaller to get things started) fot the lug holes and #46 & #47 (may be sufficient but snug fit) for the bracelet. I applied machine oil liberally and frequently to lubricate the case holes, bracelet and drill bits to keep the temp down. Next time, I will use a drill with more low speed torque than the rotary. I held the case free hand wrapped in a cold damp cloth while drilling to keep the case cool. Further, I stopped work frequently to allow all components to cool down. Take your time. After the drill work was complete, I cleaned the case thoroughly and used the dremel with a soft cotton wheel and polishing paste to polish the side case holes. I achieved best results by polishing in both directions, perpendicular to the holes.. I finished the polish work with a fresh cotton wheel and Simichrome. All polishing was done at relatively slow speed. The inside of the lugs and bracelet ends need to be smoothed (light grinding with a fine stone bit & wire wheel were necessary) otherwise you may have problems fitting the oyster bracelet to the case. This would not be a factor with vintage style bracelets, non SELs. The spring bars used are the $1.98/pair shipped cheapies, available at Ebay. They are ss and of good quality, specially for the price. The OEMs may look better & more durable but these are what I had in my tool box. The key is to take your time, use Cobalt bits and I would recommend a drill tool with more low speed torque than a rotary. Jet Edited June 17, 2006 by Jetsons Quote Link to comment Share on other sites More sharing options...
bruce79 Posted April 27, 2006 Report Share Posted April 27, 2006 Very nice, perhaps you could explain the process. What type of drill did you use, etc. They look great. Quote Link to comment Share on other sites More sharing options...
Tribal Posted April 27, 2006 Report Share Posted April 27, 2006 You must take a 1,3mm Carbid-Drill....... Take a slow drill speed about 800-1500 U/min..... You can drill step up from 1mm to 1,3mm Drill.... Take your time..... After drilling take sandpaper to line up the holes and than polishing,polishing,polishing.... RG Tribal Quote Link to comment Share on other sites More sharing options...
ubiquitous Posted April 27, 2006 Report Share Posted April 27, 2006 Nice work Jet!! Nothing like doing it yourself, eh? Quote Link to comment Share on other sites More sharing options...
ehtolcad Posted April 27, 2006 Report Share Posted April 27, 2006 lookin good! Quote Link to comment Share on other sites More sharing options...
Jetsons Posted April 28, 2006 Author Report Share Posted April 28, 2006 (edited) Thanks, Ubi! I enjoy working on mecanical toys and just about anything else but this is my first serious effort with a watch. It felt very good when it was complete! Thanks, ehtolcad! bruce, added to the initial post. Thanks for the reminder. Jet Edited April 28, 2006 by Jetsons Quote Link to comment Share on other sites More sharing options...
700club Posted April 28, 2006 Report Share Posted April 28, 2006 Excellent! Thank You for posting. Quote Link to comment Share on other sites More sharing options...
Jetsons Posted April 28, 2006 Author Report Share Posted April 28, 2006 Hey, 700club. You're welcome. I added additional information/comments and moved them to my initial post. I hope this is helpful to others wishing to give this mod a try. If anyone can add additional tips, by all means do. Jet Quote Link to comment Share on other sites More sharing options...
Recommended Posts
Join the conversation
You can post now and register later. If you have an account, sign in now to post with your account.