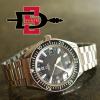
dbutlerman Posted August 2, 2012 Report Share Posted August 2, 2012 Some of you may have seen my WTB for a Lightly Frankened 3717. Luckily for me Chieftang responded that he was willing to part with his. I was hoping for a rep 3717 with either a Gen Dial or relumed V3 with the thick Lume pads removed. Chieftang's was more than I had hoped for. His had Gen Caseset (Crystal, Pushers, Midcase & case back), ETA 7750, Rep Hands Re-Lumed by the Zig, a Di-Moddell strap, and the rep original bracelet. He also had Gen. IWC German Day and Datewheels available for the next service interval. I tried to make contact with Concepta to see if he could find me a Gen. Bracelet and a handset, but I haven't heard back, so I decided to do a little work myself. As others have noted the Rep bracelet doesn't fit the Gen Case. The rep bracelet endlinks are 21.1mm and the Gen case lugs are right around 21.02~ mm. So, I filed down the endinks to a perfect fit and mounted the bracelet. The major tell of a Rep. bracelet are the holes in the clasp that allow for the spring bar to attach the two parts of the bracelet together. As seen below (picture stolen from rafi717): . I remember reading a post here on RWG about a bracelet mod that would get rid of the whole by replacing the spring bar with a solid stainless steel bar, and then sanding and polishing it down to make it disappear into the clasp. Which is probably exactly how IWC does it (although they probably have a better polishing rig than I do). The results turned out really good, I could probably polish it a bit more, but I am really happy with it for the moment. The original bracelet modification post is here: CLICK HERE. Here is a break down the process with some pictures: What you need to do is get one of these: Igot mine from Otto Frei, part number is MM-M124. It gets you a full set of bars from .8mm to 1.8mm. I used a 1mm bar, but from what I understand, the hole in the bracelet may vary is size. Use the bar that is the tightest fit into the hole, you'll need to hammer it into place later, and the tension between the hole and the bar is what holds everything in place, so a tight fit is good. You then remove the bracelet from the clasp from the bracelet, remove the tiny flat head screw that secures the release mechanism from the clasp, and then pull out the button. There is a small spring inside the clasp, go ahead and pull that out too so it doesn't get lost later. Release the spring bar and separate the two pieces. Next step is to disassemble the spring bar. Simply pull out the the ends and it will remove the tips, pull out the spring as well. We will use the spring bar tube to take up the space between the 1 mm bar and the part we just pulled the spring bar out of. Next, put the spring bar tube back in the clasp, put the clasp back where it came from, and hammer the steel bar through the outside of the clasp, through the spring bar tube, and clear through the other side of the bracelet. (this image is for clarity - this is done with the clasp separate from the watch - bar would be driven in from the right to the left) Drive the bar so it is flush at one side. You'll still have several mm left at the opposite side, trim off the excess with a good pair of wire cutters. Next step is sanding. I used a file to bring down the extra long side (the side you hammered from) until it was flush with the clasp. I then sanded both sides of the clasp using 200 grit sand paper, followed by 500 grit and then 1,000 grit sand paper. The land two steps take a while as it takes off very little material. The 1,000 grit takes a really long time. Here is a picture after the 1,000 grit sanding: ...and the opposite side: These pics are under 10x magnification. The next step is what makes all the difference, mask off the brushed parts of the parts of the clasp and then polish the sides of the clasp using Red Rouge and a bench polisher. After a few minutes of polishing the bar ends begin to disappear. Keep polishing until you can't see them anymore. When you're finished it will look like this: ...and under 10x magnification, depending on the light, you can just barely see the bar: ...and reattached to the bracelet: This side needs a bit more polishing - which I will take care of soon... ...and here are a couple of crappy pictures from my iPhone. I promise to take some better ones in the next couple of days with my DSLR. 1 Quote Link to comment Share on other sites More sharing options...
dluddy Posted August 2, 2012 Report Share Posted August 2, 2012 Outstanding. great result Quote Link to comment Share on other sites More sharing options...
ryaku Posted August 2, 2012 Report Share Posted August 2, 2012 I want the same for my IWC Mark XVI now Quote Link to comment Share on other sites More sharing options...
dbutlerman Posted August 2, 2012 Author Report Share Posted August 2, 2012 @ ryaku I've got a few extra pins if you want 'em Easy job! @dluddy Thanks Buddy! I'm really happy with the results too! Quote Link to comment Share on other sites More sharing options...
ryaku Posted August 2, 2012 Report Share Posted August 2, 2012 I'm not sure at all I'd be able to follow your instructions successfully. The result is really unbelievable. Quote Link to comment Share on other sites More sharing options...
dbutlerman Posted August 2, 2012 Author Report Share Posted August 2, 2012 It's really not bad! Quote Link to comment Share on other sites More sharing options...
vlydog Posted August 2, 2012 Report Share Posted August 2, 2012 Congratulations on tackling this mod so successfully. Your results are fantastic! Quote Link to comment Share on other sites More sharing options...
FxrAndy Posted August 2, 2012 Report Share Posted August 2, 2012 Very nice work and a nice simple mod Quote Link to comment Share on other sites More sharing options...
redwatch Posted August 3, 2012 Report Share Posted August 3, 2012 Love it! Very ingenious! Quote Link to comment Share on other sites More sharing options...
dbutlerman Posted August 3, 2012 Author Report Share Posted August 3, 2012 Congratulations on tackling this mod so successfully. Your results are fantastic! Thanks! It's really super easy - anybody with the right tools can do this one without a lot of fear! Very nice work and a nice simple mod Thanks Andy! Love it! Very ingenious! Wish I could take credit for the idea. It really is a great idea! ...and here are some better pics: Quote Link to comment Share on other sites More sharing options...
redwatch Posted August 3, 2012 Report Share Posted August 3, 2012 Wow! Even more great pics! Nicely done db! Which lens is that one? Quote Link to comment Share on other sites More sharing options...
dbutlerman Posted August 3, 2012 Author Report Share Posted August 3, 2012 This is the NIkor 18-200 VRII. Not great for this kinda of shot - but it still works. I really want a macro lens - but I'm too cheap Quote Link to comment Share on other sites More sharing options...
dbutlerman Posted August 3, 2012 Author Report Share Posted August 3, 2012 ...I just notice all that florescent green, it's coming from a plant on the desk...funny... Quote Link to comment Share on other sites More sharing options...
mrswe Posted August 3, 2012 Report Share Posted August 3, 2012 Nice mod! Quote Link to comment Share on other sites More sharing options...
Watchmeister Posted August 3, 2012 Report Share Posted August 3, 2012 Very nice piece. I know Chief put that piece together with a lot of love and now it is at a new level. Wear it well. Quote Link to comment Share on other sites More sharing options...
dbutlerman Posted August 3, 2012 Author Report Share Posted August 3, 2012 Thanks! I think I've found some gen. Hands too. Sweet! 1 Quote Link to comment Share on other sites More sharing options...
justlounging Posted August 3, 2012 Report Share Posted August 3, 2012 very well done mod indeed..congrats! Quote Link to comment Share on other sites More sharing options...
Kutio Posted August 7, 2012 Report Share Posted August 7, 2012 Great job on the bracelet. I never even though of the spring bar mode. I just accepted the bracelet as is after filing it down to fit of course. Mine says hi Quote Link to comment Share on other sites More sharing options...
Cromag Posted August 7, 2012 Report Share Posted August 7, 2012 Nice! Quote Link to comment Share on other sites More sharing options...
Cromag Posted August 9, 2012 Report Share Posted August 9, 2012 Really nice photography. After doing all that work you probably don't want to keep that 3717 much longer. I'll take it off your hands, just send me a PM Quote Link to comment Share on other sites More sharing options...
Kutio Posted August 10, 2012 Report Share Posted August 10, 2012 lol, I don't know about the OP, but my genestein pair is going to stick around for a while Quote Link to comment Share on other sites More sharing options...
Michael_B Posted August 10, 2012 Report Share Posted August 10, 2012 Wow I am so jaleous of your watch. I am trying to build a franken myself, but so far no success with finding the parts I need. Quote Link to comment Share on other sites More sharing options...
dbutlerman Posted August 10, 2012 Author Report Share Posted August 10, 2012 Sorry Cromag - this one is sticking the stable for a while Quote Link to comment Share on other sites More sharing options...
HauteHippie Posted August 11, 2012 Report Share Posted August 11, 2012 (edited) Lookin very good. I don't think the gen bracelet is going to offer enough bang for the buck as you'd probably need to double the price of the project to acquire one. But you will notice the thinness of the rep next to the gen bracelet. Anyhow, enjoy! Sent from my iPhone using Forum Runner Edited August 11, 2012 by chieftang Quote Link to comment Share on other sites More sharing options...
dvn Posted August 13, 2012 Report Share Posted August 13, 2012 (edited) Very nice Frankenstein 3717 indeed. Congrats db2. I have been looking for 1 for a while now. Edited August 13, 2012 by dvn Quote Link to comment Share on other sites More sharing options...
Recommended Posts
Join the conversation
You can post now and register later. If you have an account, sign in now to post with your account.