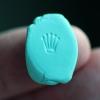
ubiquitous Posted March 1, 2010 Report Share Posted March 1, 2010 More bezel experiments; I've had this aftermarket 1675 insert in my parts box for a couple of years now; figured it was as good of a candidate to put through the motions... This insert was originally a deep, semi matte black color: After some artificial aging: Comparison- New lumi service insert, 1675 insert, and my old MBW insert to give an idea f the different tones achieved: Fitted to the bezel: Always fun to play with this stuff; the results are very rarely ever the same Thanks for looking, //ubi Quote Link to comment Share on other sites More sharing options...
Fer Posted March 1, 2010 Report Share Posted March 1, 2010 Love that faded shade... Quote Link to comment Share on other sites More sharing options...
hiker01 Posted March 1, 2010 Report Share Posted March 1, 2010 Sweeeeeeeeet........when are you gonna divulge the secret process?????? We're all dying to hear it! Quote Link to comment Share on other sites More sharing options...
OSRep Posted March 1, 2010 Report Share Posted March 1, 2010 Nice one Ubi Quote Link to comment Share on other sites More sharing options...
vlydog Posted March 1, 2010 Report Share Posted March 1, 2010 Nicely done Ubi> IMO just the right amount of aging; still clean and crisp. Quote Link to comment Share on other sites More sharing options...
Jkay Posted March 1, 2010 Report Share Posted March 1, 2010 Thank you Ubi .. I wish I had the drive to take this hobby to the next step. Maybe one day. Quote Link to comment Share on other sites More sharing options...
ubiquitous Posted March 1, 2010 Author Report Share Posted March 1, 2010 Thanks, gang. I've been having fun with aging these, as it's always interesting to see how they turn out. I wish I had the drive to take this hobby to the next step. Maybe one day. Jkay- What's stopping you? Juat jump on in Quote Link to comment Share on other sites More sharing options...
highoeyazmuhudee Posted March 2, 2010 Report Share Posted March 2, 2010 is it time to share the cadbury secret yet? Quote Link to comment Share on other sites More sharing options...
TwoTone Posted March 2, 2010 Report Share Posted March 2, 2010 After some artificial aging: Quote Link to comment Share on other sites More sharing options...
TeeJay Posted March 2, 2010 Report Share Posted March 2, 2010 is it time to share the cadbury secret yet? +1 Quote Link to comment Share on other sites More sharing options...
dluddy Posted March 2, 2010 Report Share Posted March 2, 2010 Just the right amount. I like it Ubi Quote Link to comment Share on other sites More sharing options...
ubiquitous Posted March 2, 2010 Author Report Share Posted March 2, 2010 Quote Link to comment Share on other sites More sharing options...
midshipman01 Posted March 4, 2010 Report Share Posted March 4, 2010 is it time to share the cadbury secret yet? I'd guess soaking it in bleach. At least, that will give you similar results. Some bezels require a very, very light sand with a fine grit to remove any clearcoat that might prevent the paint from fading. Quote Link to comment Share on other sites More sharing options...
ubiquitous Posted March 4, 2010 Author Report Share Posted March 4, 2010 Newp. Quote Link to comment Share on other sites More sharing options...
Jkay Posted March 4, 2010 Report Share Posted March 4, 2010 LASERS!! <--- Ubi laser goggles Quote Link to comment Share on other sites More sharing options...
ubiquitous Posted March 4, 2010 Author Report Share Posted March 4, 2010 Sharks! With frickin laser beams attached to their heads! Quote Link to comment Share on other sites More sharing options...
marsupilami Posted March 4, 2010 Report Share Posted March 4, 2010 I guess its just polishing them. Quote Link to comment Share on other sites More sharing options...
highoeyazmuhudee Posted March 4, 2010 Report Share Posted March 4, 2010 my guess is brake fluid and a tanning bed Quote Link to comment Share on other sites More sharing options...
jmb Posted March 4, 2010 Report Share Posted March 4, 2010 This weekend I'm gonna toss one into a carb cleaner vat and see what happens... Quote Link to comment Share on other sites More sharing options...
ubiquitous Posted March 4, 2010 Author Report Share Posted March 4, 2010 I do have some Pentosin brake fluid in the garage... But, no... No brake fluid for me I'll be curious to see how your carb cleaner experiment goes, J! Quote Link to comment Share on other sites More sharing options...
Gorilladame Posted March 4, 2010 Report Share Posted March 4, 2010 Things you defenitly must not do is putting bleach and salt acid together on the insert. did it once, while experimenting on an insert, and it started to build smoke, I couldn Quote Link to comment Share on other sites More sharing options...
ubiquitous Posted March 4, 2010 Author Report Share Posted March 4, 2010 Bleach and salt... Yikes!! Quote Link to comment Share on other sites More sharing options...
vlydog Posted March 4, 2010 Report Share Posted March 4, 2010 Bleach and salt... Yikes!! Has anyone tried hydrogen peroxide and baking soda? Or, Professional teeth whitening gel or solution? Quote Link to comment Share on other sites More sharing options...
HauteHippie Posted March 4, 2010 Report Share Posted March 4, 2010 Any solution be it bleach, carb cleaner, etc., if caustic enough to remove the clear coat and paint underneath by simply soaking, will do so in a blotchy manner. There is definitely some elbow grease needed to achieve the evenly faded look... To get an evenly faded look I think an even polishing is what is needed. Getting the even fade is probably the tricky part, so I might be tempted to start with a very light polish such as cape cod cloths that will remove very little surface material in a single swipe. Put some double stick tape down on the workbench, place the insert on the tape. This should hold it in place while you work your way around and around. Check results periodically. If this didn't produce desirable results my next attempt would be a very unaggressive rouge on the buffing wheel of the grinder. Red or green might be too aggressive. But, I think applying very light pressure and working all the way around the insert at a consistent rate could result in an evenly faded look. However, it might be tough to get even results on the buffing wheel, and so lastly I think wet sanding with 2000-4000 grit could also produce nice results. Hummmmm. I looked in my parts bins and could only find old crappy inserts that won't really work as test pieces. They're just too flimsy. But experimentation most certainly needs to be performed on test pieces first! None of my theories may work at all!! I am going to see what I can find on the cheap in the way of aftermarket inserts and give it a go! Quote Link to comment Share on other sites More sharing options...
Gorilladame Posted March 4, 2010 Report Share Posted March 4, 2010 I personally don Quote Link to comment Share on other sites More sharing options...
Recommended Posts
Join the conversation
You can post now and register later. If you have an account, sign in now to post with your account.