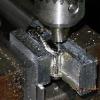
jmb Posted October 9, 2009 Report Share Posted October 9, 2009 OK, I have sacrificed my $43 Submariner on the alter of knowledge in order to discover a way to drill thru-holes in the lugs. There seemed to be a lot of info on how to re-drill existing holes but I could find nothing on drilling lug holes where no thru-holes ever existed. I have finished my first attempt at drilling lug holes where no external holes existed. All-in-all I'm not too unhappy with the results and feel the next attempt should go rather smoothly. I tried three different "techniques" until I decided which was the best way to proceed, consequently one of the holes is a few thousandths off but not really noticeable especially when on the wrist. I don't think I'm going to attempt a "how-to" article as probably most of what I would describe as far as hole location, etc., would only make sense to another machinist. I'll just show one pic of my setup in the mill. I finished this a few days ago but was waiting for the correct spring bars from ofrei, which arrived today. While I was at it I also reshaped the CGs a little bit and decided that a tool/shop watch should not be shiny so I gave the entire case a fine brushed finish that hopefully will not show scratches as bad. Here are a few pics of the finished product. The only trick is to get whatever it is you are working on clamped down solid so it won't move and where whatever operation you want to perform can be precisely located relative to your fixture. That's about all i'm going to say about that! This is the watch before I started on it. Even though it was only $43, including shipping, and is probably as "incorrect" as you can get I have really gotten attached to it. I've worn it pretty much constantly since I've gotten it and have decided it's now a perfect watch (strong spring bars, brushed finish, etc.) to wear while farting around in the shop. I have it regulated to about +2 sec/day and it hasn't missed a beat. All that said, I'm glad I didn't destroy it but I wouldn't have lost any sleep if I had. I can confirm that a $40 range Rolex rep does indeed have a stainless steel case, albeit somewhat on the soft side. The lack of hardness was fine with me as it made the drilling much easier and besides being a cheap ba$tard I'm a bit on the lazy side! This was how I fixed and secured it on the mill: Here are the results: My next attempt at this will be on my $33 "no-date" Submariner. Now, back to making hand pressers... Quote Link to comment Share on other sites More sharing options...
highoeyazmuhudee Posted October 9, 2009 Report Share Posted October 9, 2009 NICELY done. I couldnt get the holes lined up accurately enough for my liking on my sub. i found there was too much bend in the bit when drilling into the curved down lug, the bit kept slipping a bit by bending cause of the curvature of the lug. Quote Link to comment Share on other sites More sharing options...
rosnik Posted October 9, 2009 Report Share Posted October 9, 2009 My compliments for your self made work! Quote Link to comment Share on other sites More sharing options...
jmb Posted October 9, 2009 Author Report Share Posted October 9, 2009 You can't directly drill into the lug, at least I wouldn't try it. I first used a 1/16" carbide endmill to lightly spot where the hole would be, then located started the hole with a small center-drill, and followed up with a drill bit. It's somewhat tedious but not too bad if you have the stuff laying around... Quote Link to comment Share on other sites More sharing options...
JoJo35 Posted October 9, 2009 Report Share Posted October 9, 2009 Nice job, it looks great! Quote Link to comment Share on other sites More sharing options...
predfan2001 Posted October 10, 2009 Report Share Posted October 10, 2009 Somebody should do this for resale. I'd like to have a Noob with lugholes....and maybe I'd pop a non sel band on it?? Quote Link to comment Share on other sites More sharing options...
Guest Carl Posted October 10, 2009 Report Share Posted October 10, 2009 Very nice work which I hope you will keep up. I'd like to see how far you can take a $40 Sub, just for curiosity. We need to get more new members in here with YOUR curiosity. We all have had to start somewhere and I think that it has always been the curiosity which has kept this going. Carl Quote Link to comment Share on other sites More sharing options...
jmb Posted October 10, 2009 Author Report Share Posted October 10, 2009 Predfan, surely there are people around that do this. I think I'm going to buy a few more "inexpensive" no-date Subs, drill the lug holes, generally spruce 'em up. Since I don't need a drawer full of "no date" subs maybe I can then pawn them off! :-) Maybe by then I might know what I'm doing... Carl, thanks for the encouragement, it's fun to tinker. I may be about to run out of gas on the super low-budget Sub as my next project might have been a different bezel insert but these super cheap ones just have what amounts to a "sheet metal" insert and there would be much machining to be done to fit a thicker insert. But, it might get the crown reshaped as soon as I make a holding fixture to stick it in so I can chuck it in the lathe... Quote Link to comment Share on other sites More sharing options...
Jkay Posted October 10, 2009 Report Share Posted October 10, 2009 Congratulations! And yes .... you should never just try and plunge a small bit into metal. At the very least, use a center punch to locate your starting point. Bits will walk .. that's just life. Quote Link to comment Share on other sites More sharing options...
jmb Posted October 10, 2009 Author Report Share Posted October 10, 2009 Jkay, yeah, you're correct. Any time I ever drill into a surface that's not perfectly perpendicular to the drill bit I always use an end mill to "spot face" where I'm going to drill AND still use a center drill. If the location has maybe +/- .010 I might skip the center drill and just use a stub drill but on this I was trying to get closer than that. Quote Link to comment Share on other sites More sharing options...
gavidoc Posted October 10, 2009 Report Share Posted October 10, 2009 For those who might not know, the equipment used isn't what you'd find in your own shop. Having a Mill, center drills and endmills makes this easier then just the run of the "mill" drill bits and drill press. Quote Link to comment Share on other sites More sharing options...
jmb Posted October 10, 2009 Author Report Share Posted October 10, 2009 gavidoc, thanks for pointing that out a bit clearer, that's why I decided not to do a "how-to" on the procedure. I really can't think of any easier way of doing it and the only way I've found that works reliably is to locate and drill each hole. Drilling through and nailing the bottom in the same setup was what got one of my holes a couple thou off and slightly buggered up the back side when the bit broke through. But, if anybody is curious and has a Harbor Freight store nearby... I Quote Link to comment Share on other sites More sharing options...
predfan2001 Posted October 11, 2009 Report Share Posted October 11, 2009 I would be in the market for a nodate like the one you just did. I have purchased 2 14060 reps and woth were garbage...the ones with the bad "Oyster Perpetual" fonts and conical rehaut. That rep you started with looks better than the ones I have seen. Quote Link to comment Share on other sites More sharing options...
jmb Posted October 11, 2009 Author Report Share Posted October 11, 2009 I started with a $43! Quote Link to comment Share on other sites More sharing options...
Omega007 Posted October 13, 2009 Report Share Posted October 13, 2009 I would be in the market for a nodate like the one you just did. I have purchased 2 14060 reps and woth were garbage...the ones with the bad "Oyster Perpetual" fonts and conical rehaut. That rep you started with looks better than the ones I have seen. I'd be up for one also. So when is production beginning ? Quote Link to comment Share on other sites More sharing options...
jmb Posted October 13, 2009 Author Report Share Posted October 13, 2009 I hadn't thought about getting into the watch manufacturing business, let me think on it... Quote Link to comment Share on other sites More sharing options...
lanikai Posted October 13, 2009 Report Share Posted October 13, 2009 looks good jmb !! Quote Link to comment Share on other sites More sharing options...
jmb Posted October 13, 2009 Author Report Share Posted October 13, 2009 Thanks, Lanikai. Quote Link to comment Share on other sites More sharing options...
Recommended Posts
Join the conversation
You can post now and register later. If you have an account, sign in now to post with your account.