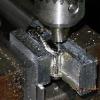
jmb Posted May 20, 2010 Report Share Posted May 20, 2010 I took a break from a somewhat vexing project today to relax a little so I decided to attach a Tudor signed vintage style clasp to complete this fantasy Tudor's illusion. The AP clasp arrangement it pretty slick, and I thought seriously about just gluing a Tudor shield onto it, ala Daytona flip-lock, but it looked like it would be easy to bump and unlatch so it had to go. As the clasps were different widths and nothing lined up it would be necessary to machine some "transition pieces" to hook everything together. I first cut a chunk of 1/8" stainless the proper size and clamped it into the milling vise and "squared it up" and brought it to it's finished size: I machined it to .400" x .582". For all of you metric guys, sorry, but as a machinist I think in thousandths of an inch! I then clamped it back in the vise and used an edge finder to locate the l/h edge. All layout measurements would be made from this edge. This is the finished slot that will go toward the clasp: Here is a test fitting to make sure I machined the slot size adequately: I then flipped the transition link over, located the l/h edge, and proceeded to mill the notches on the band side. The mid links on the band will mate into these notches: At this point the machining of the link was complete and all that remained was to de-burr it with a fine file and locate and drill the pin holes. Holes are really easy to locate and drill with precision when you are starting with a clean fresh piece of metal. The first step is to clamp it back up and use the edge finder to locate the l/h end and the rear edge. The table is cranked in the Y axis the proper distance to place the center drill in the exact center (.0625" in this case) and over in the X axis (.050" for these holes) and the hole is "pecked" with a center drill. The table is again moved in the X axis to the second hole where it is "pecked". After the holes had been located and "pecked" the center drill is removed and the proper drill bit is installed. I decided on a .050" hole is this was very close to the hole size in the AP links. At this point the pin holes are drilled: This completes one transition link and I repeated these steps to make the second one. I then chucked up some 2mm SS rod in the lathe and turned a short section down to about .052" - .053". I won't bore you with lathe shots of doing this as it is really a "yawner"... After the pin stock was made I then pressed the pins into the transition links and band, filed the pins flush with the links, and the job was finished. Here's my fantasy case with Rep Tudor Prince Date dial, AP Royal Oak band (thanks again, Ubi! ), and rep vintage style Tudor clasp. Even though this watch has quite a few boo-boos and other defects I quite like it and I can only hope the next will be easier and better executed. Thanks for following along with me on this "road less traveled" and I hope you enjoy the finished product... Quote Link to comment Share on other sites More sharing options...
FxrAndy Posted May 20, 2010 Report Share Posted May 20, 2010 top work mate Quote Link to comment Share on other sites More sharing options...
ubiquitous Posted May 20, 2010 Report Share Posted May 20, 2010 Great work, J! Very, very creative... Quote Link to comment Share on other sites More sharing options...
jmb Posted May 20, 2010 Author Report Share Posted May 20, 2010 I just did this to prove to myself I could still drill holes where I wanted them! I still need to bevel the ends of the transition links but they're not really seen while "on the wrist". Quote Link to comment Share on other sites More sharing options...
lhooq Posted May 20, 2010 Report Share Posted May 20, 2010 What a finish! And a great ending to this project, too! Top work, jmb. Quote Link to comment Share on other sites More sharing options...
TeeJay Posted May 20, 2010 Report Share Posted May 20, 2010 Awesome idea, bro My only suggestion would be to shave a quarter off the transition link on the 'shield end' of the clasp, just so it's the same size as the other links in the bracelet, then it'll completely blend right in Quote Link to comment Share on other sites More sharing options...
jmb Posted May 20, 2010 Author Report Share Posted May 20, 2010 T - Yeah, I probably should have but it isn't seen when wearing it... Quote Link to comment Share on other sites More sharing options...
krpster Posted May 20, 2010 Report Share Posted May 20, 2010 Great work jmb! Love the finish. That is something you can wear proudly. Quote Link to comment Share on other sites More sharing options...
chiman12 Posted May 20, 2010 Report Share Posted May 20, 2010 You disgust me jmb...GREAT WORK ONCE AGAIN!!!! Question jmb...I might dabble in a little metal work. Based on your opinion, do you think that mini mills and mini lathes are any good for projects such as your Tudor project? Thanks in advance for the advice! Quote Link to comment Share on other sites More sharing options...
TeeJay Posted May 20, 2010 Report Share Posted May 20, 2010 T - Yeah, I probably should have but it isn't seen when wearing it... I know what you mean, if it's not seen, it's not really an essential fix, and it looks fine as it is Quote Link to comment Share on other sites More sharing options...
jmb Posted May 20, 2010 Author Report Share Posted May 20, 2010 ChiMan - That's what I use. I have a modified Harbor Freight 9 x 20 lathe and a Harbor Freight round column Mill/Drill. The lathe has been modified with variable speed 1.5 hp DC motor, wuick-change tool post, and a beefier/stiffer compound clamp. I've done nothing to the mill other than mount a digital "scale" on the quill. T - If I would have been thinking clearly I would have made the transition links the same size. I did gain enough insight into link making, though, to feel fairly comfortable in tackling making a band from scratch so the next "1530" style project may very well have a band styled after the gen... Quote Link to comment Share on other sites More sharing options...
TeeJay Posted May 20, 2010 Report Share Posted May 20, 2010 T - If I would have been thinking clearly I would have made the transition links the same size. I did gain enough insight into link making, though, to feel fairly comfortable in tackling making a band from scratch so the next "1530" style project may very well have a band styled after the gen... Quote Link to comment Share on other sites More sharing options...
BrianT Posted May 20, 2010 Report Share Posted May 20, 2010 You know Justin.....one of these days someone from Rolex is going to hire you........ Quote Link to comment Share on other sites More sharing options...
jmb Posted May 20, 2010 Author Report Share Posted May 20, 2010 Gawd, I hope not! Quote Link to comment Share on other sites More sharing options...
Recommended Posts
Join the conversation
You can post now and register later. If you have an account, sign in now to post with your account.