When you buy through links on our site, we may earn an affiliate commission.


projectologist
-
Posts
1,381 -
Joined
-
Last visited
-
Days Won
2
Everything posted by projectologist
-
The rep of the 288 is the most accurate of the lot, followed closely by the latest 292.
-
 Yes, the larger one in the last pic for the CG body. The smaller file was in reference to the mod in this post... http://www.rwg.cc/topic/143410-the-CG-mod-nobody-talks-about
 -
Also a little warning... when I said the following in my CG mod post... "I've found it easy to replicate this by taking a small diameter wood dowel and wrap a small piece of polishing cloth (I used a Tiger cloth) and running it along just the edge at a 45° angle to the CG body. This is after I've knocked down the edge sharpness a litte doing the same with 1200 grit wet/dry." I forgot to clarify in my last sentence that the same didn't mean using a dowel or any round object like a screwdriver with sandpaper to take down the edge a little prior to polishing. You need a more stable platform to do this task. I suggest cutting strips of the appropriate grit and securing them to a craft stick with double-sided carpet tape as pictured below. Bending wet/dry around a small dowel or similar can risk putting micro kinks in the paper as well as offer a very small surface area of contact. If you use the slightest bit of too much pressure, the sharp edge of the CG body can potentially start cutting through the sandpaper (the carpet tape offers a small amount of give). The goal is to stroke the edge (I know, don't go there) as evenly as possible and in one direction only, never back and forth (I said don't go there). Buy a box of craft sticks and you'll have a lifetime supply of a very handy tool. I make up a variety micro files with these on a regular basis. I lay out strips of 2" carpet tape and then lay down different size strips/different grits. After that I cut them out and stick them to the sticks. Not just for impromptu files... you can carve them down to tweezer-shaped points and use them with Rodico to place screws and tabs when installing movements (or picking them out of the movement). Lots of other uses as they will never scratch metal surfaces. Same concept as originally suggested to me by w0lf using a paint stirring stick for a broader file surface... in the case below, 320 grit/carpet tape for a perfect Pre-V CG brushed finish. I learned the hard way that you'll never get the crisp desired result applying a brushed finish holding the sandpaper with only your fingers.
-
EXACTLY! That's what keeps me in the game, that and this community!!!
-
Yeah I know what you mean. I've mentioned it in the past and some thought I was nutz (well...), so I thought I would post some pics to illustrate.
-
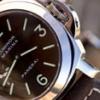
I started doing this mod with all of my brushed rep CG's as well as with the vintage versions found on 6152/1's. So far I haven't noticed this detail on Ti CG's and some of the 47mm subs. As you can see in the first pic (grabbed from an OP catalog), when the raw CG is getting milled and de-burred prior to having the final brushed finish applied, the sharp circumference edges have been very lightly chamfered (the same is done to the lever). When the brushed finish is applied, this chamfered/shiny edge is further reduced a little more, but is still present when it arrives at the AD and put on display. I've found it easy to replicate this by taking a small diameter wood dowel and wrap a small piece of polishing cloth (I used a Tiger cloth) and running it along just the edge at a 45° angle to the CG body. This is after I've knocked down the edge sharpness a litte doing the same with 1200 grit wet/dry. The reason you might not notice it right away with some gens or pics is because these edges get dulled or smudged with oils from your fingers while winding and setting the time, just like polished cases. A little clean up with a micro-fibre cloth and it's back. On your wrist you can see it with gens as a very thin highlight around the CG body edge and the edge of the lever tip when closed. The edge shininess looks exaggerated in the early stages of CG production... Easily visible when blown up but more subtle in-person. Once you notice the difference putting the modded rep CG next to one that isn't it's pretty obvious. Gives the rep CG's a more refined OEM look that gets it one step closer to 1:1. Notice too the polished edge of the lever visible at the tip when closed. The mod made a big difference on my grail place-holder...
-
My new grail place holder today...
-
I started this week with the 390, trying to ween myself off wearing the recently completed 201/A for a solid week... but I missed the king of OP logo dials. If I had silly money to spend, the gen version would be on my wrist 24/7. Couple of quick phone pics from today of the 201/A I'm keeping...
-
This should help... tried as best I could to duplicate same scenario for both.
-
Identical dials from the same batch. Combination of iPhone optics and no AR. Also the pics were taken with the watches resting on a bar stool with a domed seat cushion so they are slightly angled from each other. If I had taken side by sides on a flat surface you would see no difference. You can see in this pic, the dial on the right looks lighter, the one on the left blacker. The glare on the watch crystal on the right is greater and lightens the dial color and makes the indices look a tad fatter, but in reality it's just as black with identical indices as the watch on the left which is angled just enough to not have any glare hitting the crystal and washing out the dial. Plus the watch on the right is at the edge of the pic where iPhone lens distortion starts getting ugly.
-
Thanks D! Now they're both finished...
-
Thanks! w0lf modded 111J case set (includes DSN newborn crown and tube, double screw lug bars and polished rehaut) Fatty CG (small run project) FGD dial and hands Jakob case back Swiss 6497-1 C3 crystal w0lf did a great job reshaping the case set to Pre-V spec, incorporating the little subtleties that set the case apart from current Luminors. Everything went together nicely, no surprises
-
I was working on 2 builds at the same time (this one goes to a friend), just need to fine-tune the lever so it closes with the right snap. The movement is the same Swiss movement that came with the gen 318 (same plate finish and same ETA-choc anti-shock system). I'm addicted to 201/A's... this one is #5 going back to my first when I joined RWG in 2008 Definitely no AR on the C3 crystal...
-
I think I might actually be finished... 201/A is DONE
projectologist replied to projectologist's topic in The Panerai Area
Thanks guys for all of the nice words Here's a little more regarding parts... • w0lf case with drilled out lugs and correct Pre-V details • DSN newborn Pre-V crown and tube • BigMatt C3 crystal • Jakkob 201/A caseback • FGD dial and hands • Same ETA movement version (with eta-choc anti-shock system) used in the gen 318 FGD dial after coating with Tamiya TS-79... awesome recessed indices/numbers... Before and after CG... -
Yet another 390 pictorial - with a Ti twist
projectologist replied to z3k0's topic in The Panerai Area
Totally agree! I couldn't think of which model that was. Also the feel of the 351 with it's Ti case, brown dial and gold hands. -
If you mean the rep... probably not. In some instances I've seen the price increase a little over time, but usually they remain the same for a pretty long time.
-
Just had the lever left to do and getting the right snap when closed proved more challenging than anticipated. The spring in DSN's newborn crown is way too stiff, so it took more trial fits than I've ever needed before doing this mod. But it's all good now and I is very happy with the results. Some quick phone pics for now, will save the formal pics for when I have the other Pre-V build done that I'm doing for another member. Same parts list, should be an interesting pair Bigtime thanks to w0lf for the Pre-V project case he has offered to the community. And for all of the answers to my endless stream of questions like howTF am I supposed to make this fit and get the right finish or WTF is it suppose to look like??? Thanks to SERGEANT_AT_ARMS for the FGD hands and lume application. Thanks to FGD for the awesome dial and Tamiya for the perfect clear coat Matt/BigCrown C3 crystal, sits just right with a near perfect side profile. No AR and xtal clear. Thanks to the maniac that produced a small batch of these killer CG's. Total PITA to finish and I loved every minute of it Jakob case back, 'nuf said Total parts list and all mods when I post detailed pics of both watches. Here's the chain saw blade sharpener w0lf suggested for shaping curve shapes (highly recommended!!!). I had quite a bit of lever tip to remove before it would close. Finally on the wrist. I like where w0lf set the crown tube, spacing is just right... Love the polished rehaut... I almost deleted this next pic from my phone as it wasn't as sharp as I like plus the lighting sucked. But when I saw how it had a similar look to the gen pics I have in my reference folder, I thought I'd include it here for comparison. Why is it you never notice the dust until you see your pics??? Project... Gen... More gen pics I used for reference, focusing on the CG and lever pin...
-
Solid builds, good parts list and they have a nice "gen like" feel. I really like the group shots
-
Almost done... my 5218-201/A finally comes together
projectologist replied to projectologist's topic in The Panerai Area
Yeah I make myself crazy trying to take a pic that captures what I see in-person. I really like your pics on the granite counter Thanks!... Dirk has this particular hide back in stock after about 10 yrs of unavailability. Identical strap that was offered as a choice with the 201/A back in the day. Slightly more green than this pic... -
Almost done... my 5218-201/A finally comes together
projectologist replied to projectologist's topic in The Panerai Area
Not a member?.... now you know how I feel everytime I look at the awesome watches in your signature -
Almost done... my 5218-201/A finally comes together
projectologist replied to projectologist's topic in The Panerai Area
Thanks! BTW, my sources tell me that day isn't far off -
Almost done... my 5218-201/A finally comes together
projectologist replied to projectologist's topic in The Panerai Area
Seeing your beautiful 201/A when you posted it awhile back is what kept me going on this one... thank you for the inspiration! -
After approximately 4 months of collecting parts and assembly, I finally got to wear it today for a shake down run. Just need to fit the CG lever where it engages the crown. Plus maybe put a little more bevel on the crown, then I'm done Couple of phone pics from this afternoon, indoor and outdoor light.. more when it's done.
-
Red/white sticker is on the gen.
-
A couple... the 56 and 117