When you buy through links on our site, we may earn an affiliate commission.
Leaderboard


Popular Content
Showing content with the highest reputation on 02/27/2018 in all areas
-
LOL.... LOOOOOOL!!!!2 points
-
After a couple of great Dutch/Belgium GTG's it's time for another GTG! Sunday April 22th 2018 This time we planned it a bit different as before. We are going to split up the GTG in two parts. Part 1: For those who are interested in the watchfair they can go to the fair in the morning. Part 2: For those who want to skip the fair and meet us the lunchroom for some drinks, they are welcome over there*. Starting time around 14:00. This way the members who want to visit the watchfair have anough time to see everything. * We communicate the location of the lunchroom to those who join us, for safety reasons. The Dutch forum (www.RHForum.club) will pay for the first scale of "Bittergarnituur"! Location watchfair: Meidoornkade 24, postcode 3992 AE Houten (Utrecht) Location lunchroom: We'll communicate the location to the members who join us. For those who joined before, it's the same location as the other GTG's. Hopefully we will see you there! Please let me know if you are joining1 point
-
Straps Monster today... Sent from my iPhone using Tapatalk Pro1 point
-
Never noticed your question, it was built by @interaktiv This one built by @kilowattore1 point
-
Yeah, my plan is to start with the "least destructive" options first, and then if that doesn't work, I'll pull out the sledge and the MIG. And maybe the chainsaw. [emoji6] Sent from my SM-G930V using Tapatalk1 point
-
Erm Freddie you’re talking about the watch right..lol Sent from my iPhone using Tapatalk1 point
-
Quite understand. It's good to see that some people still have a sense of humour in this dangerous world. I always start off from the point of view that everything can get worse and usually does!! Good luck LifeTrekker. Hope it works.1 point
-
Well I hope neither of them turns out to be Ken's proverbial left nut1 point
-
Step away from the watch website. Lay down your credit card. It's okay... just come over here to the relaxing music. Deep breaths... calm deep breaths. You don't want to throw out your buying arm in the first week!1 point
-
Thanks guys! Already bought my first 2 reps tonight! Sent from my SM-N950U using Tapatalk1 point
-
@Legend, I was thinking more along the lines of Freddie holding two different things and seeing which are the fakes. *cough*1 point
-
TC at night1 point
-
It lives among its similarly geriatric brethren, aged 74, 60, 55 and 46 ... all gen. But I treat them a little better now... Heck, 50 years is still wet behind the ears. Ive got one that's 106 years old and a pocket watch that turns 134 this year. Still run great too.1 point
-
SOLD but enough hide for one more custom. Fresh out of the shop a nice super soft Mustard Suede with Navy Blue stitch. This is all suede. 130/75, 24/24 SOLD - $65 shipped Canada/USA (Overseas add $12) Pmt via PP1 point
-
Hi. That's bad luck. Just from an engineering point of view you might try heating up the bracelet link locally to the hole as fast as poss before the heat can get right through to the broken pin. This should expand the hole in the link quickly (faster than the pin) and might just let you be able to pull the broken part free with a good pair of tweezers. Might take a couple of tries, but if you can move it out enough to grab with a good pair of sharp long nose pliers then you have it. This is fairly standard practice when trying to get siezed or stuck car parts, such as bushes, out when experiencing the same problem. Repeated heating and colling with a good penetrating oil may also help. It also of course works on inserts which have to be heat fitted in to a tight hole in an engineering component. Component is heated up first, then the insert is press fitted into the now larger hole. When cool its a very tight fit. Good luck.1 point
-
Enviado desde mi iPhone utilizando Tapatalk1 point
-
Welded lug on Simoma chocolate Bruno Sent from my SM-N920P using Tapatalk1 point
-
1 point
-
Firstly, a welcome to you to RWG and next, good tastes in watches. With the quality of reps getting better, I really think that buying the genuine is unnecessary. Of course, without the genuine model, the replica will not exist in the first place and it is important that we acknowledge and respect that.1 point
-
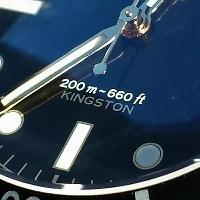
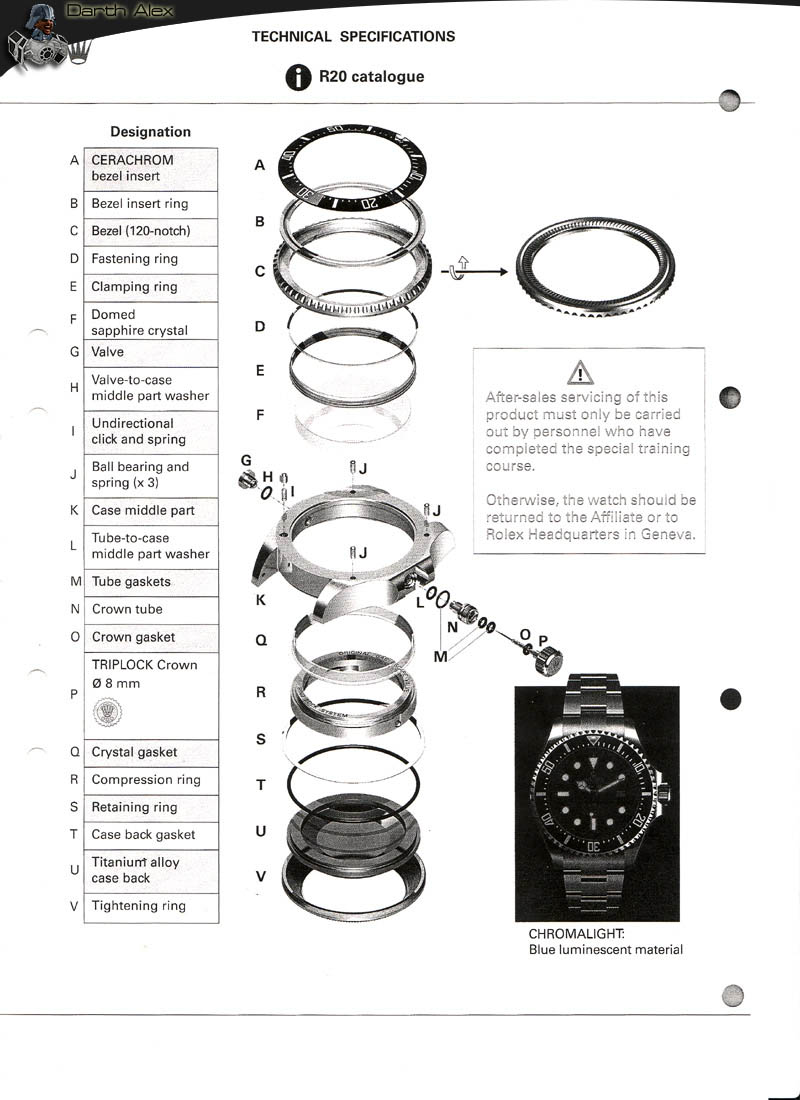
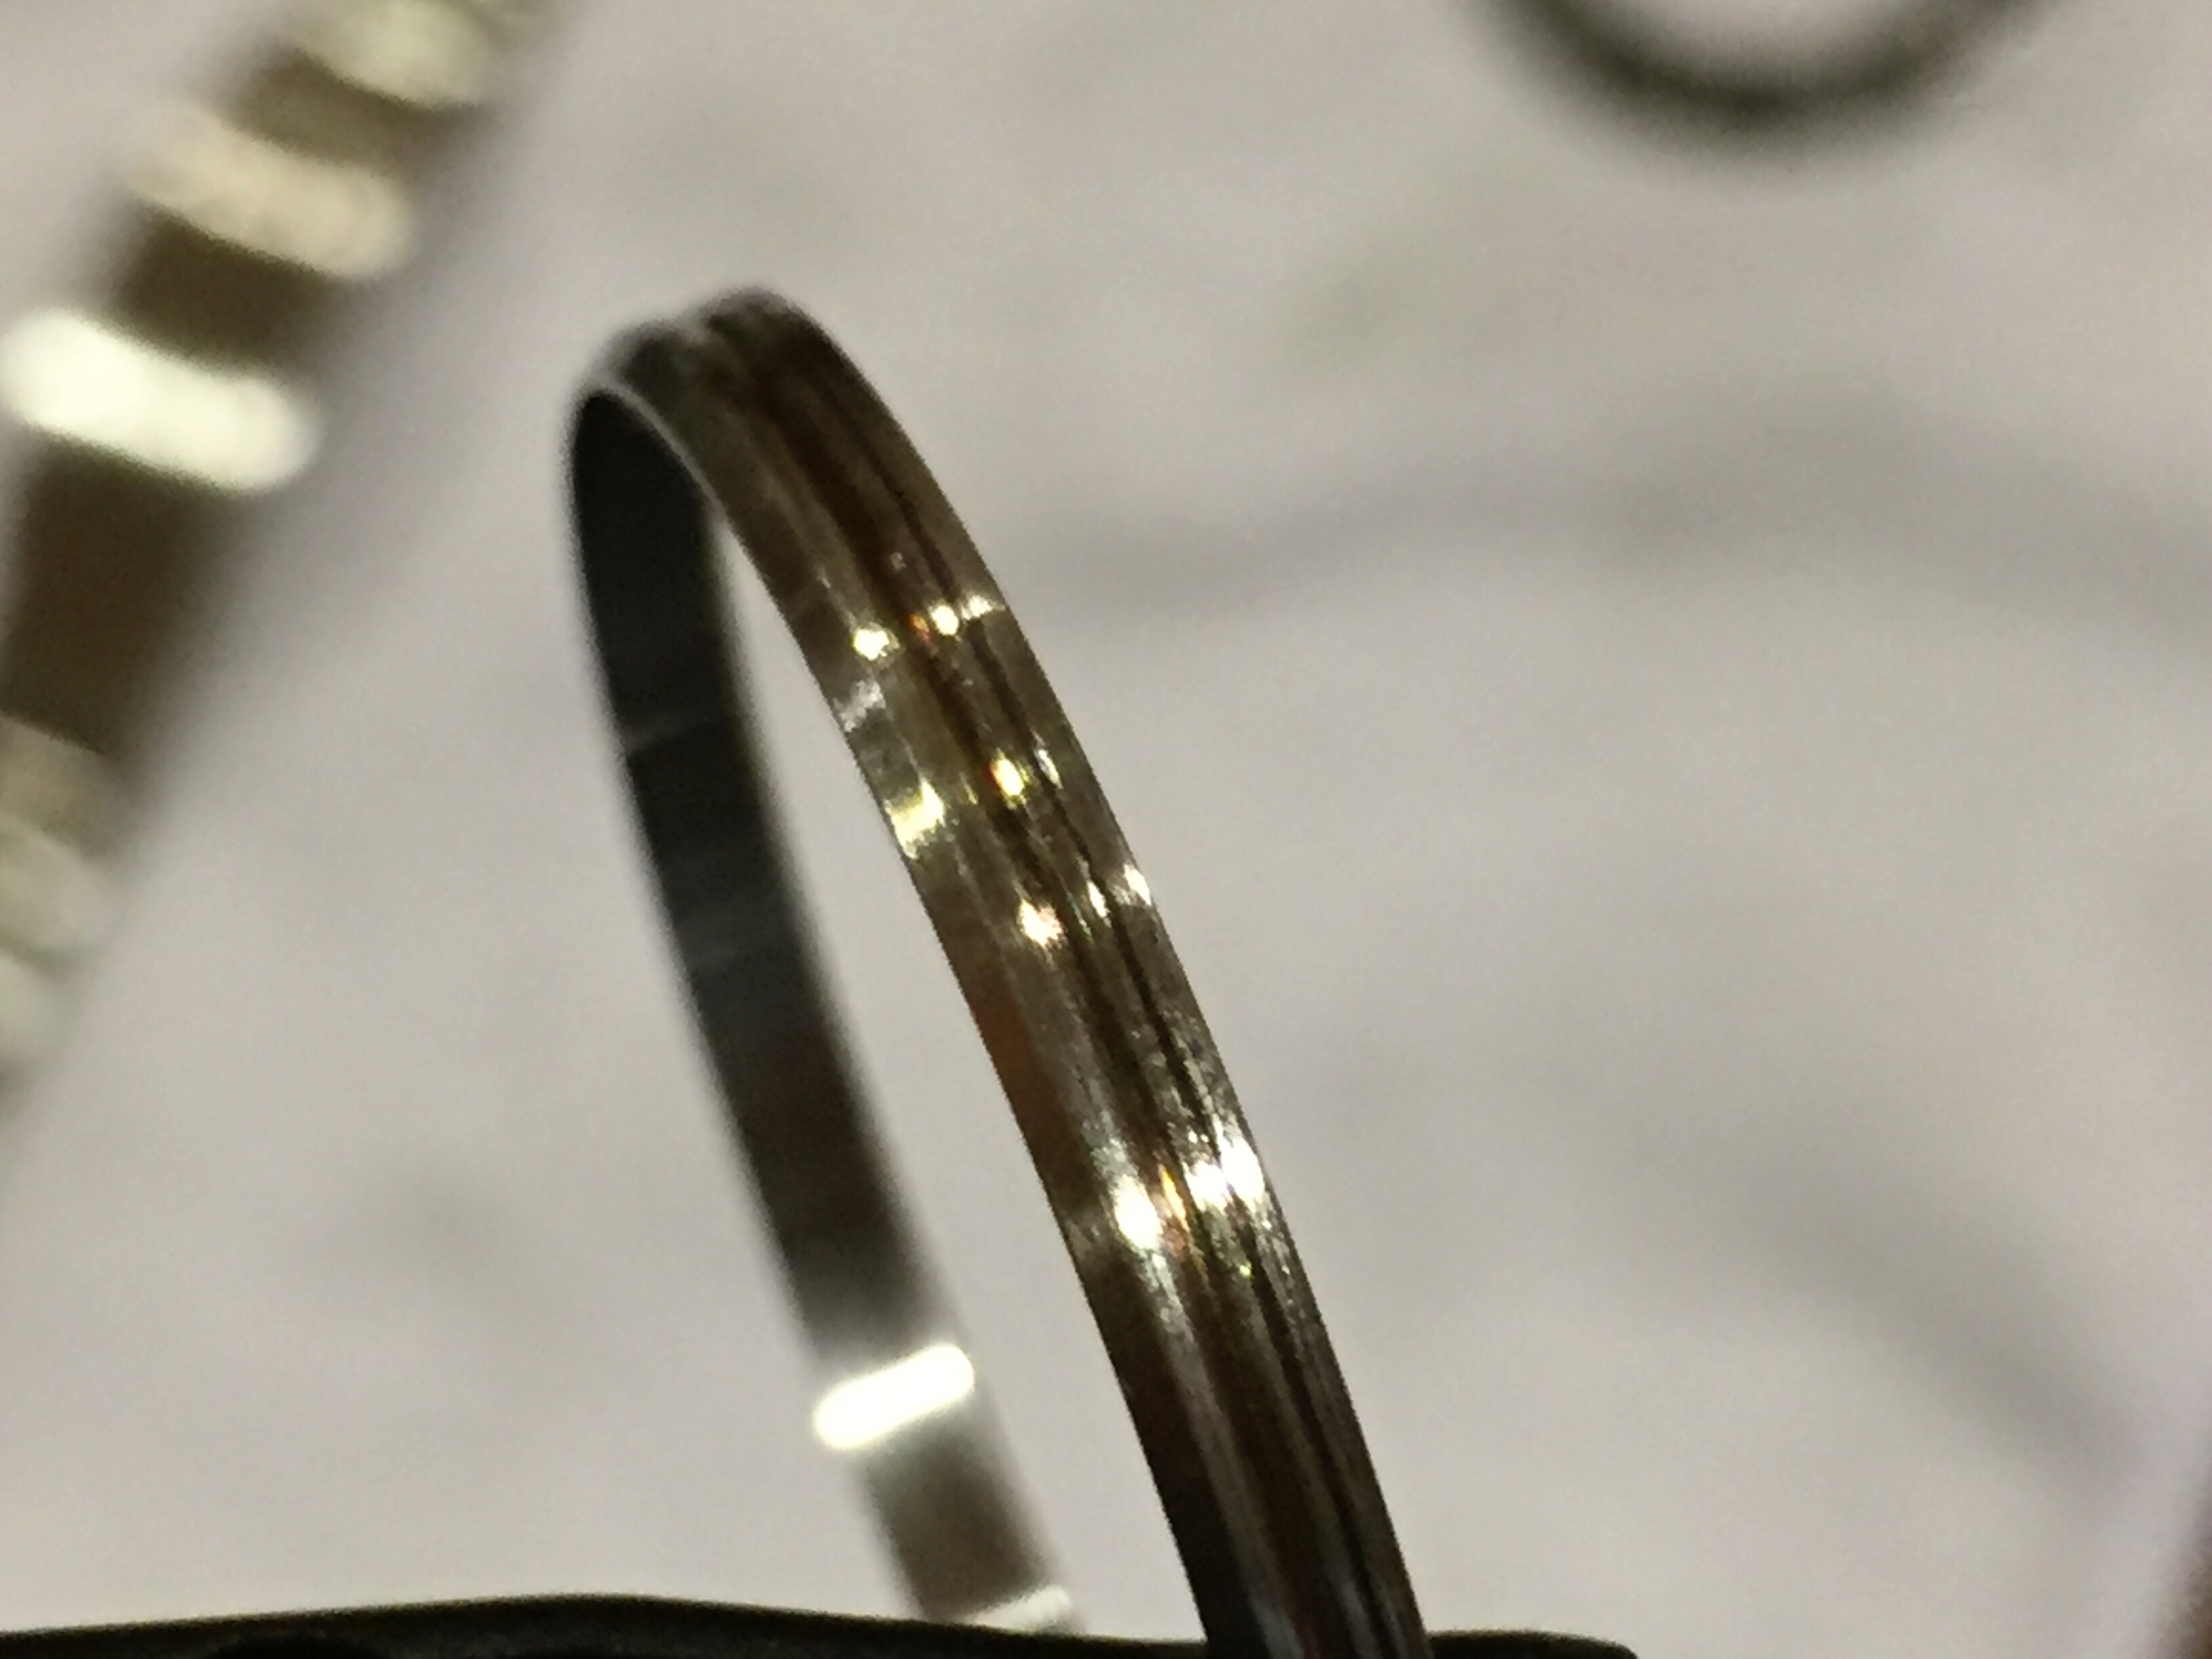
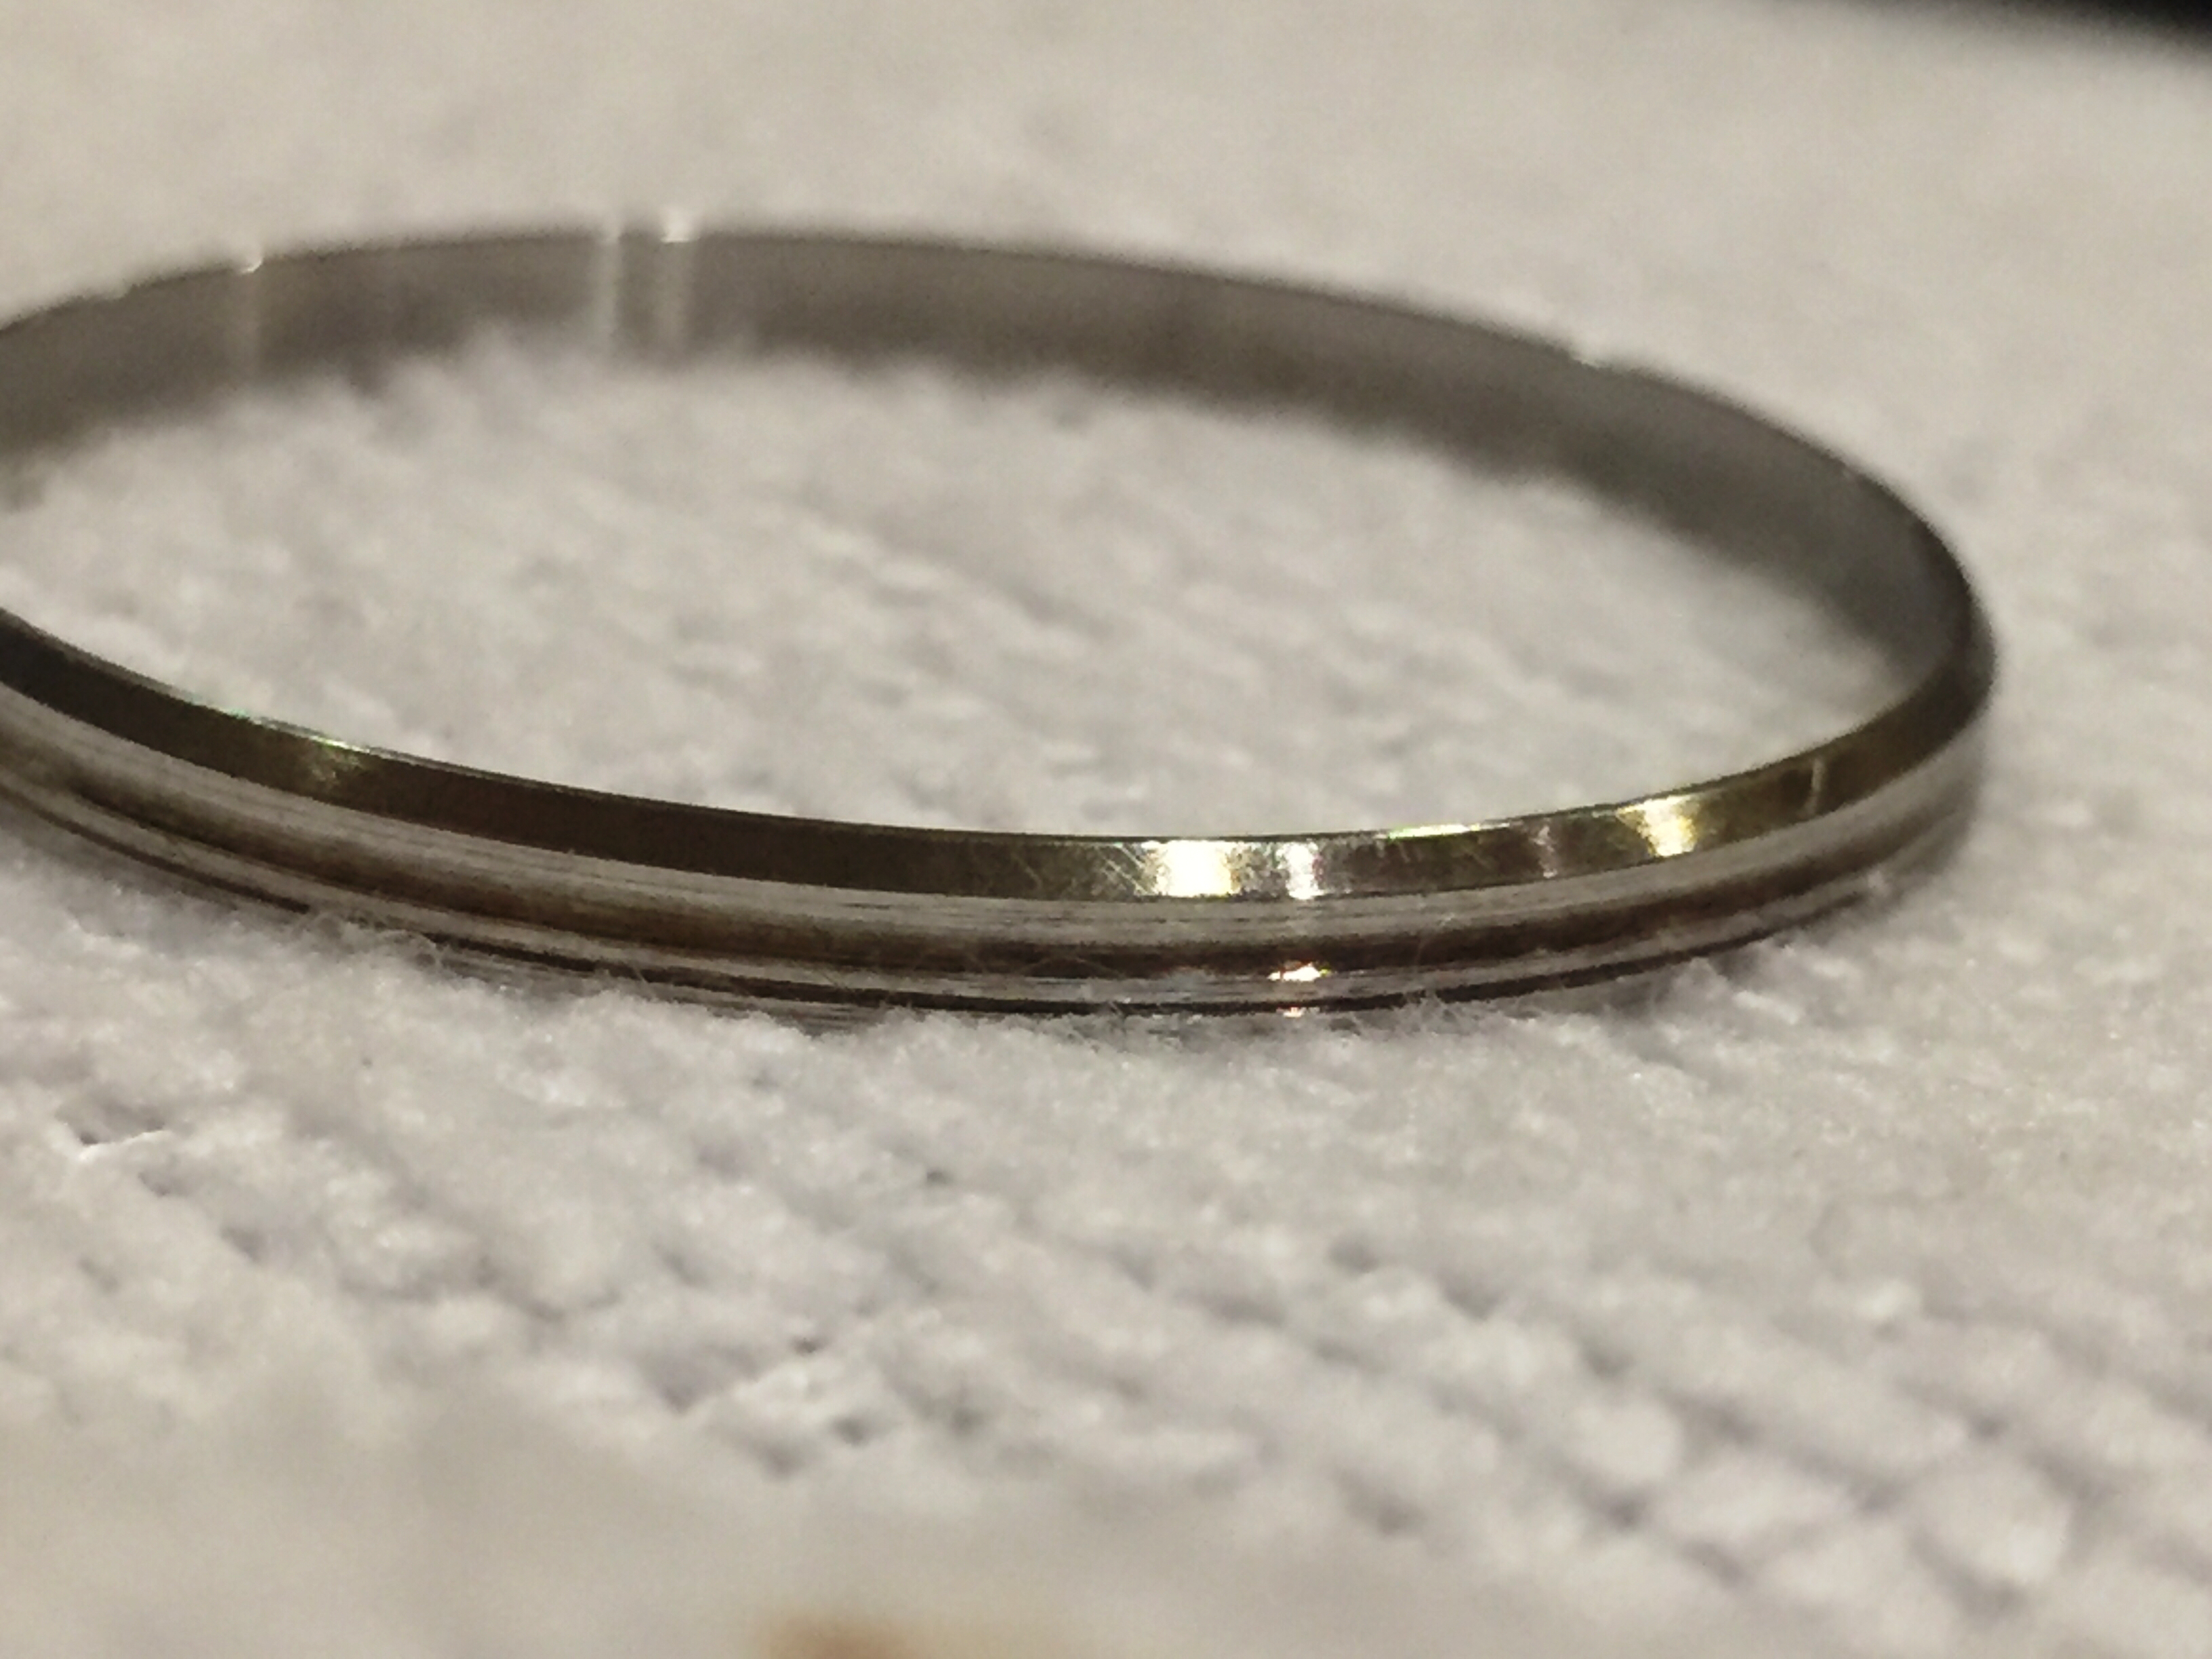
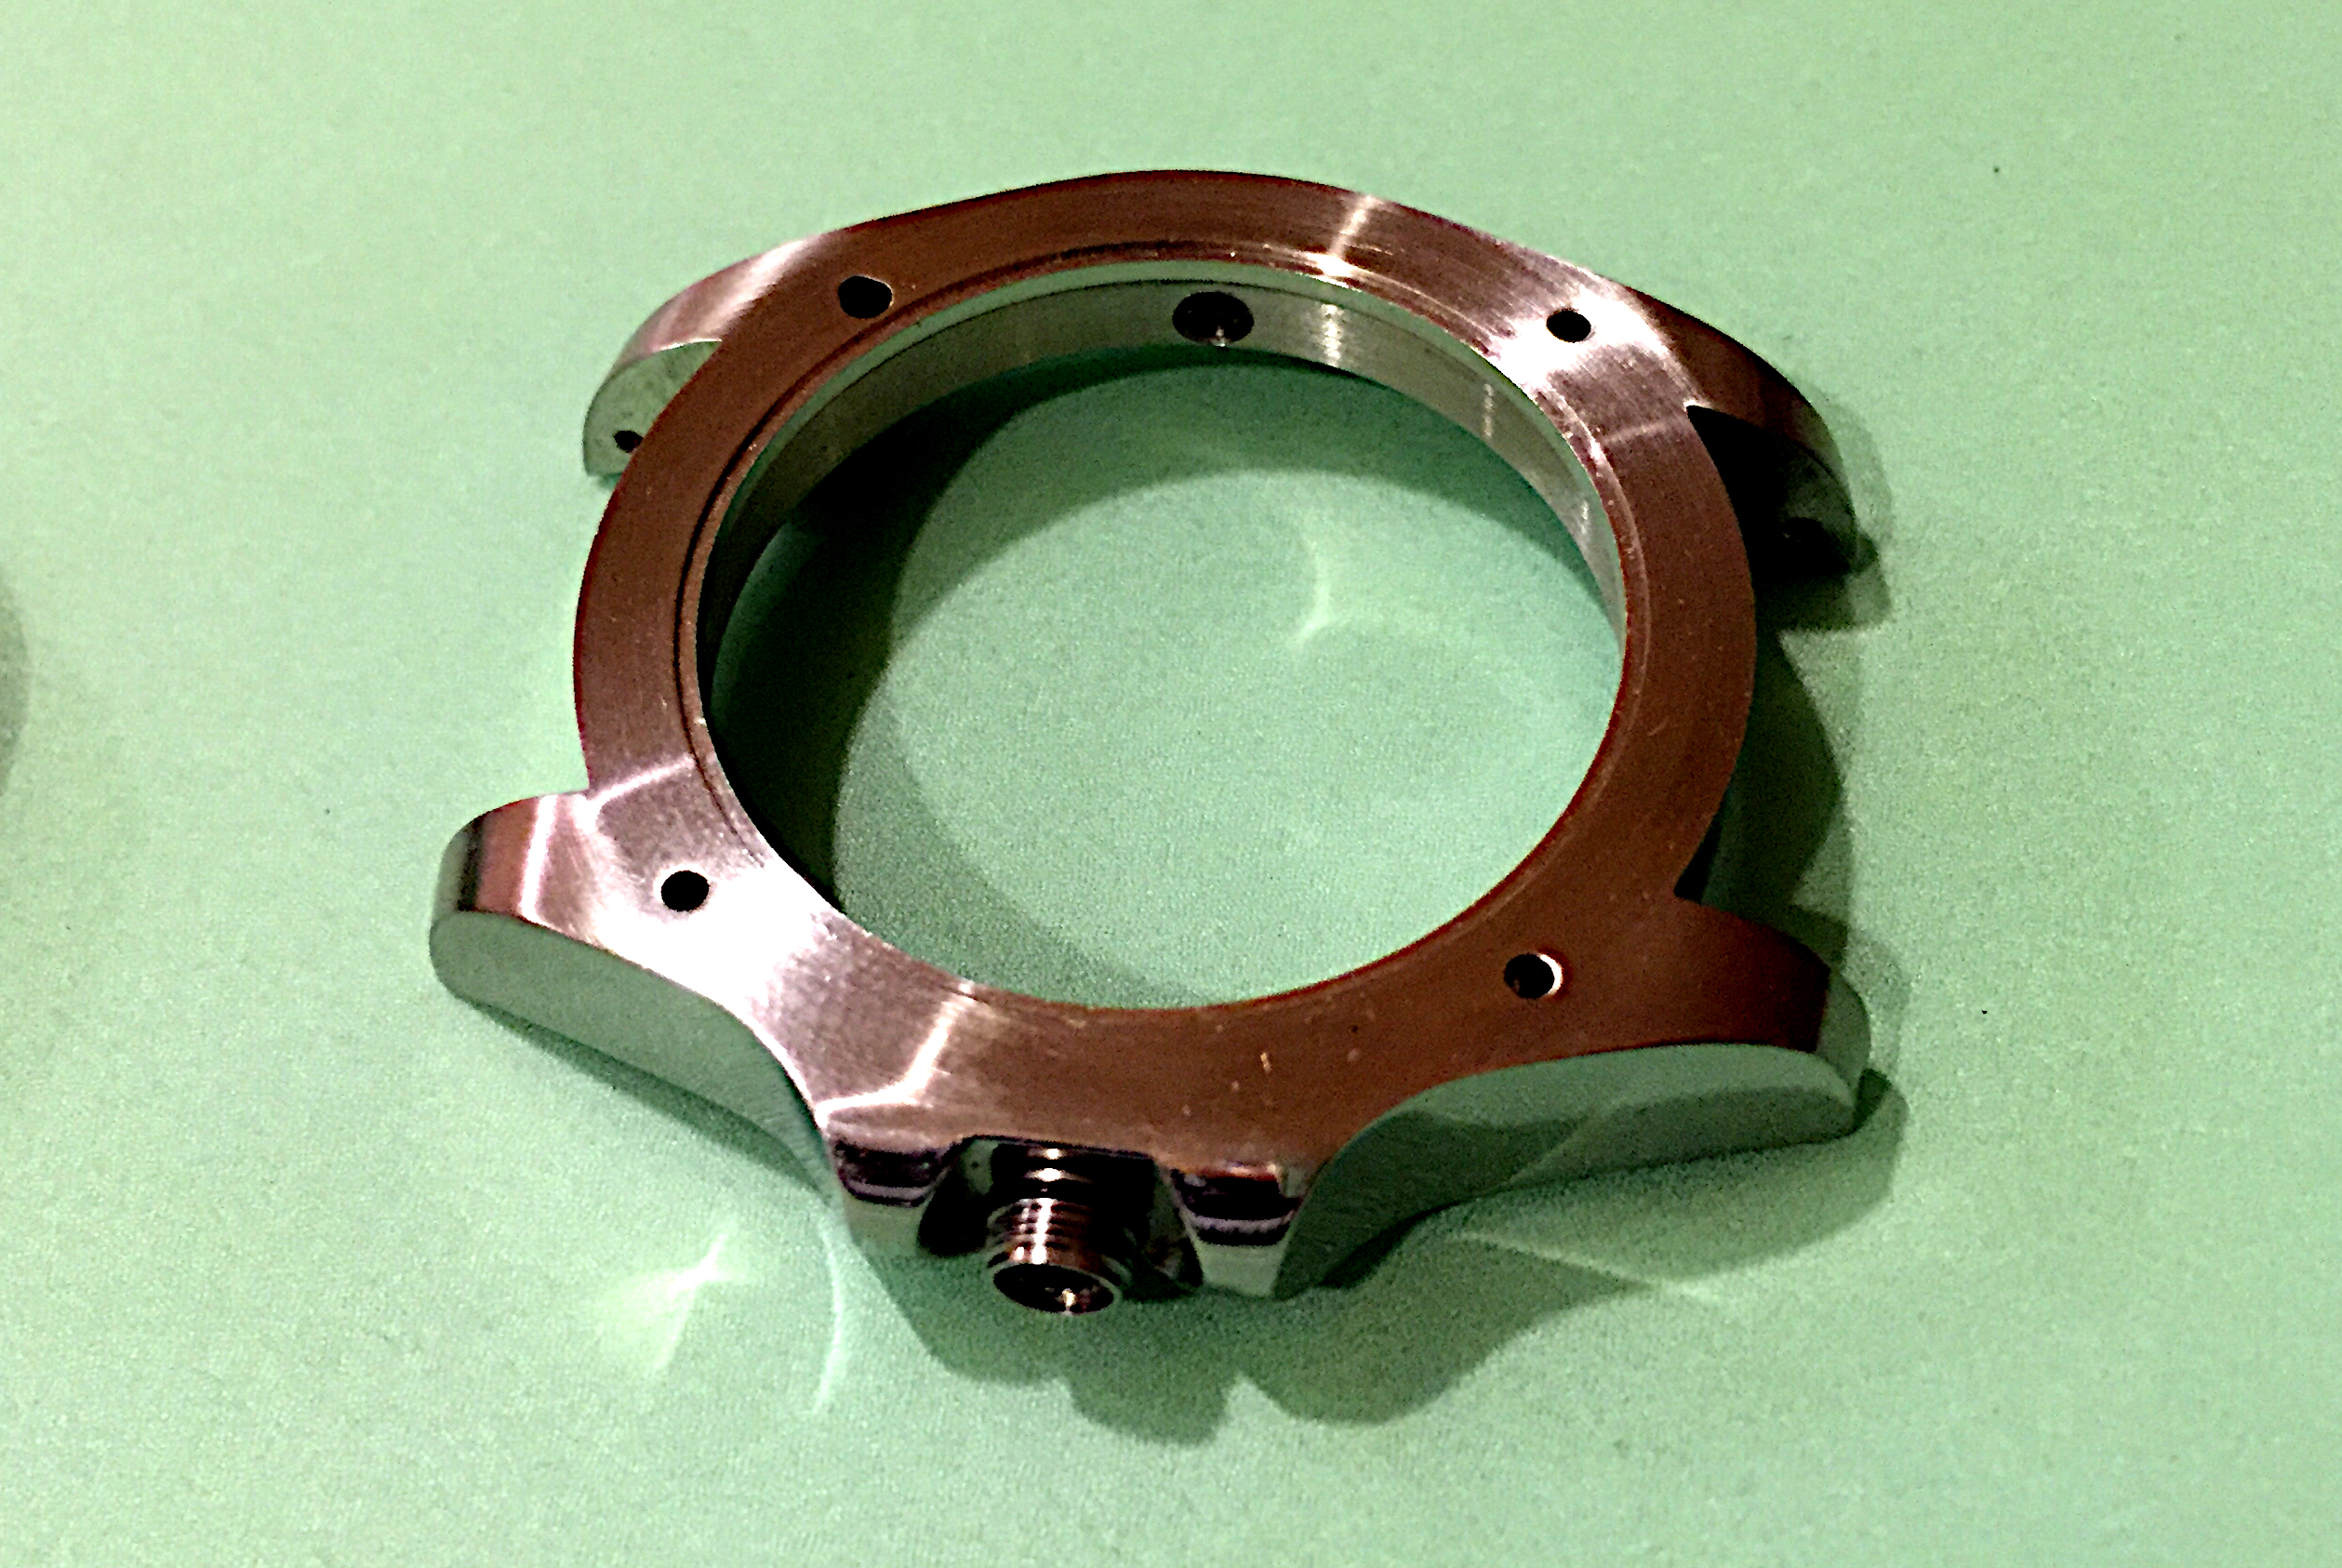
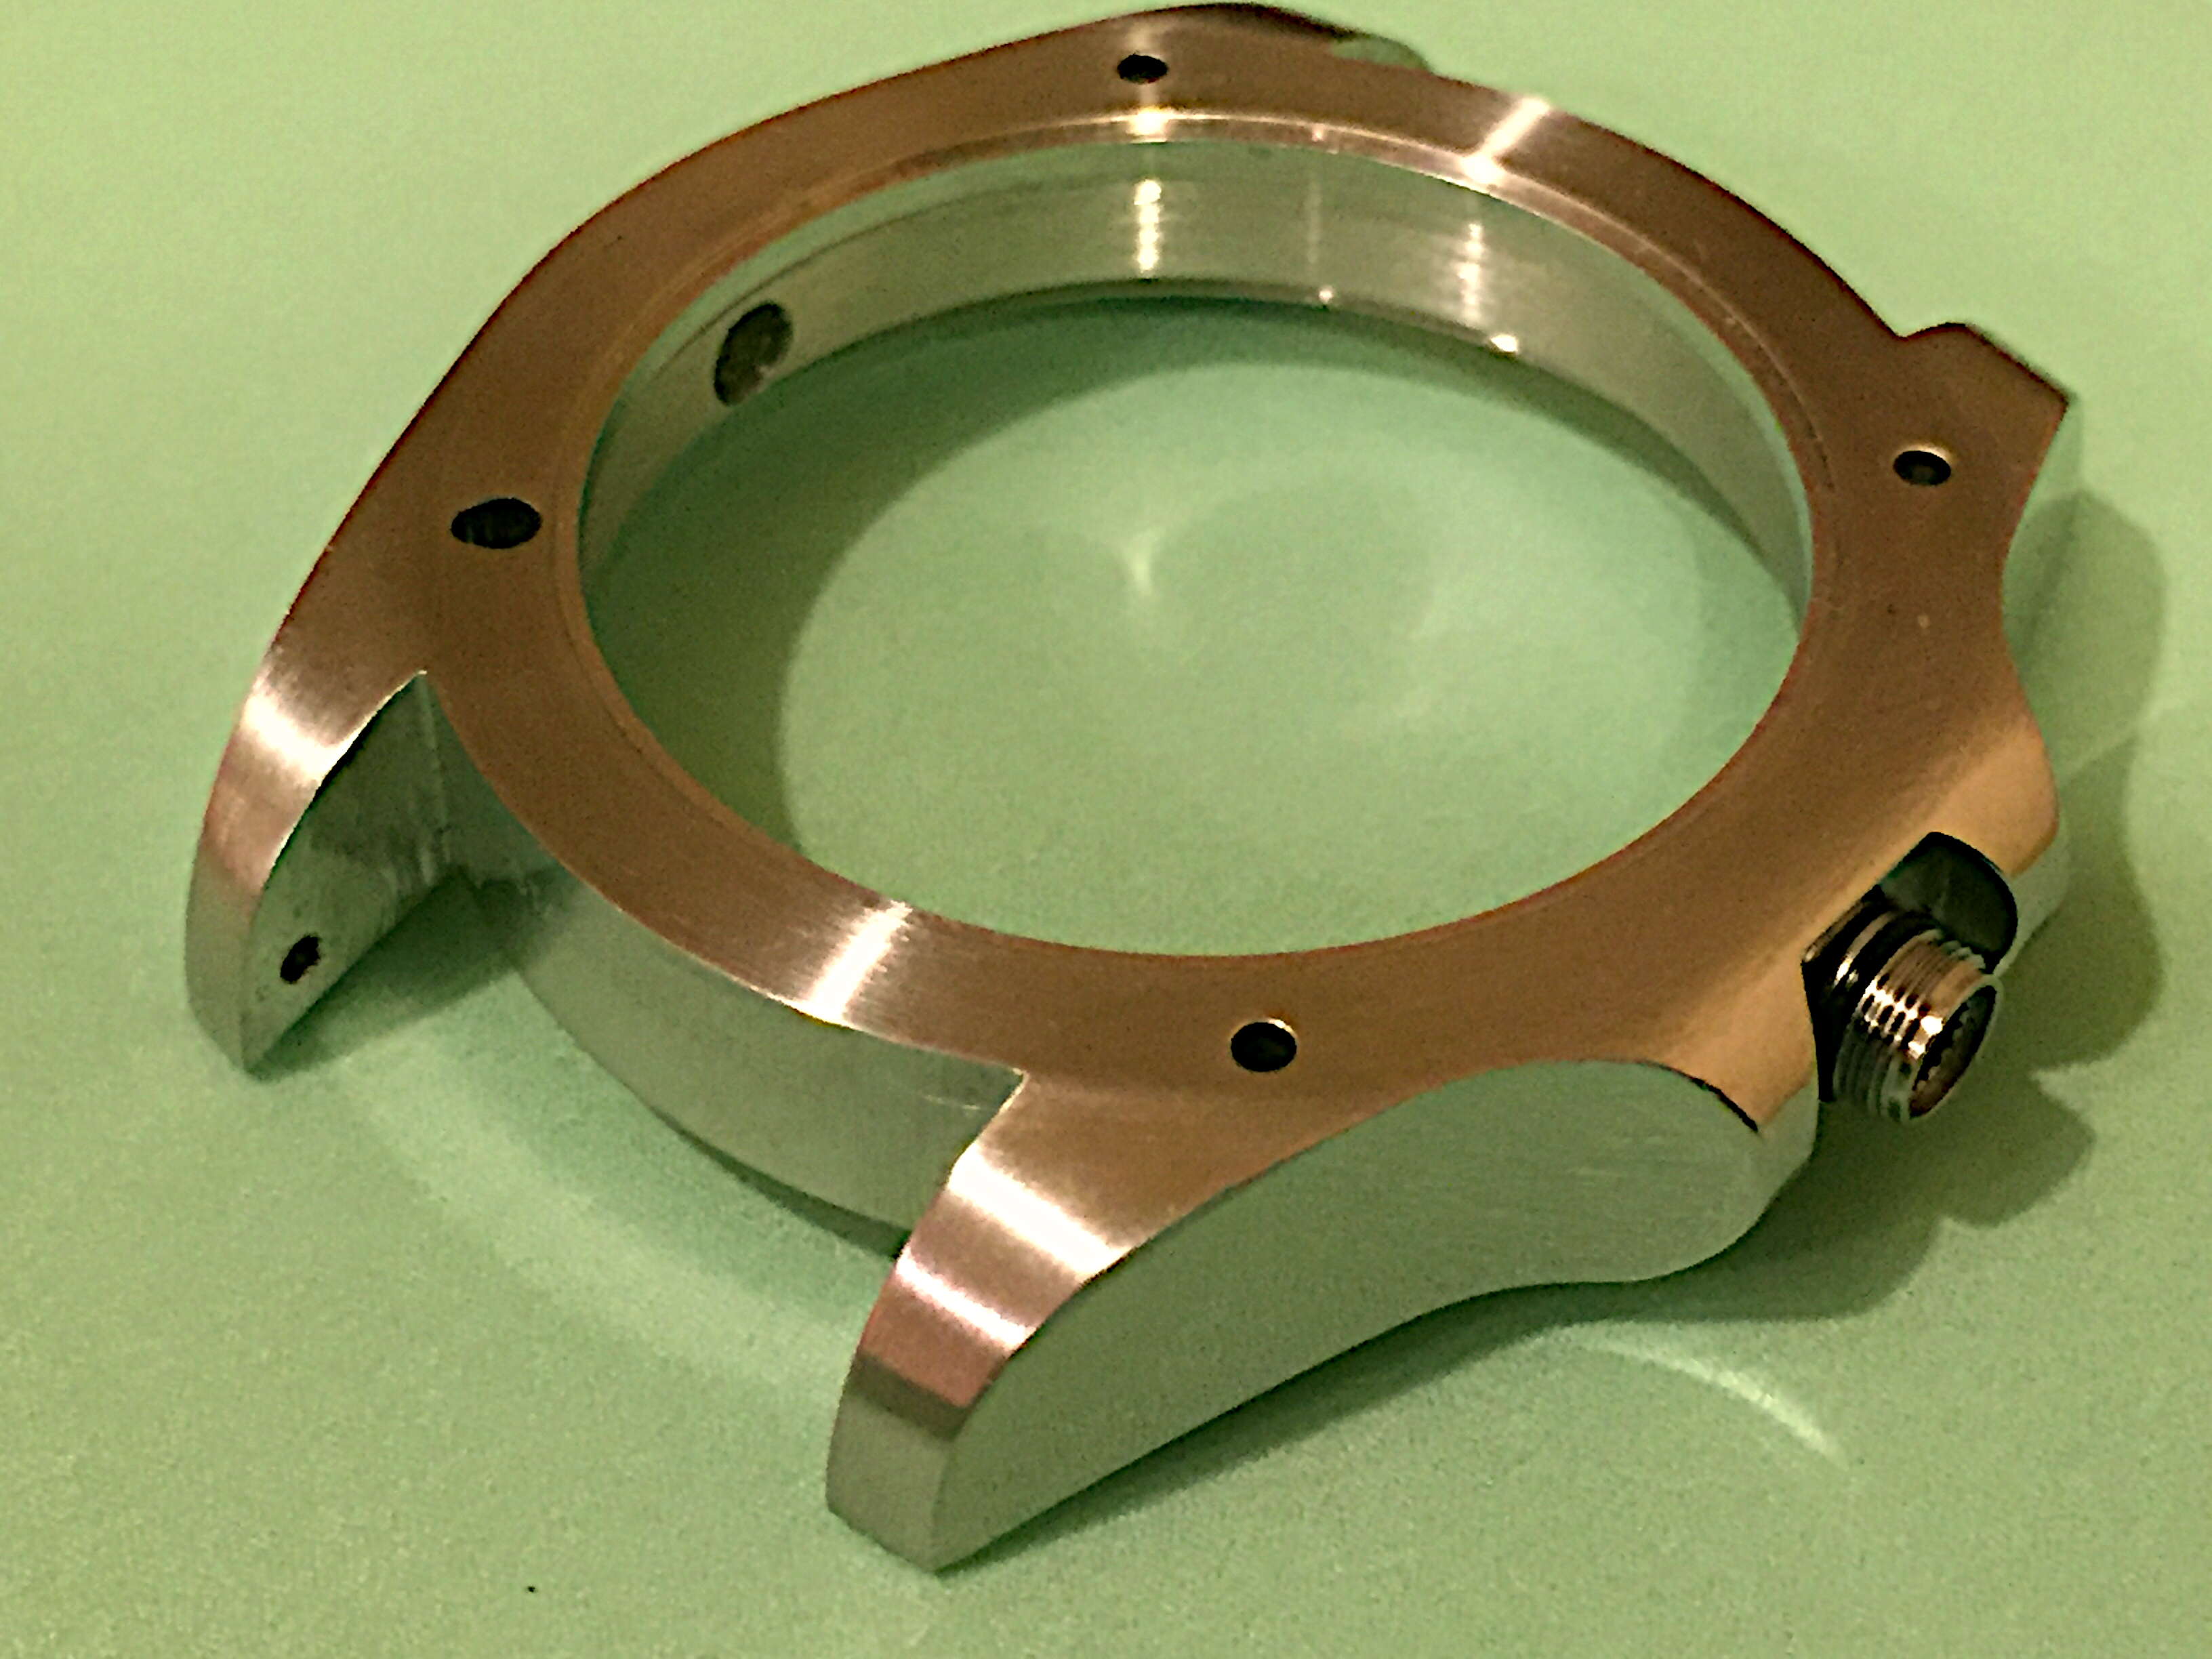
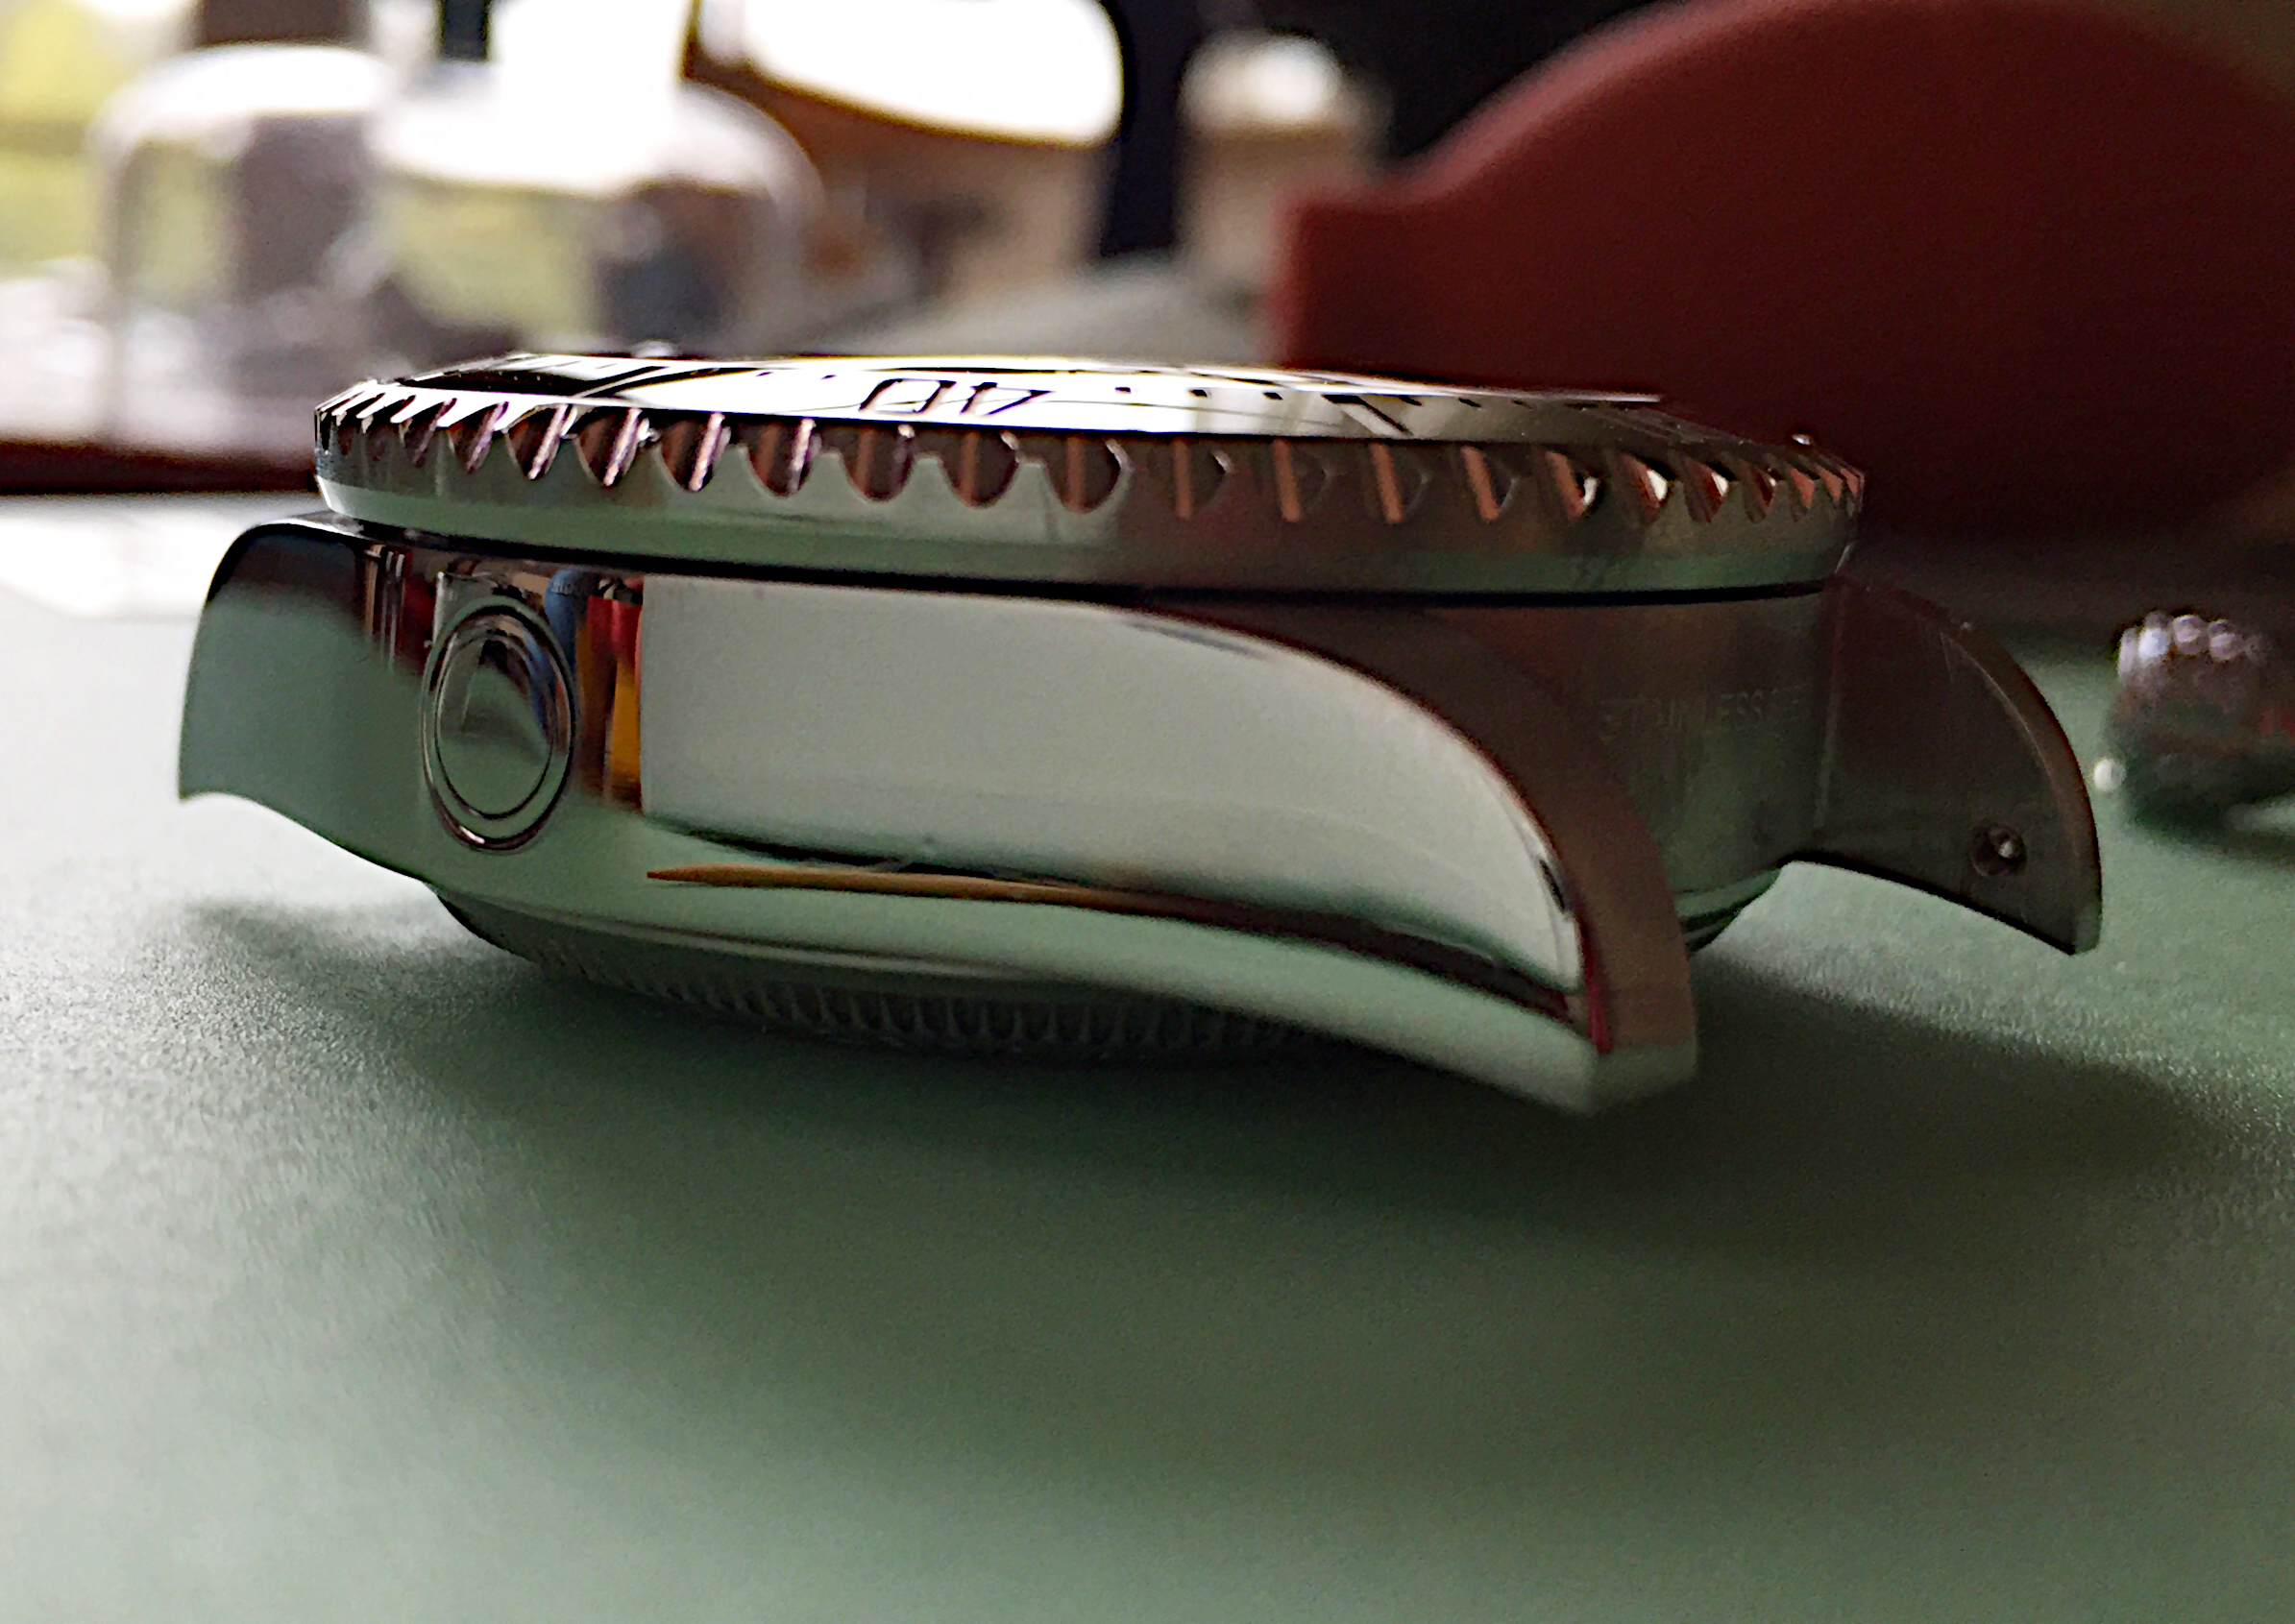
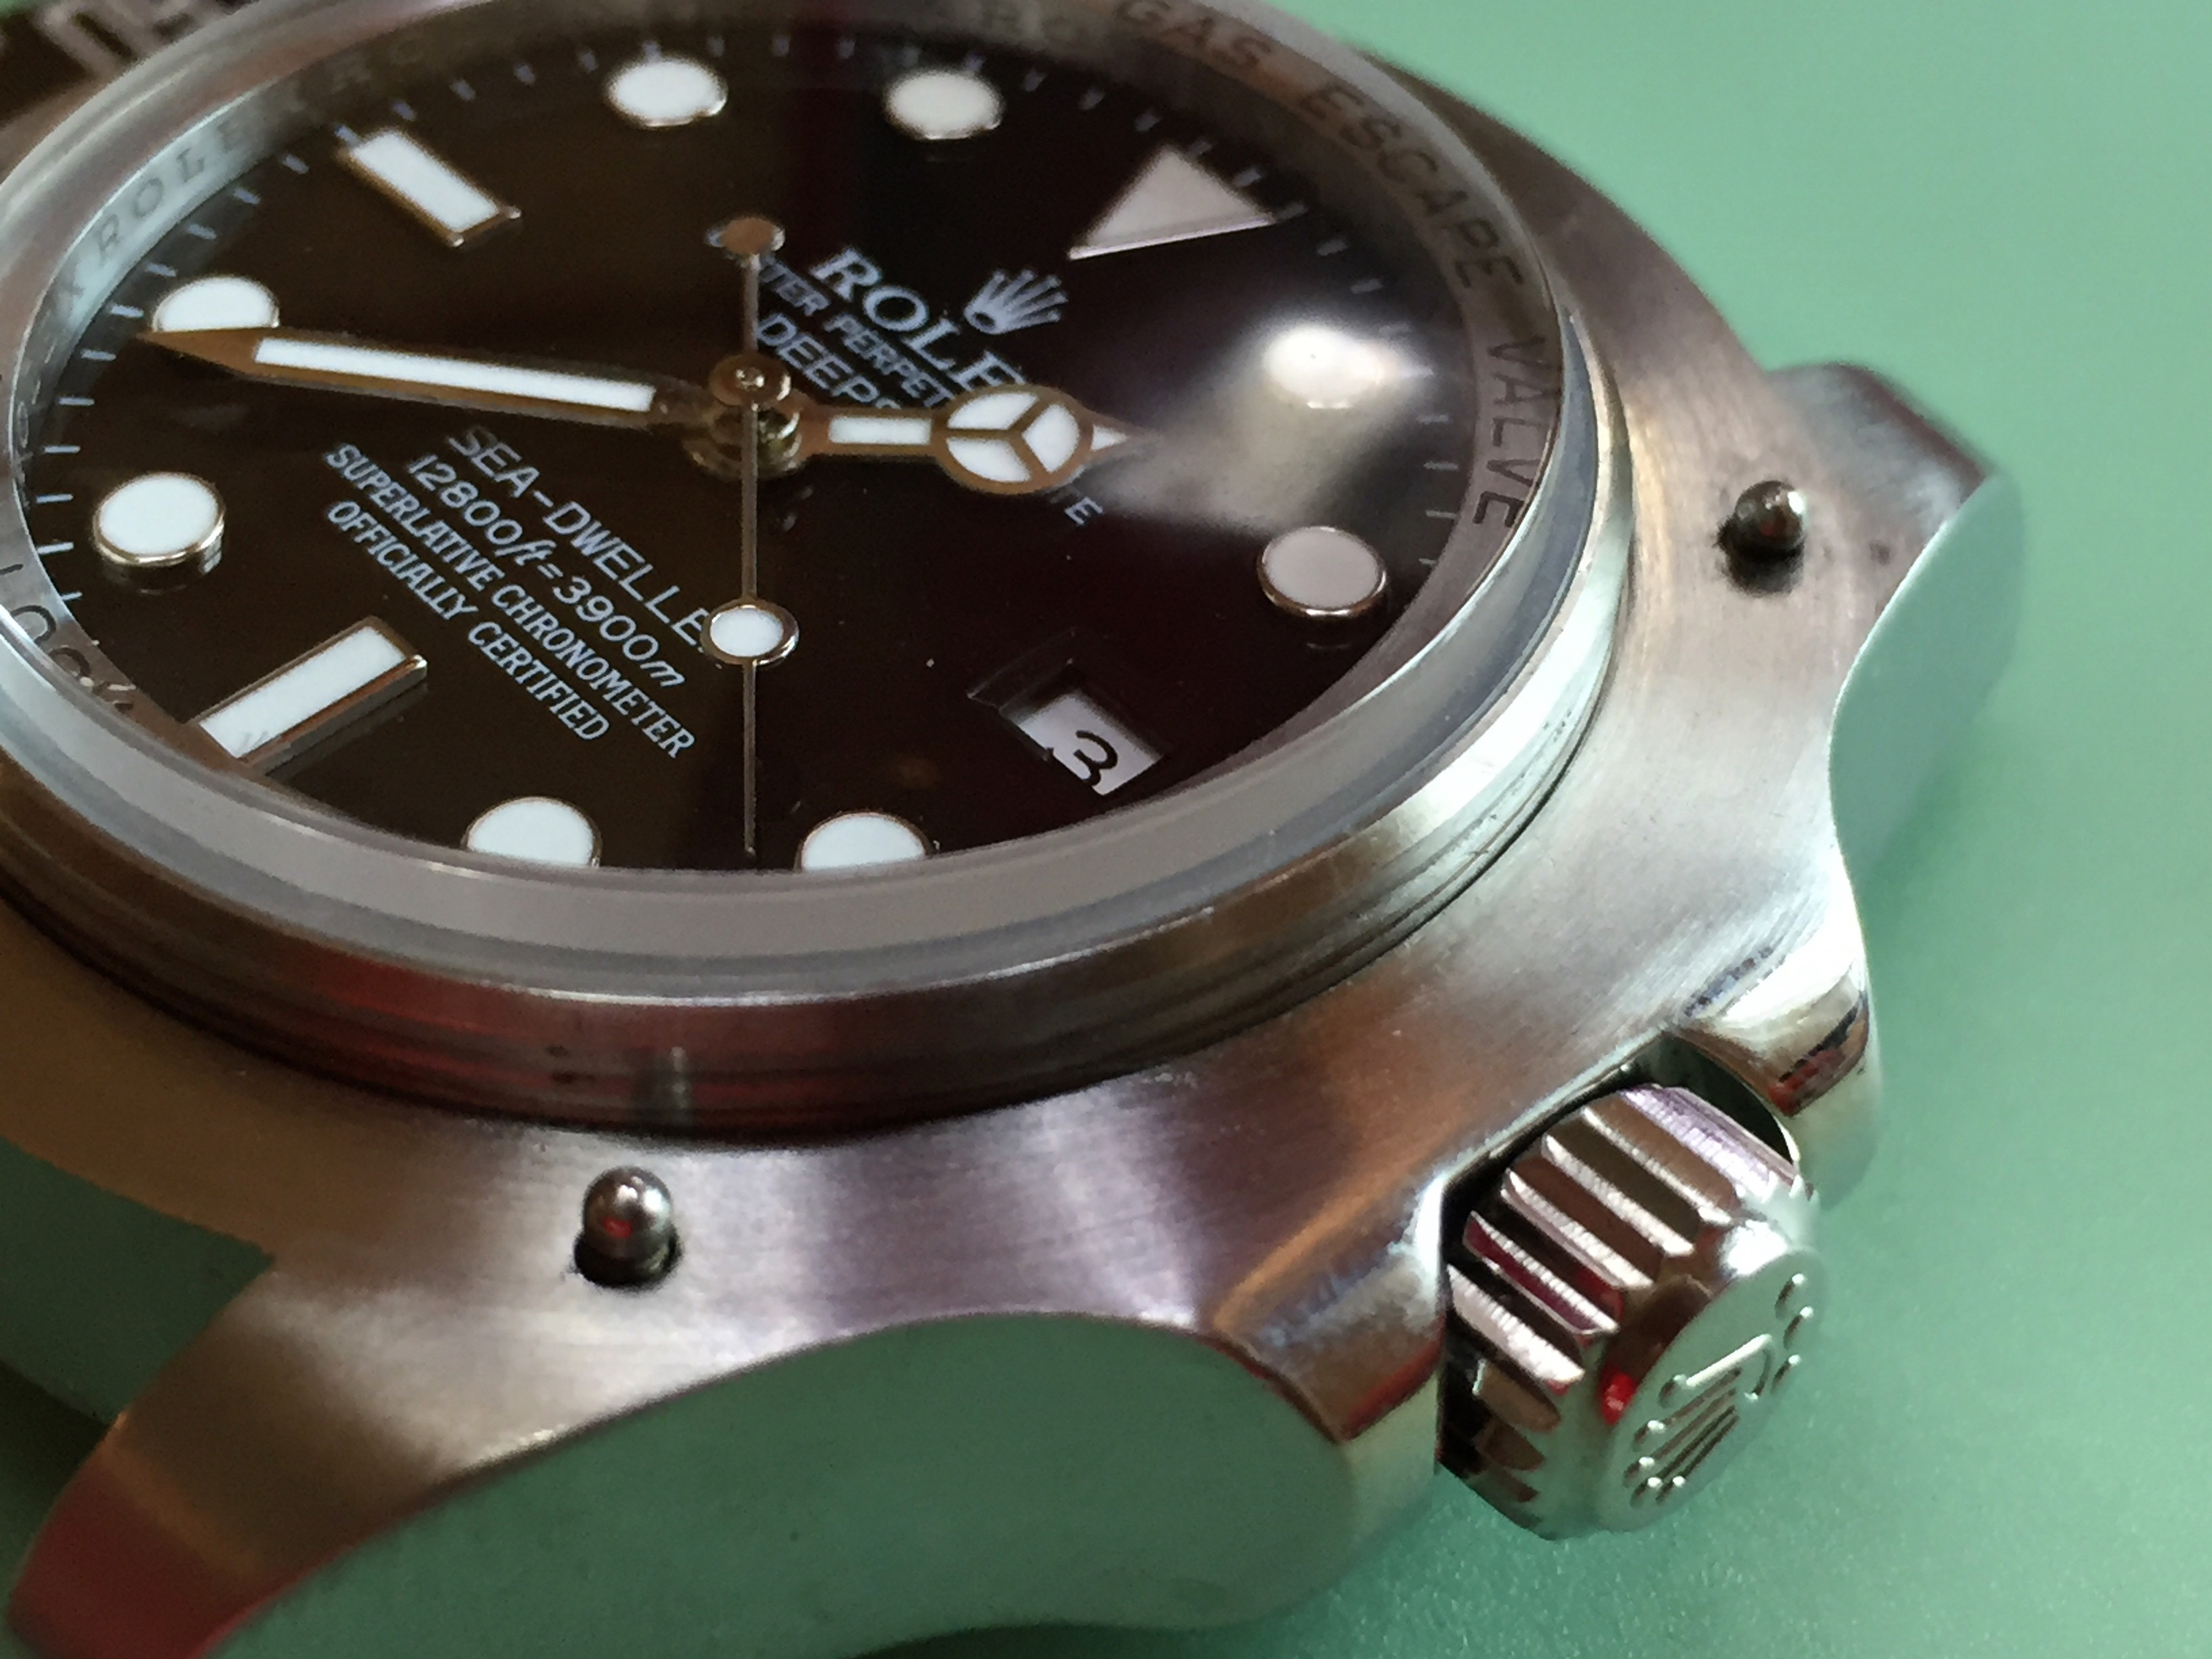
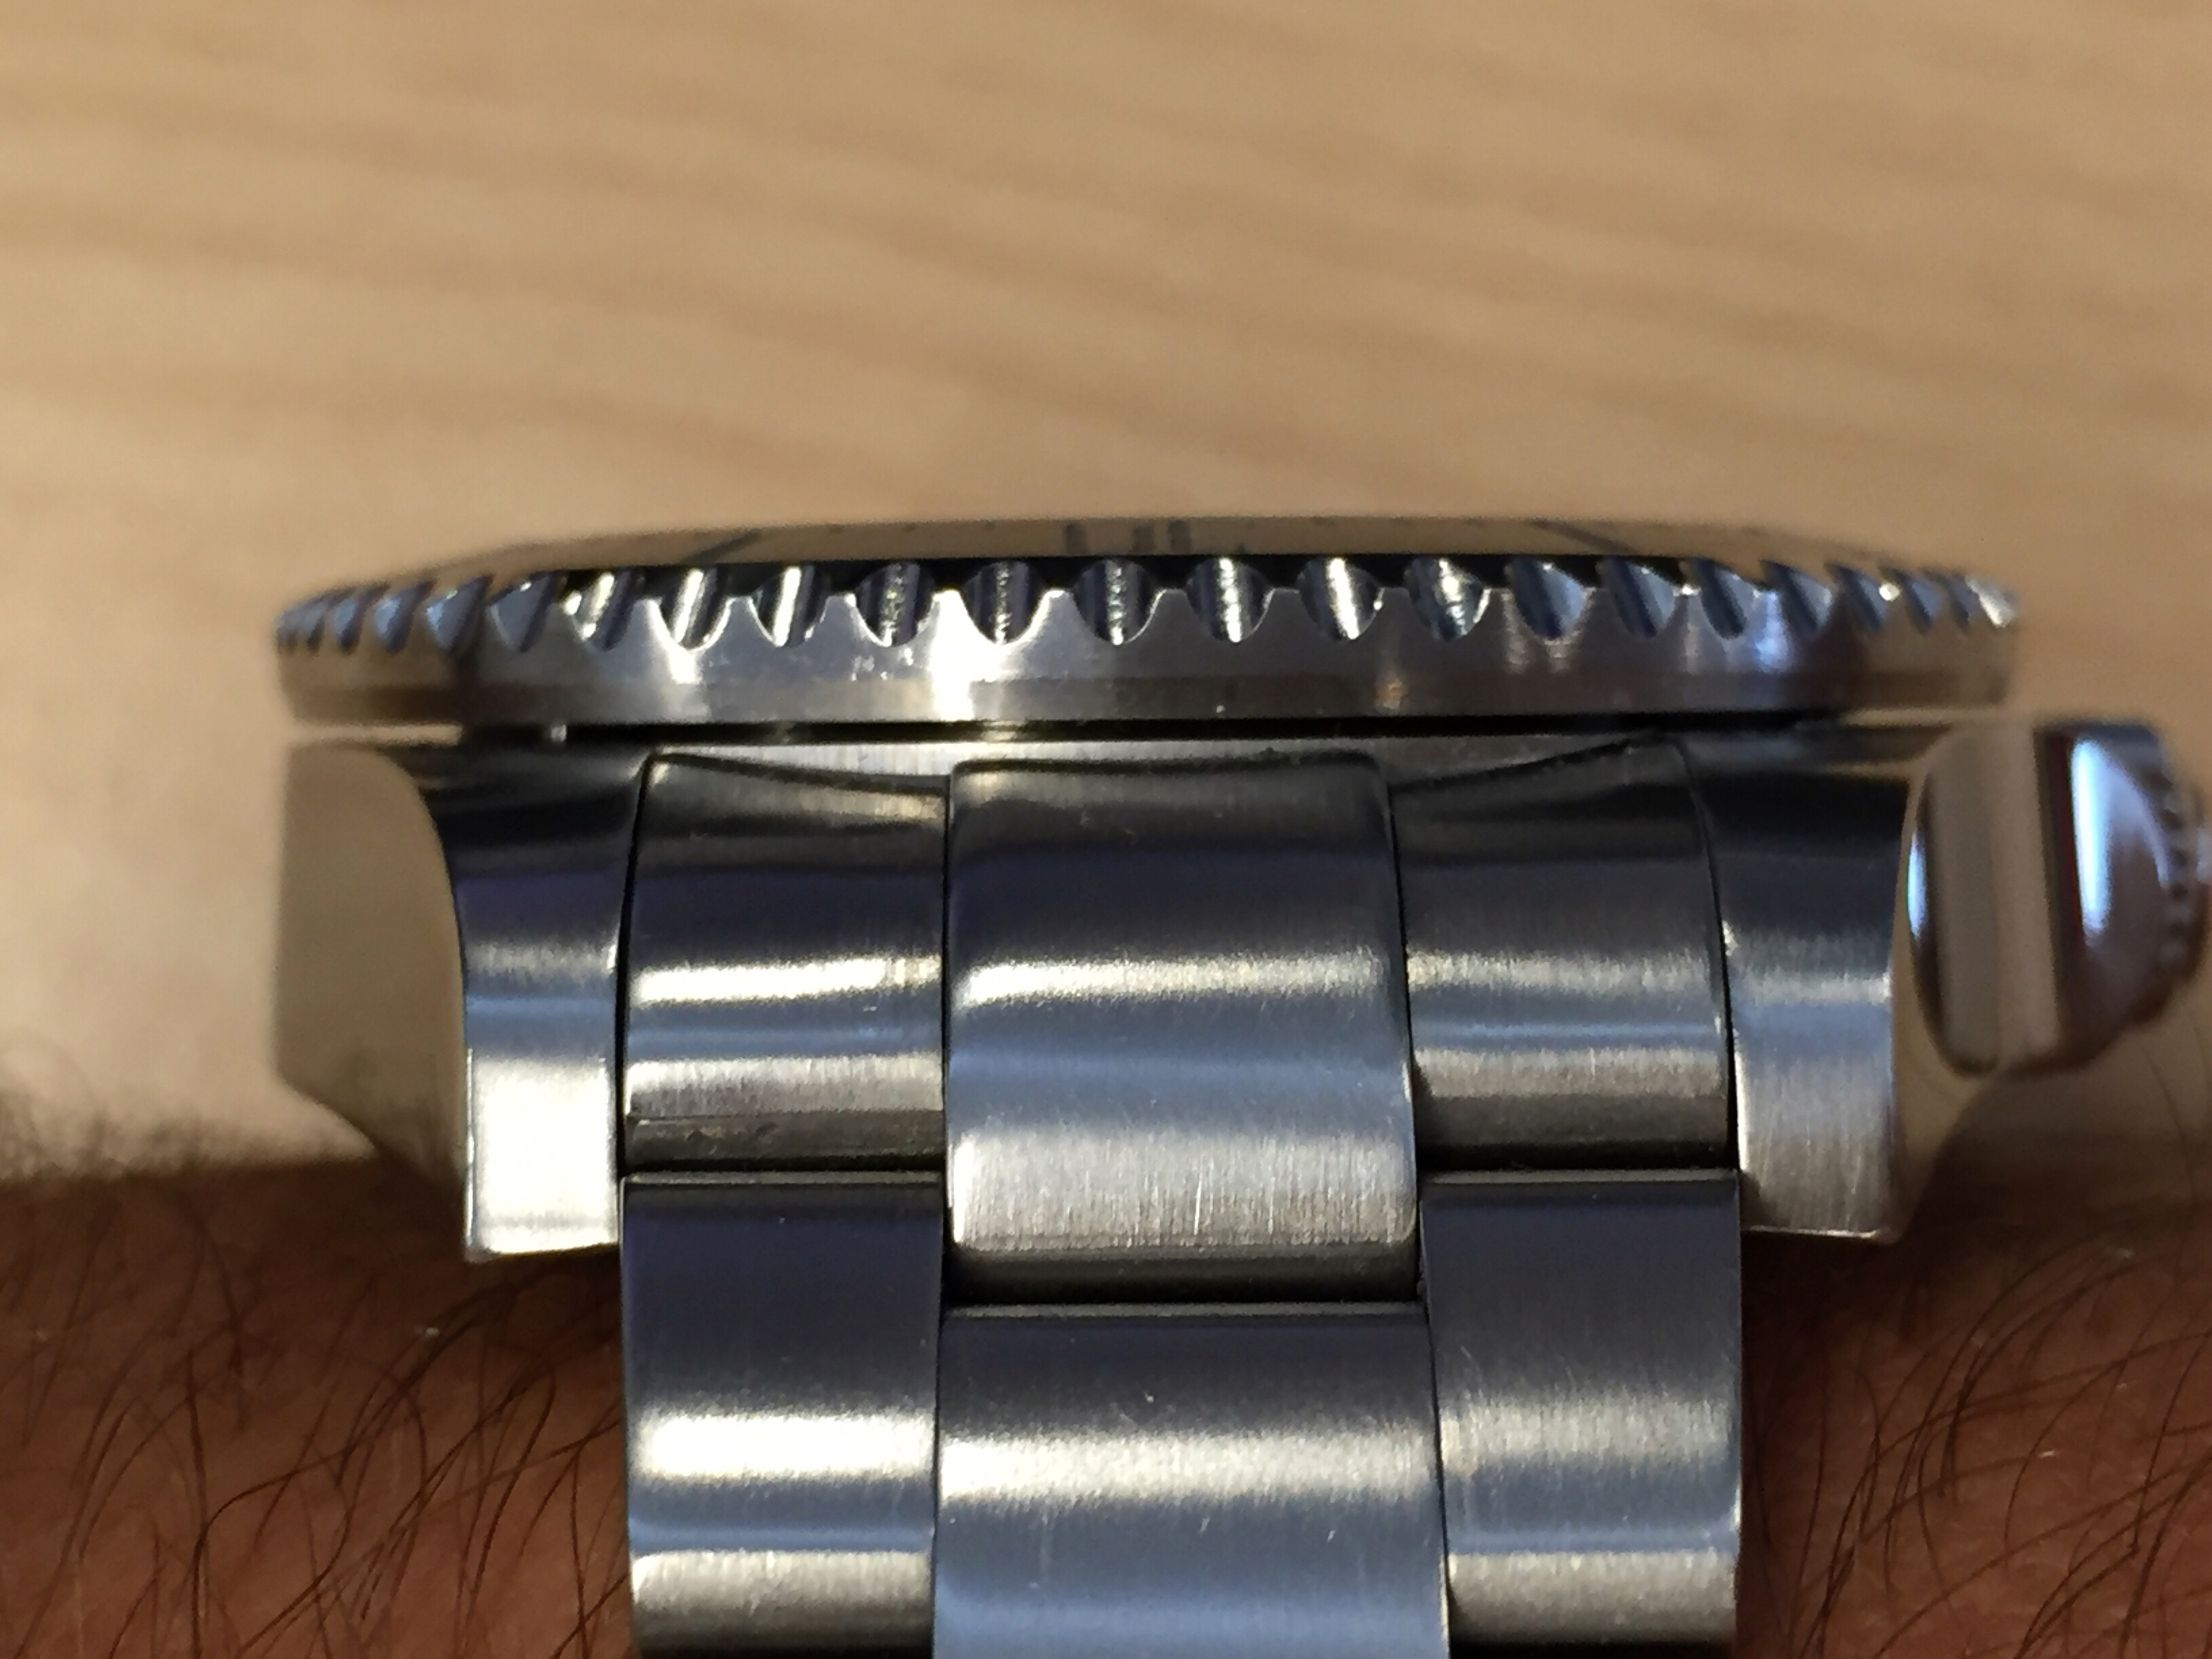
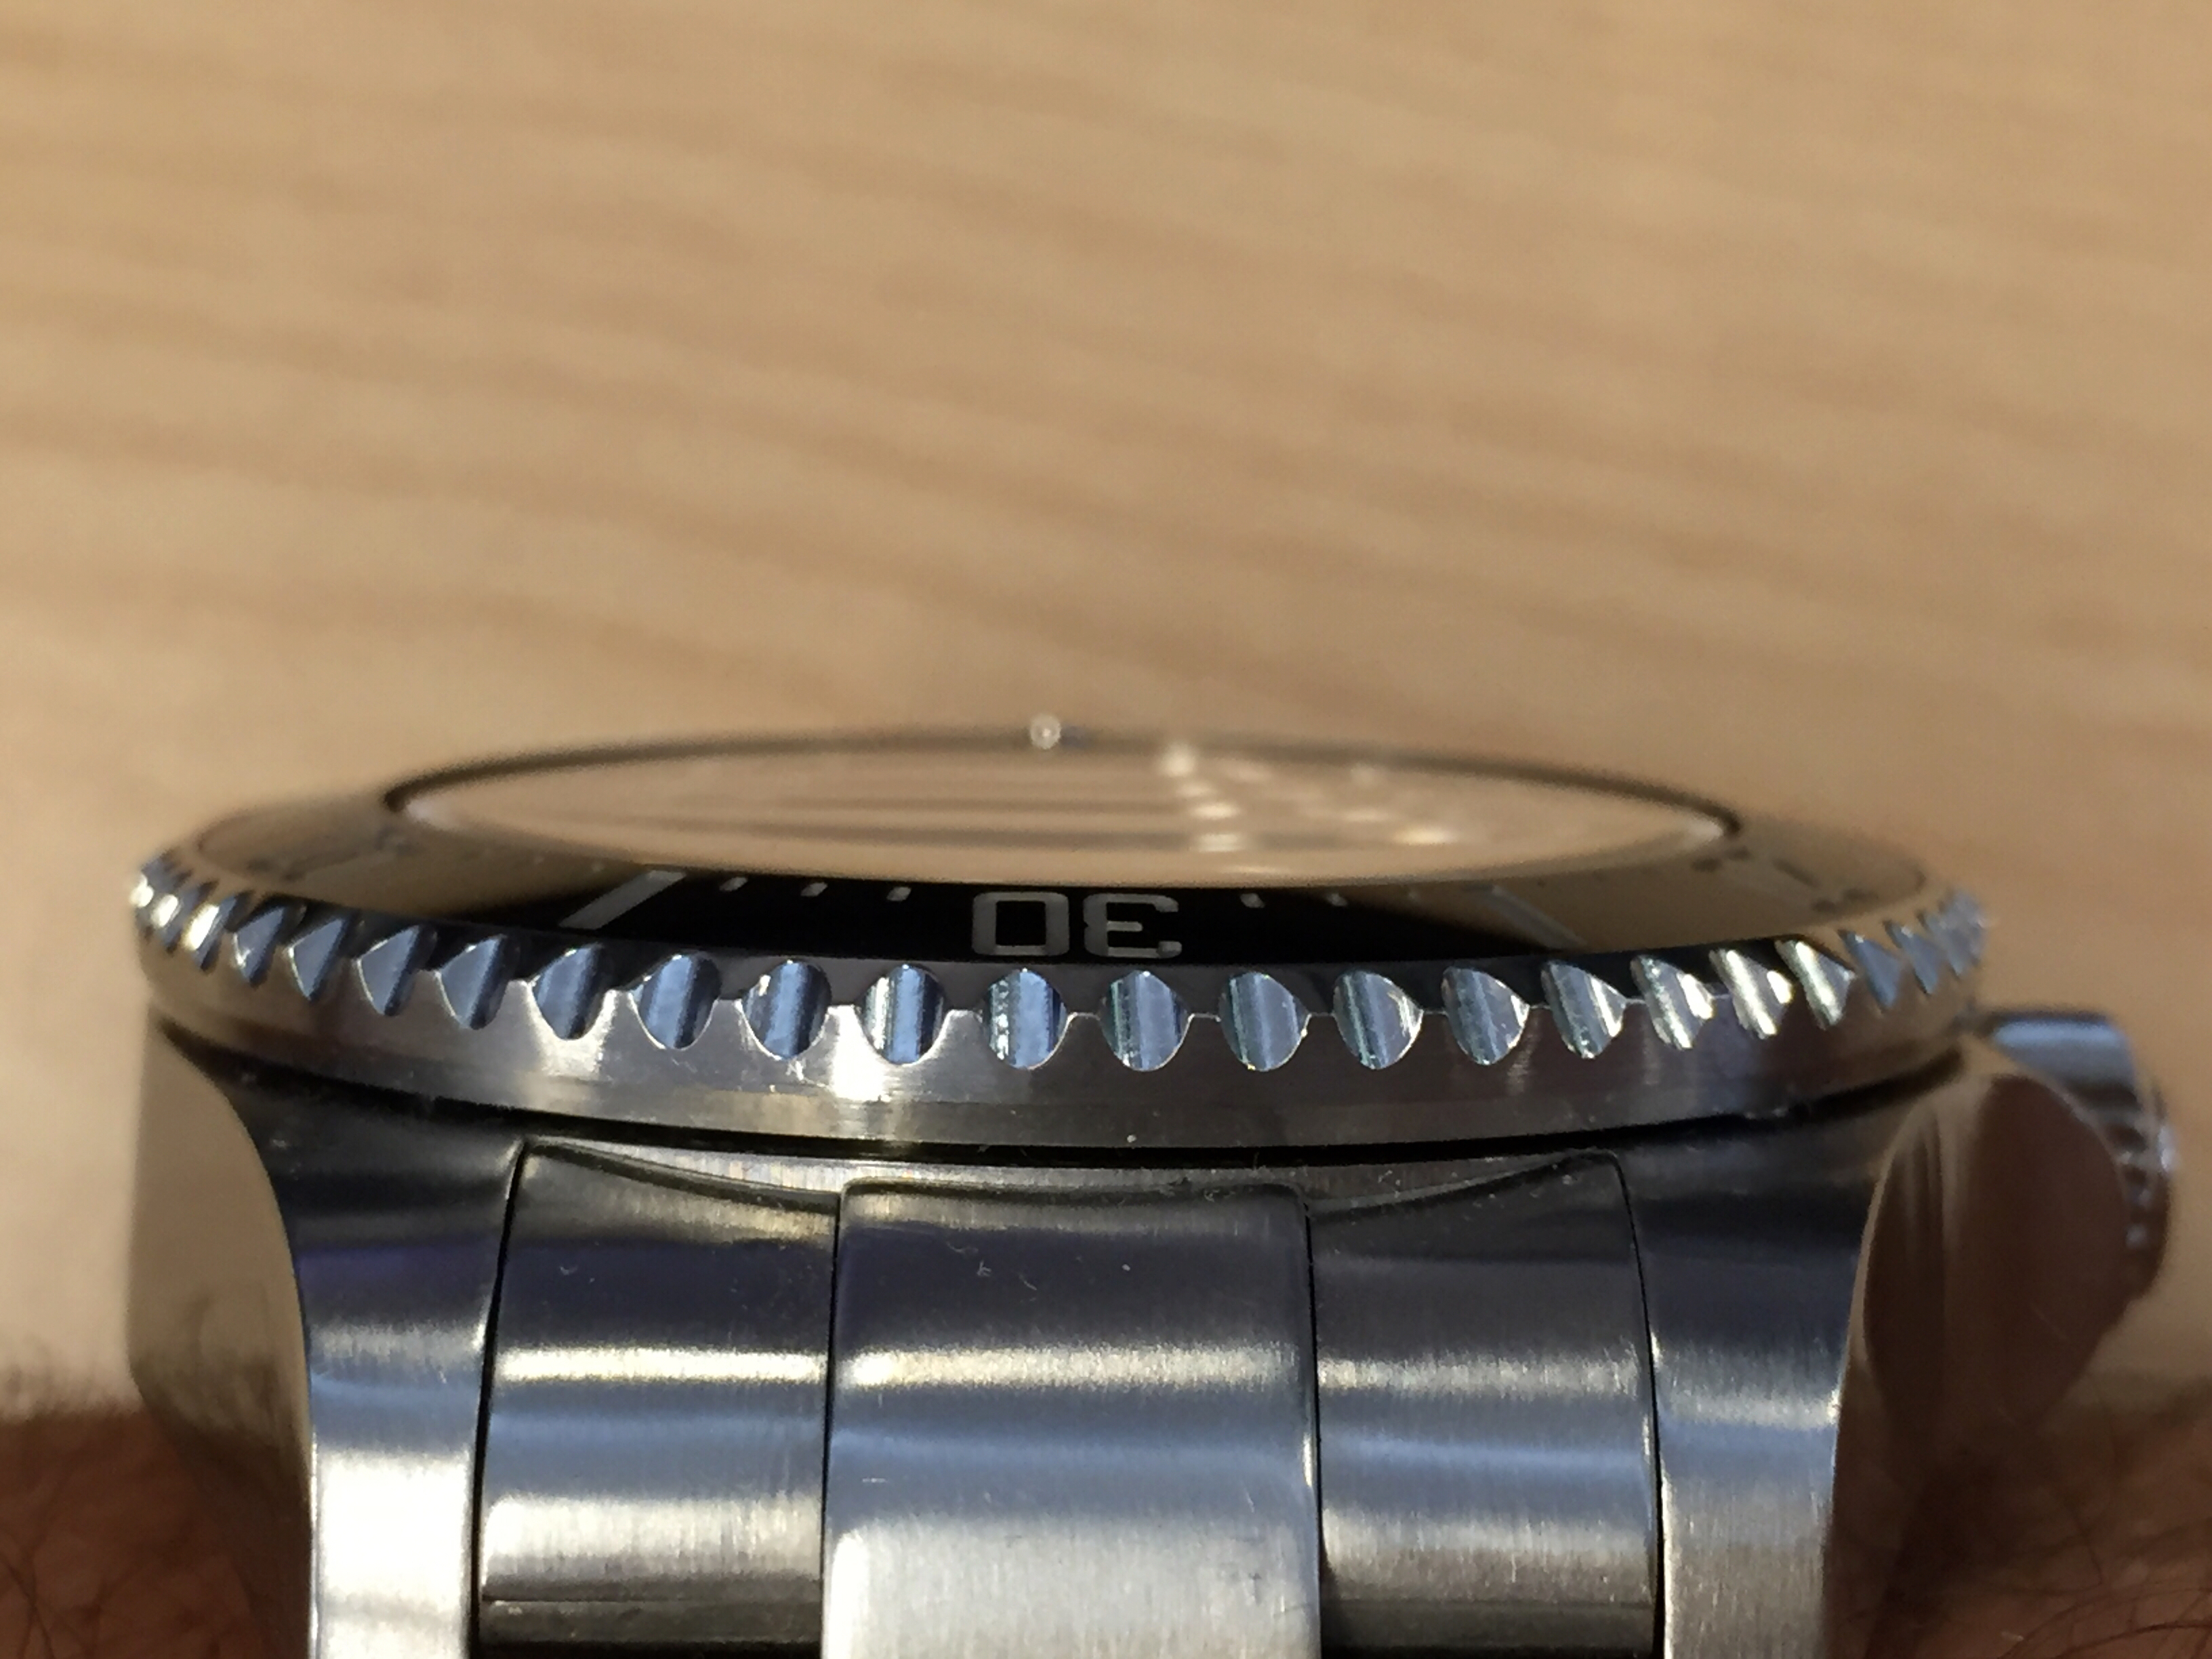
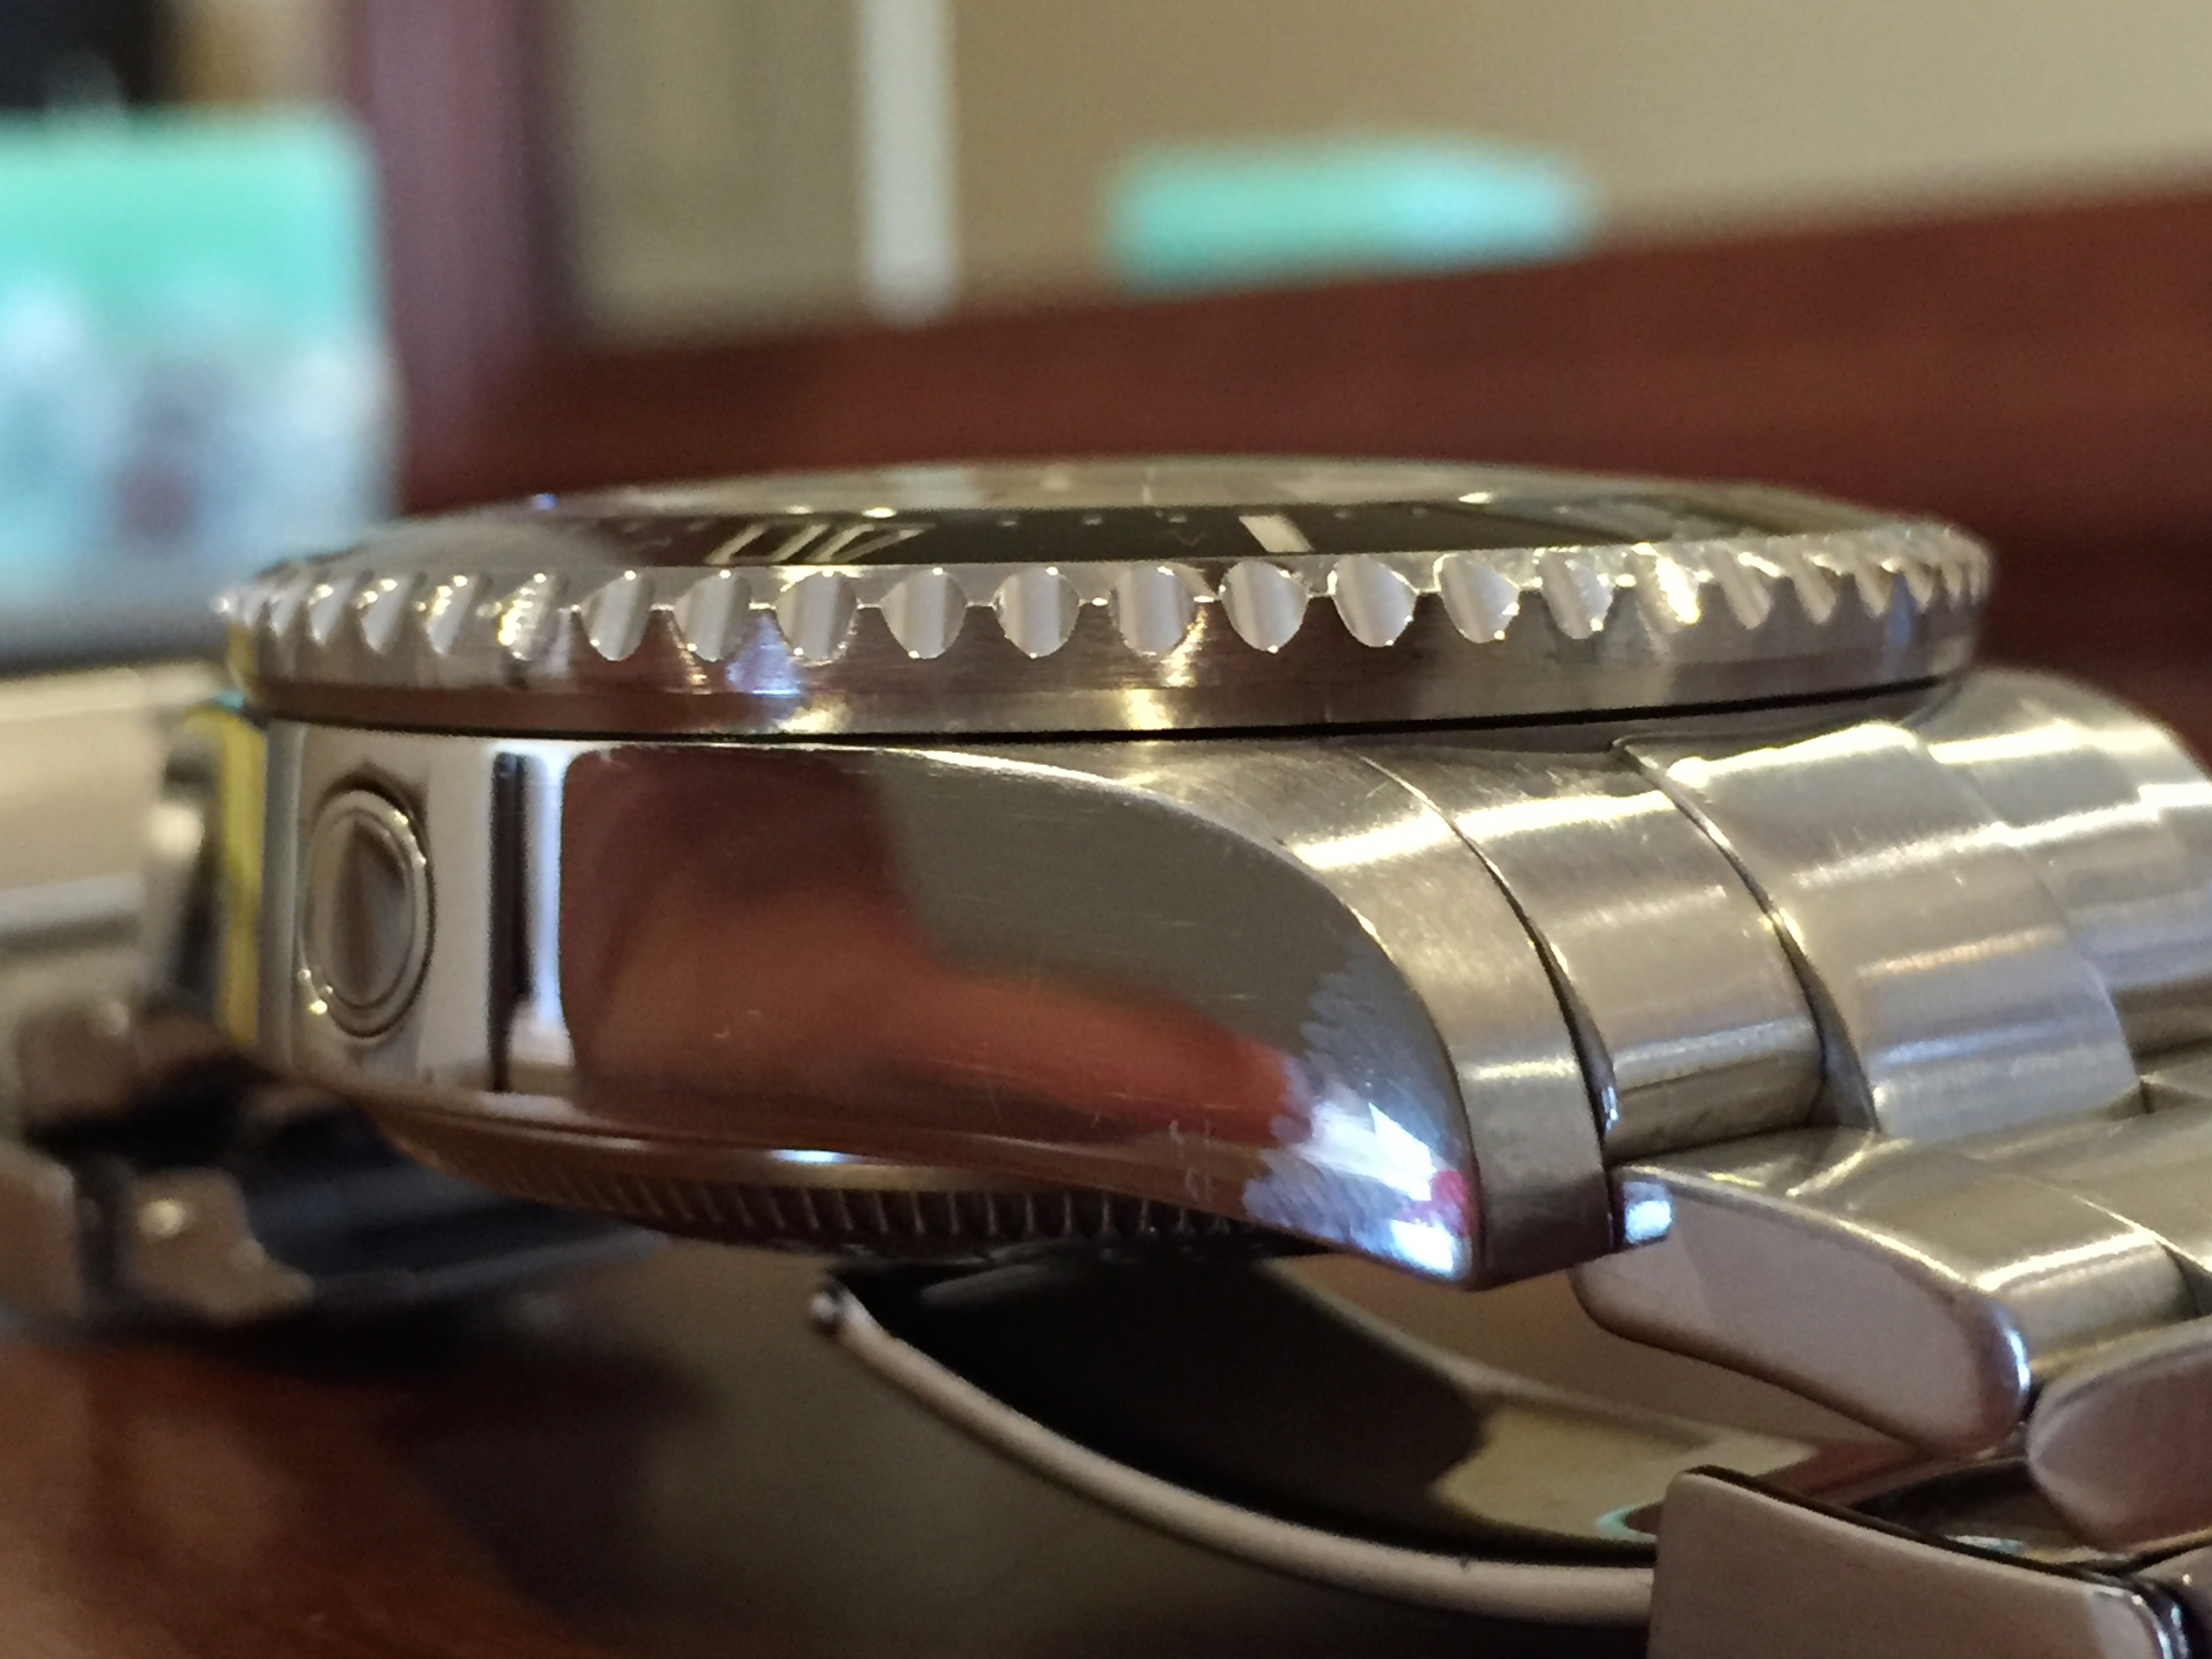
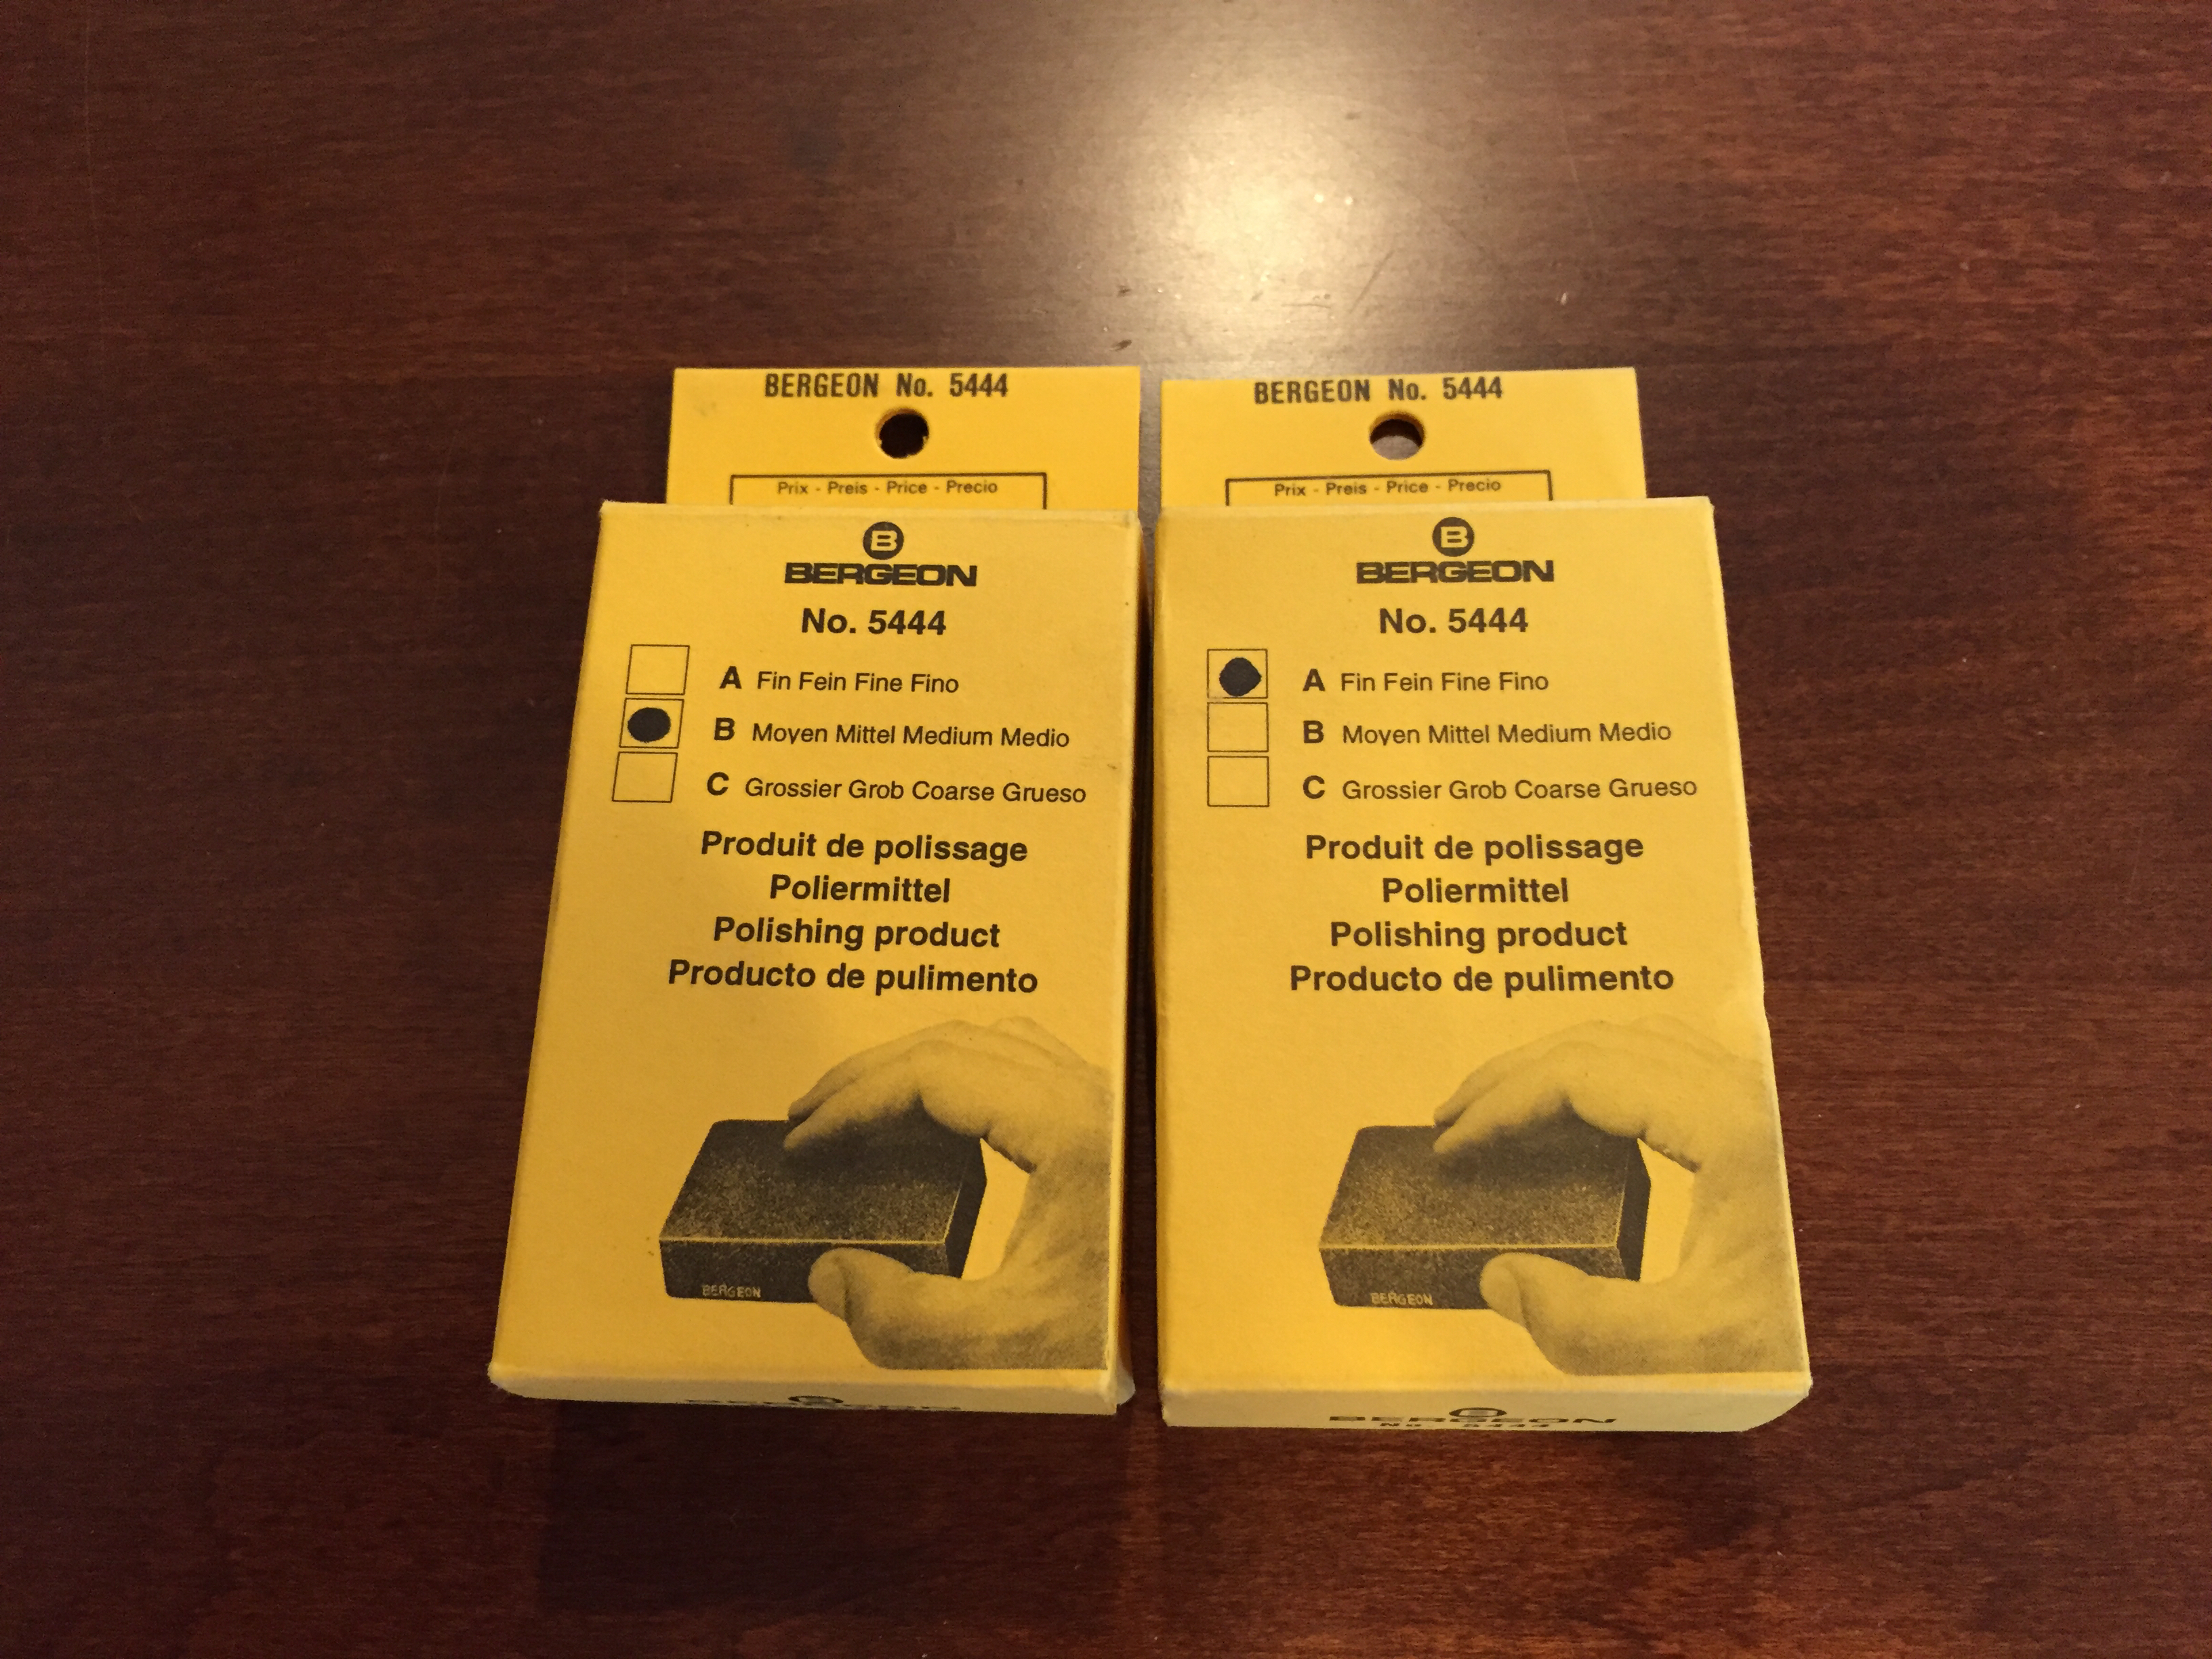
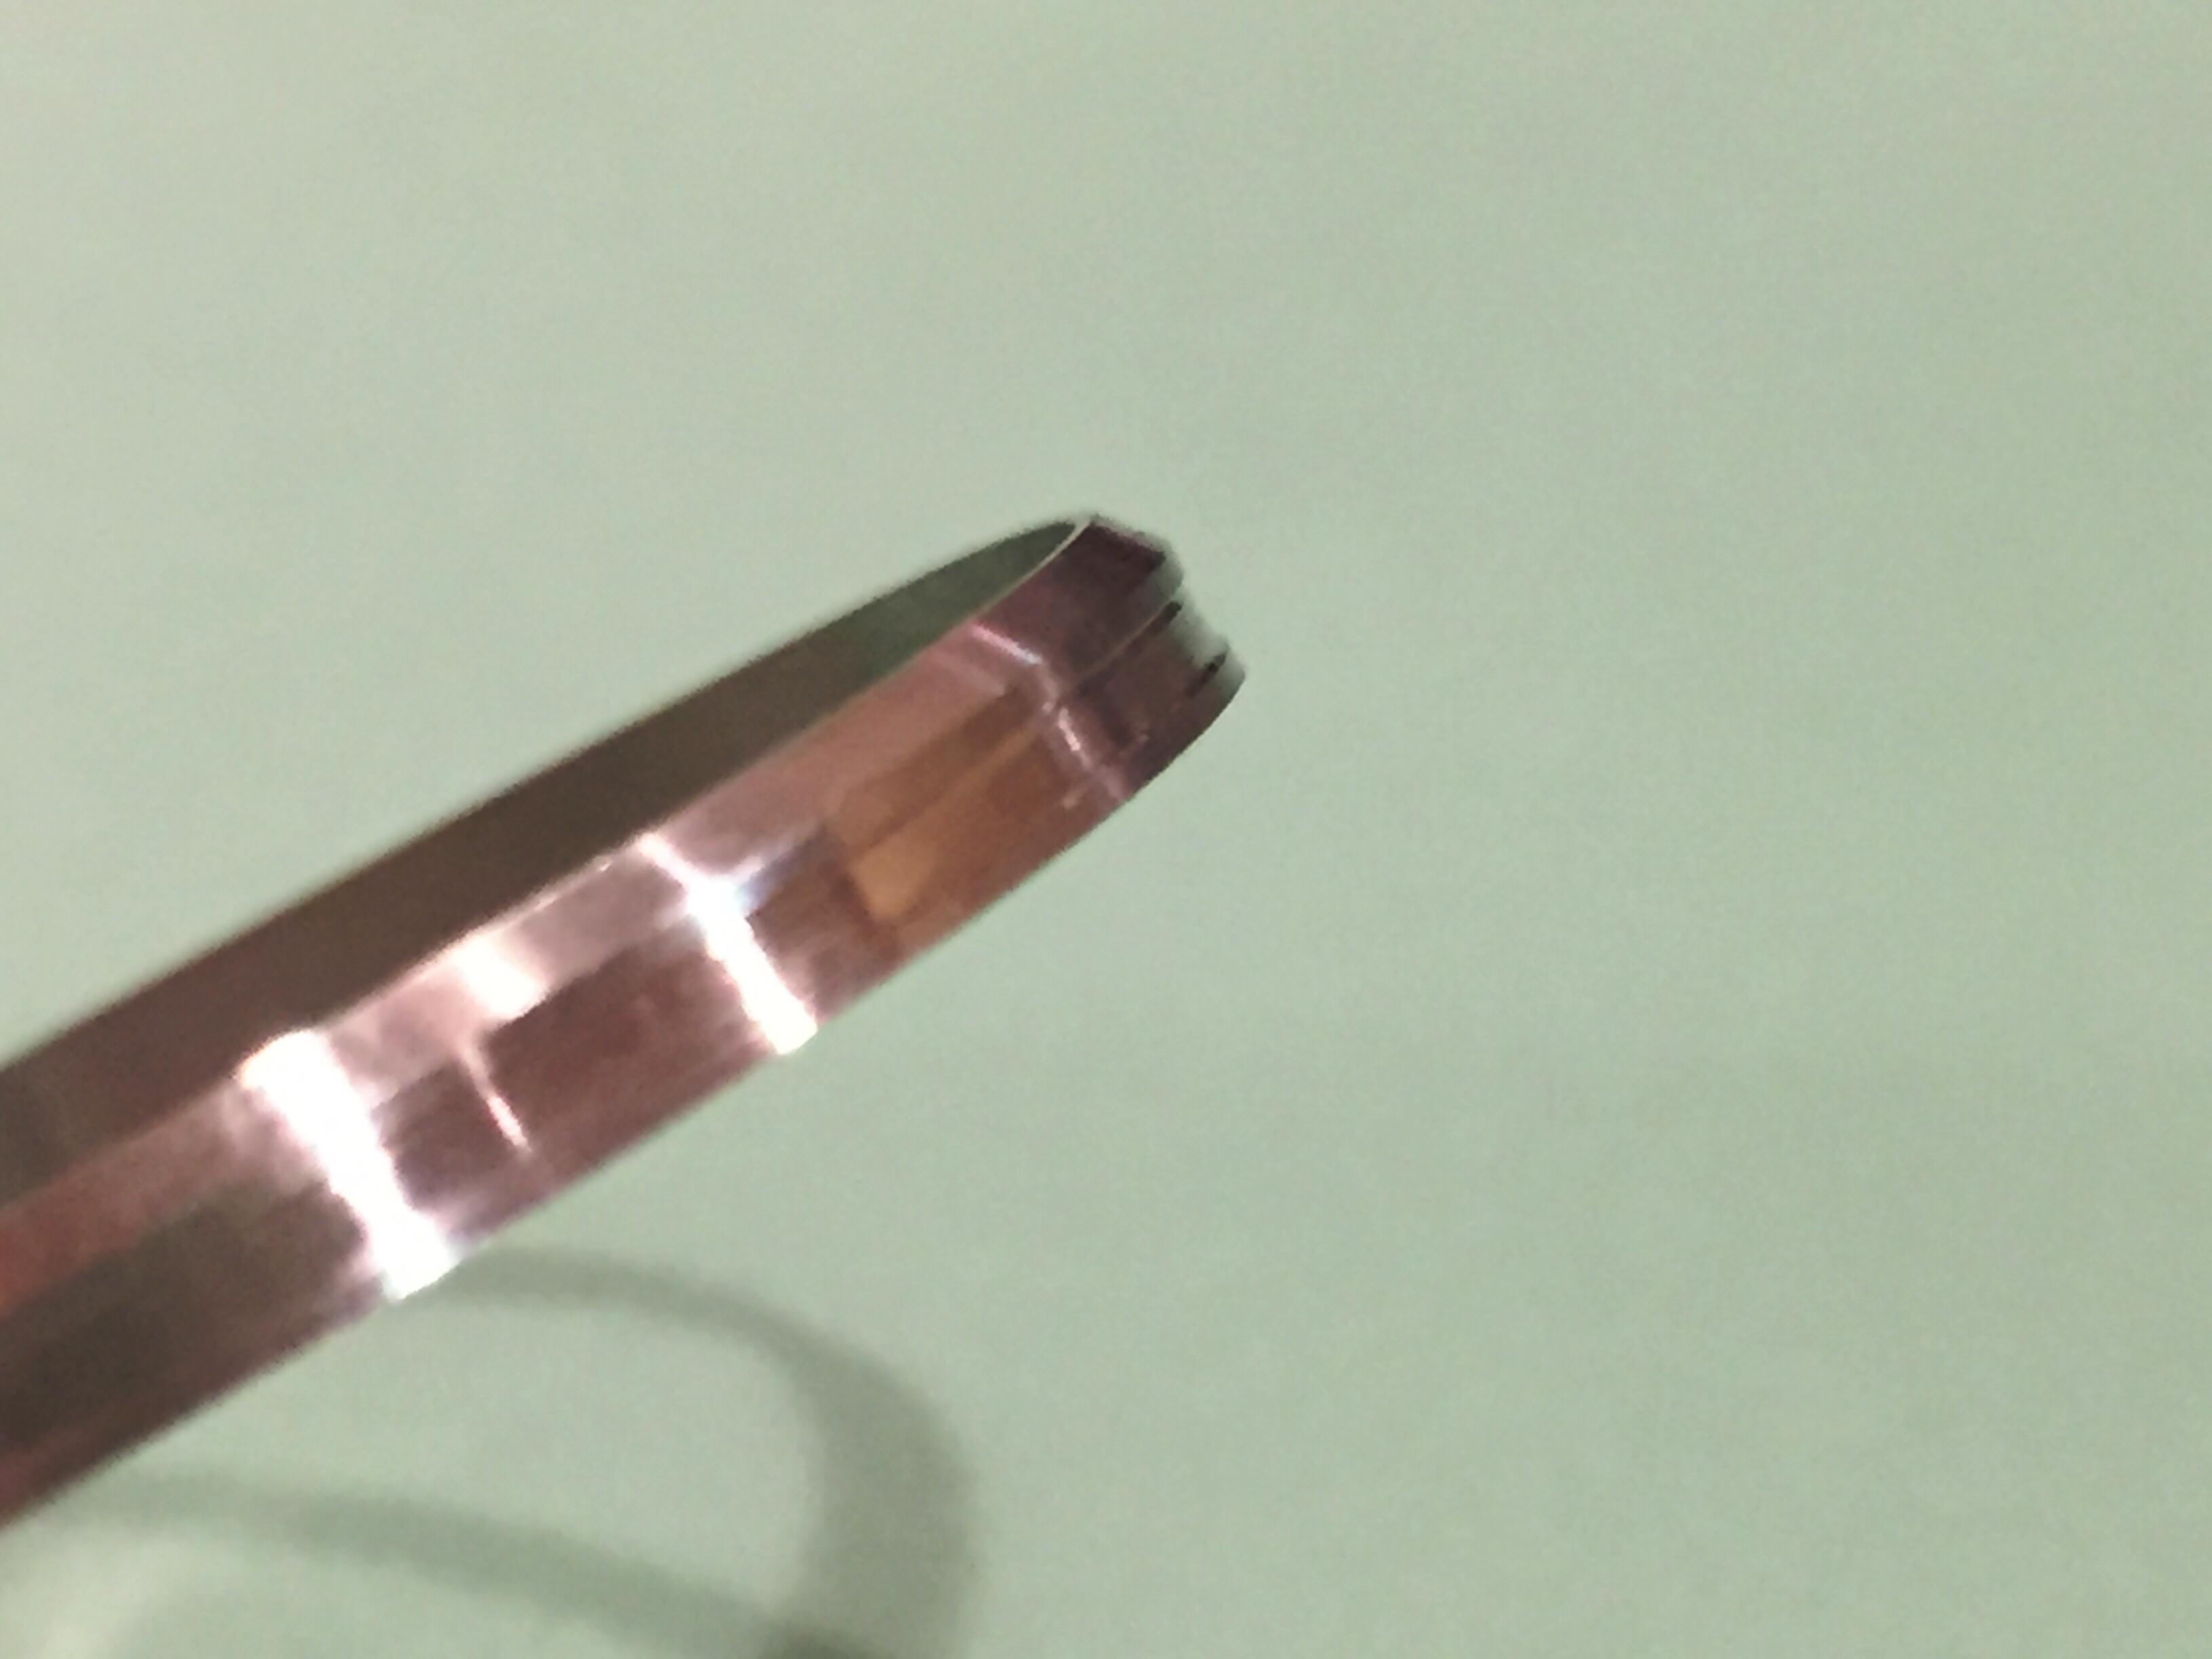
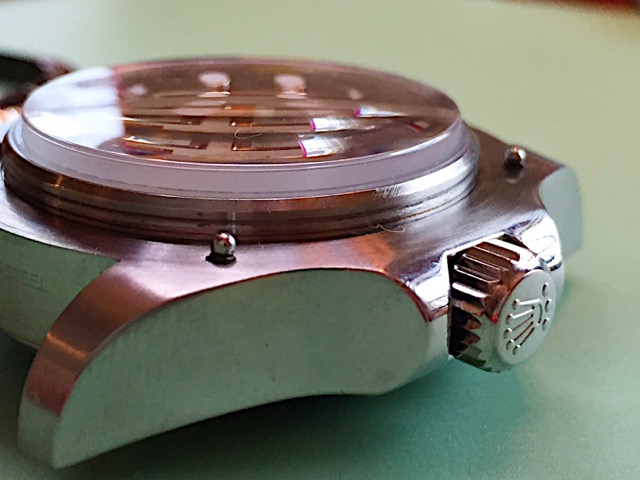
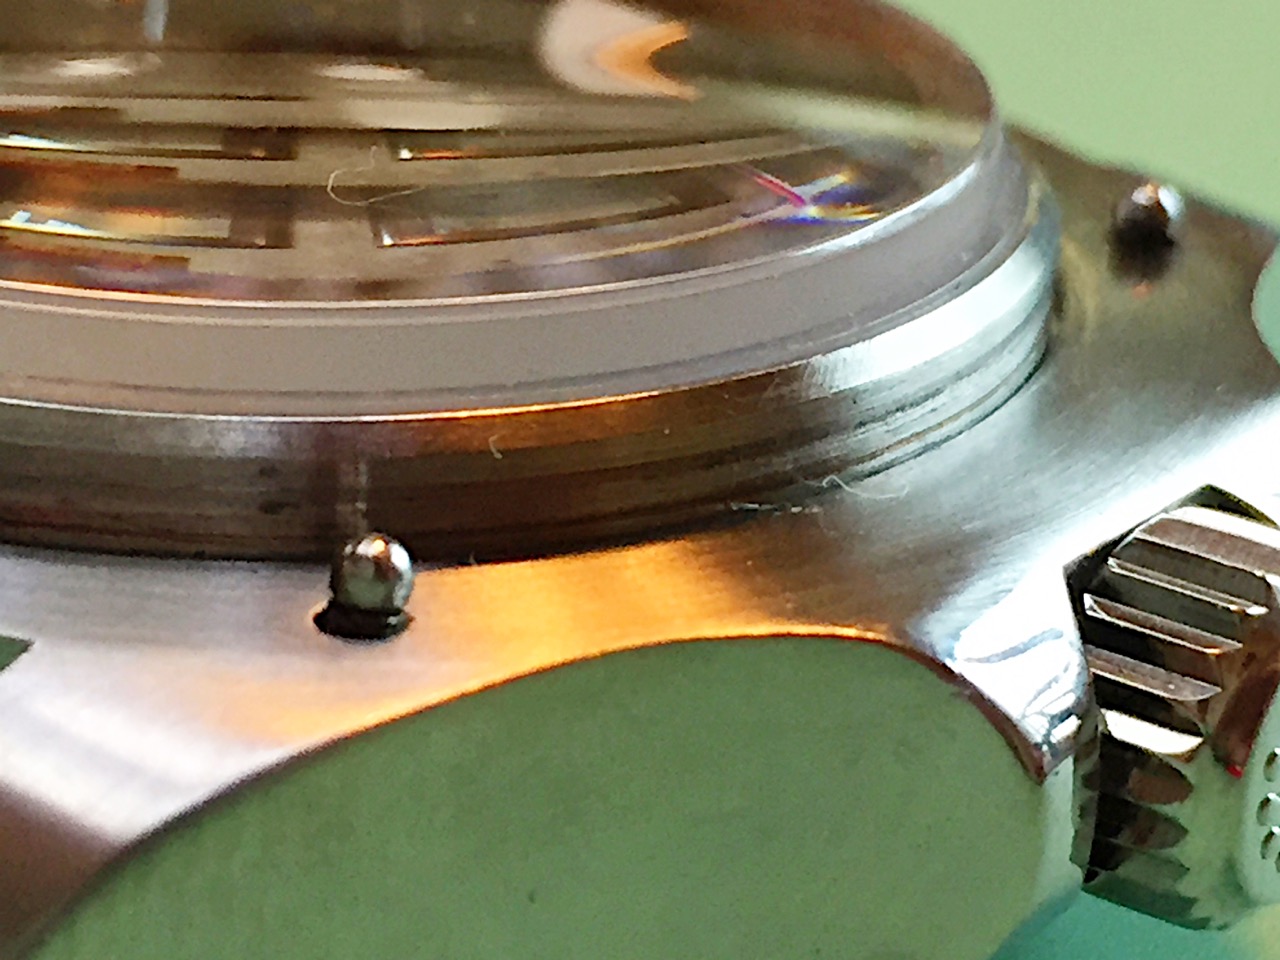
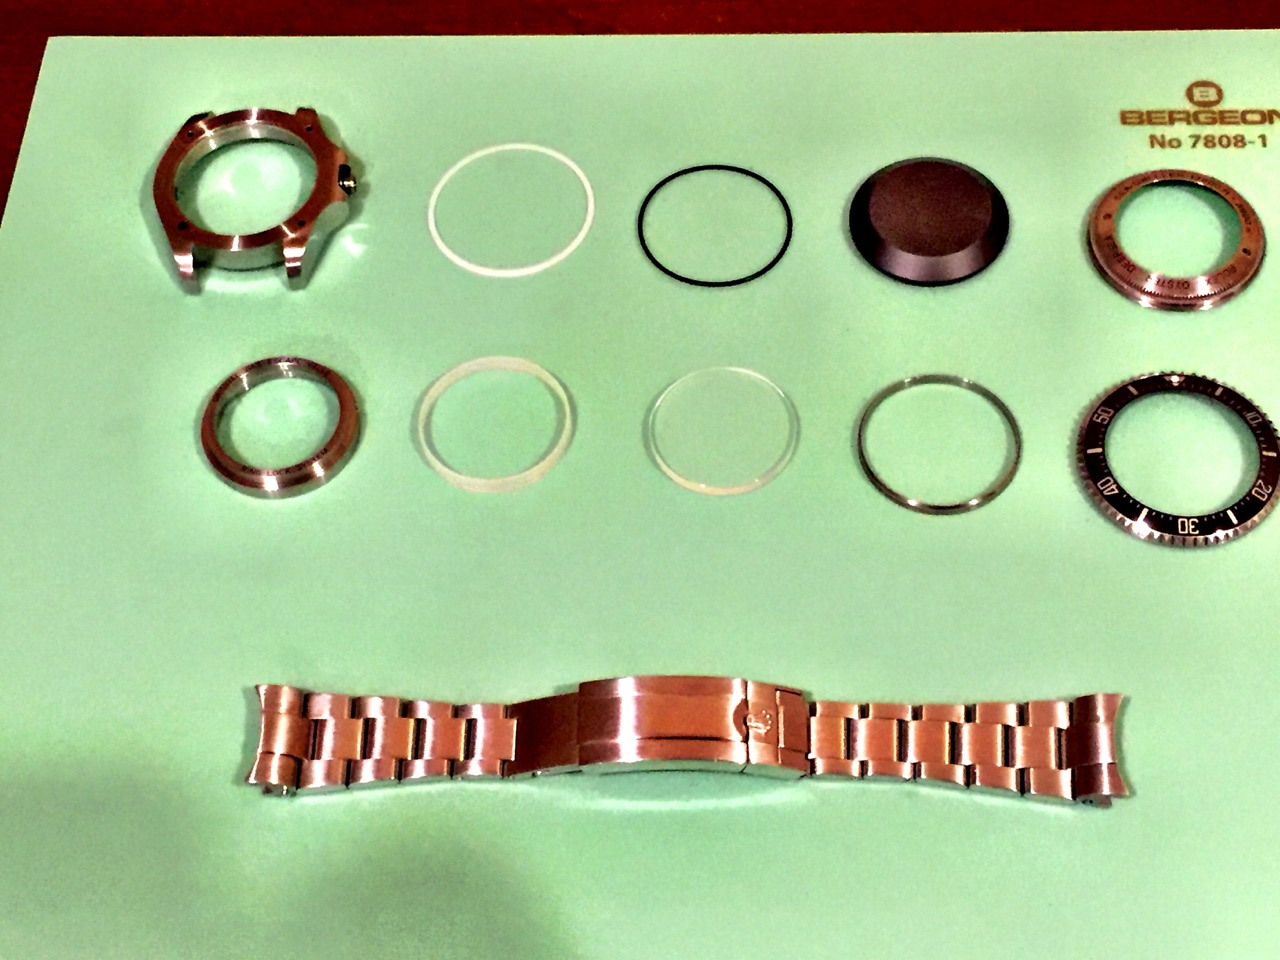
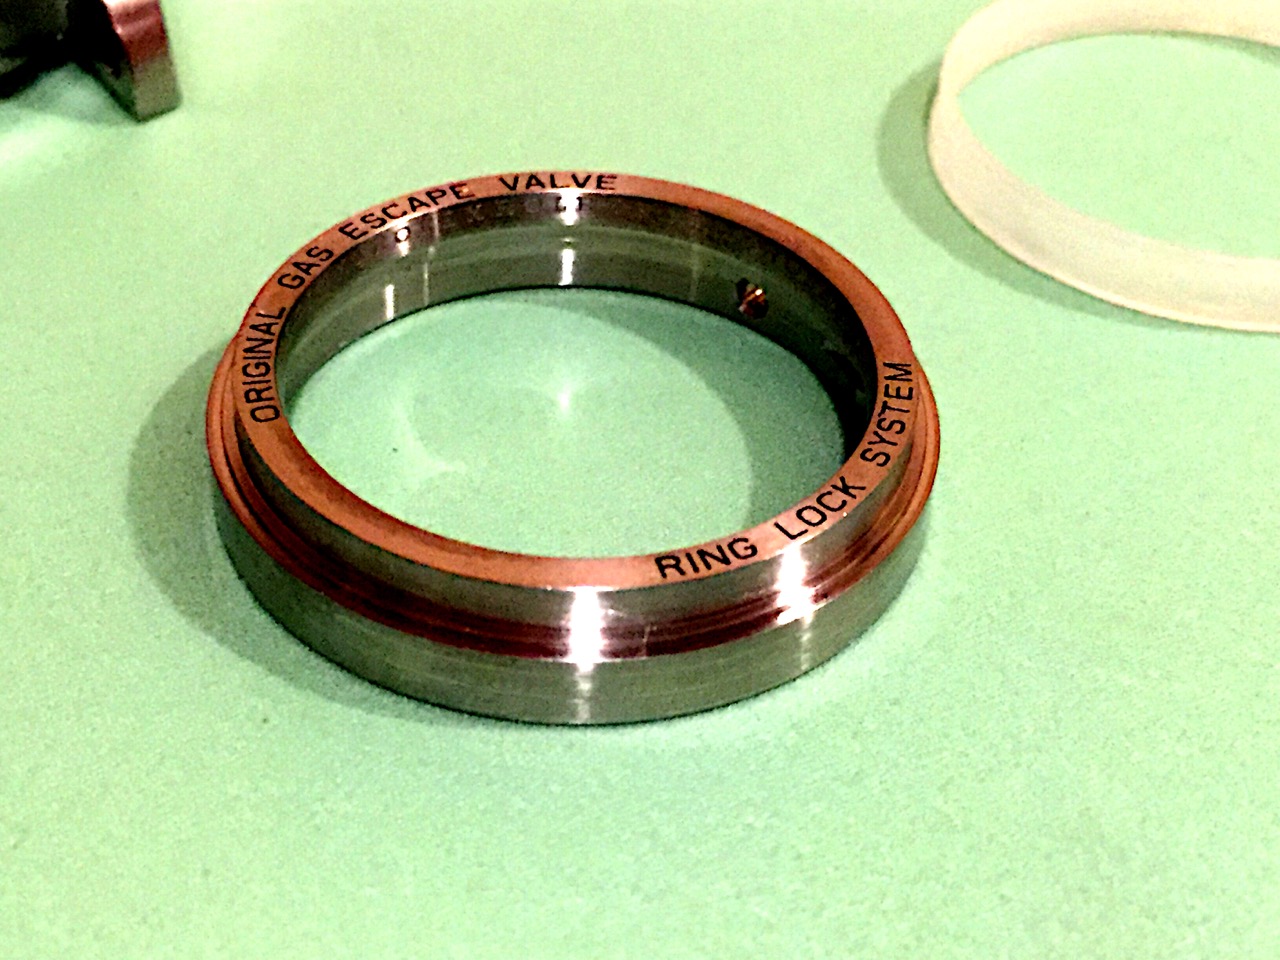
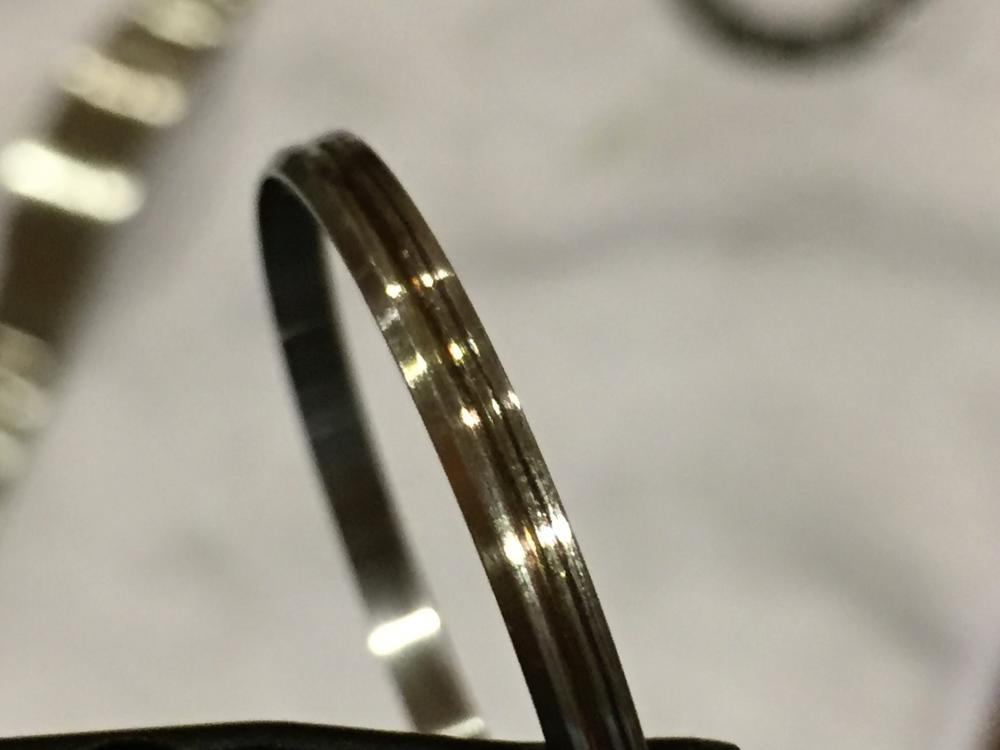
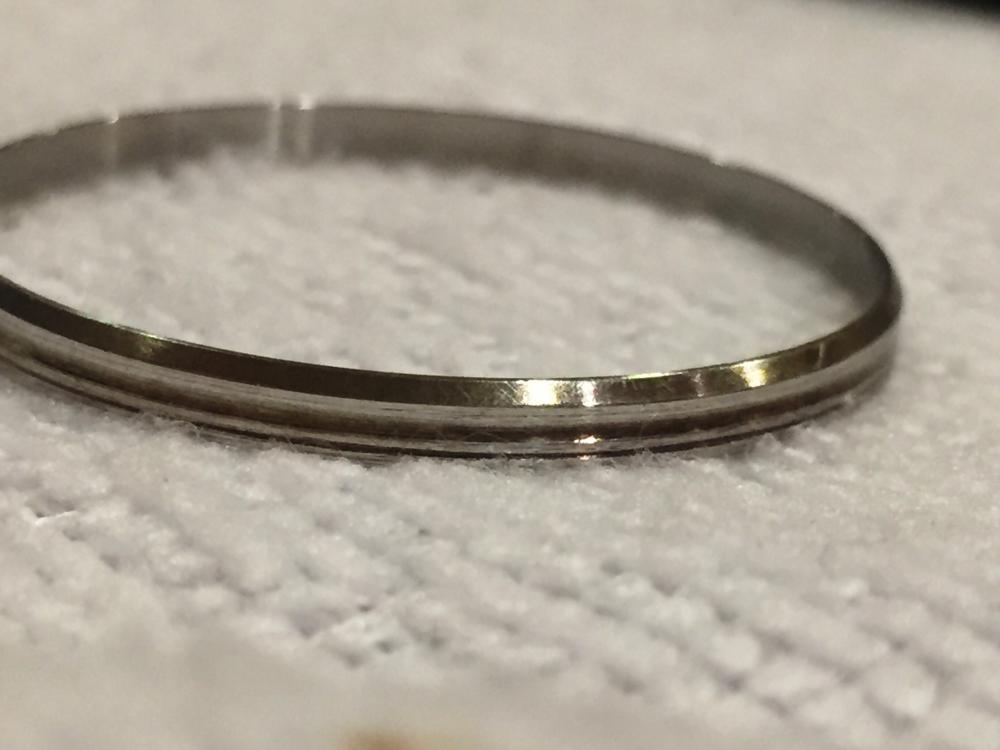
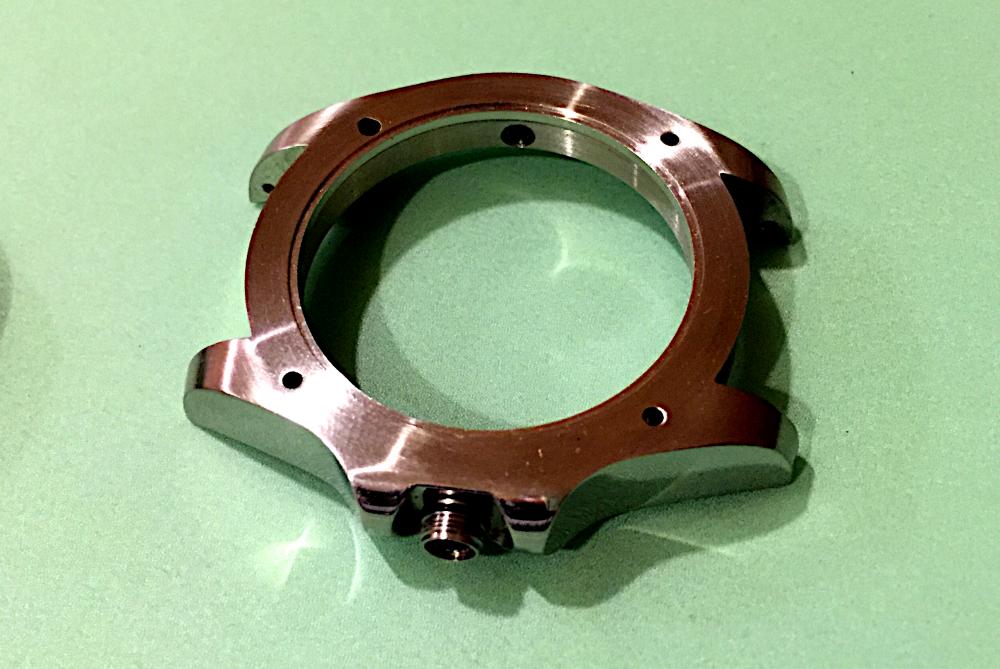
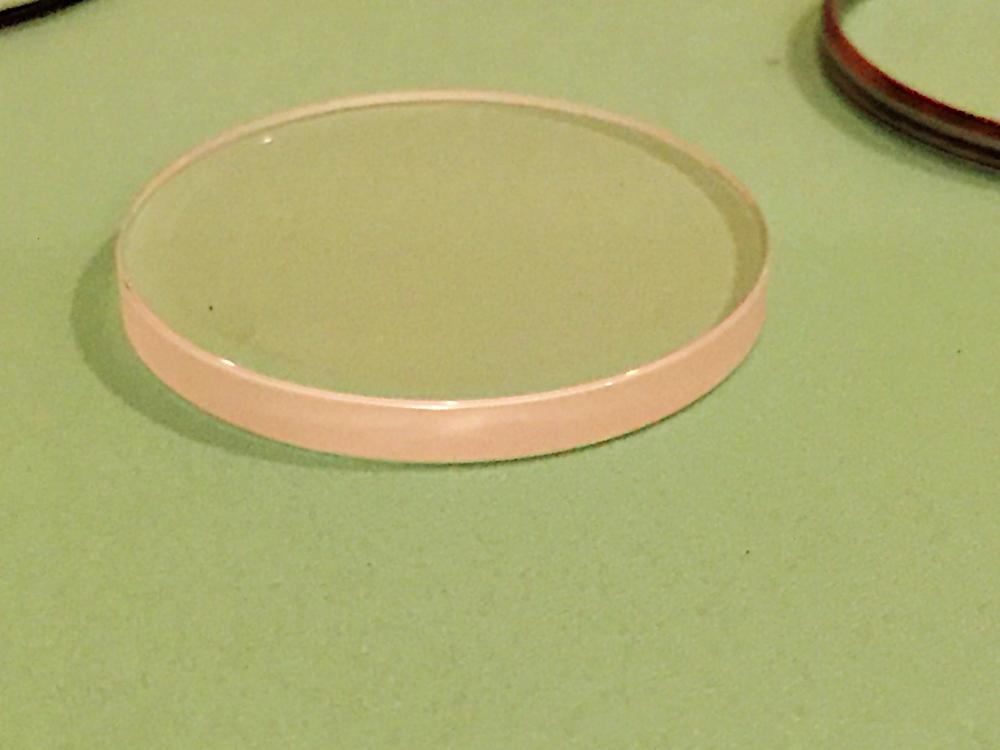
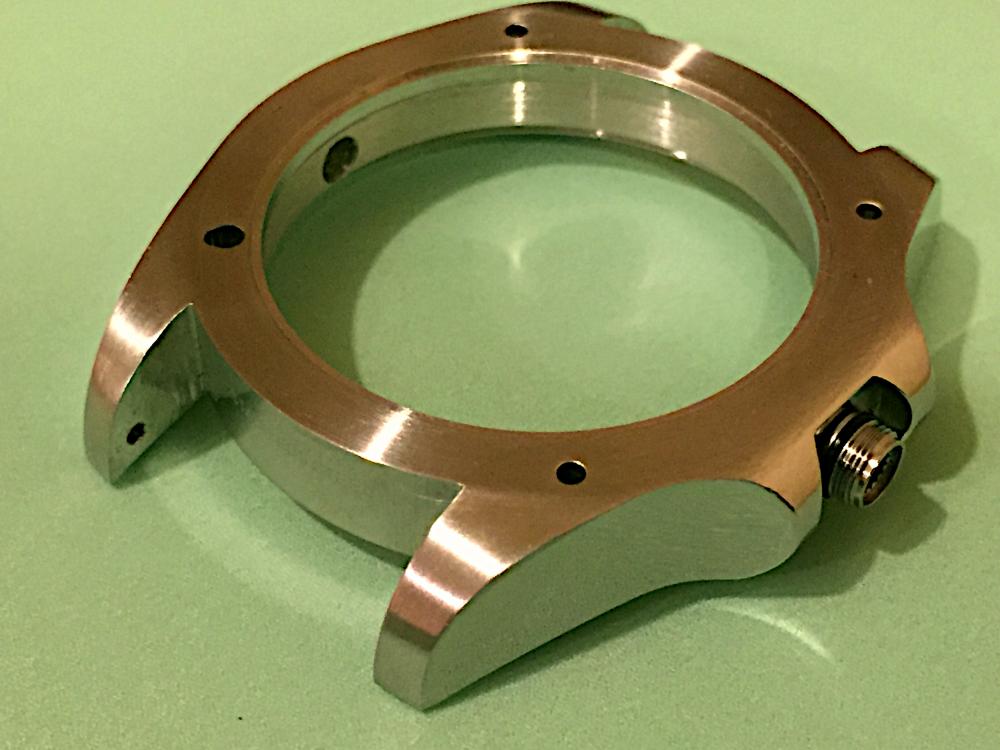
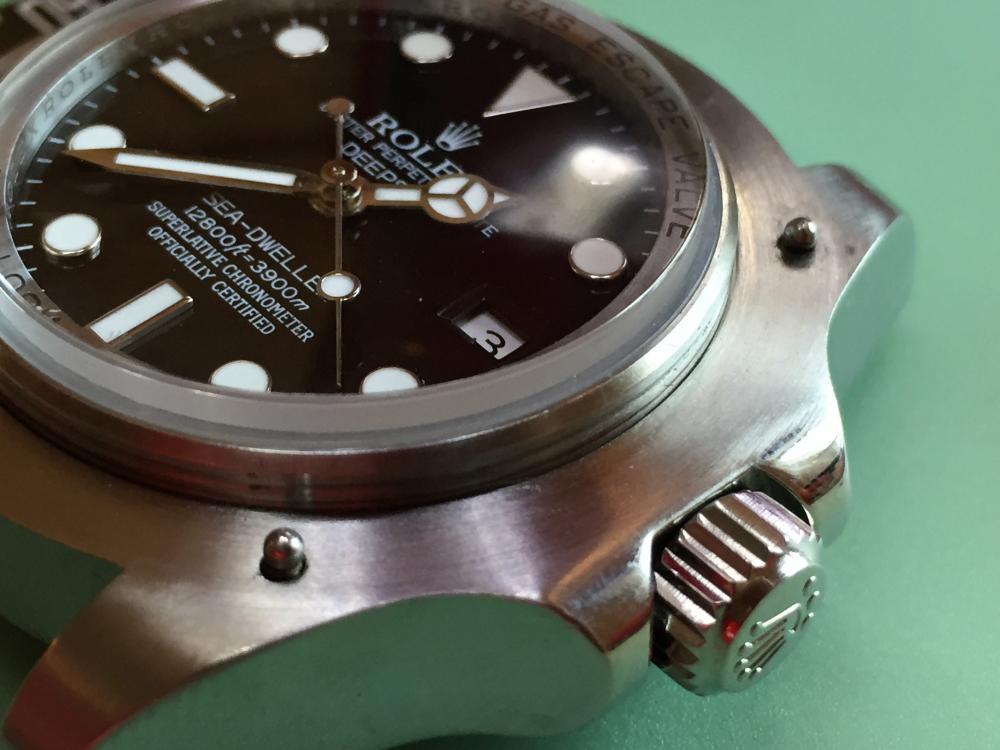
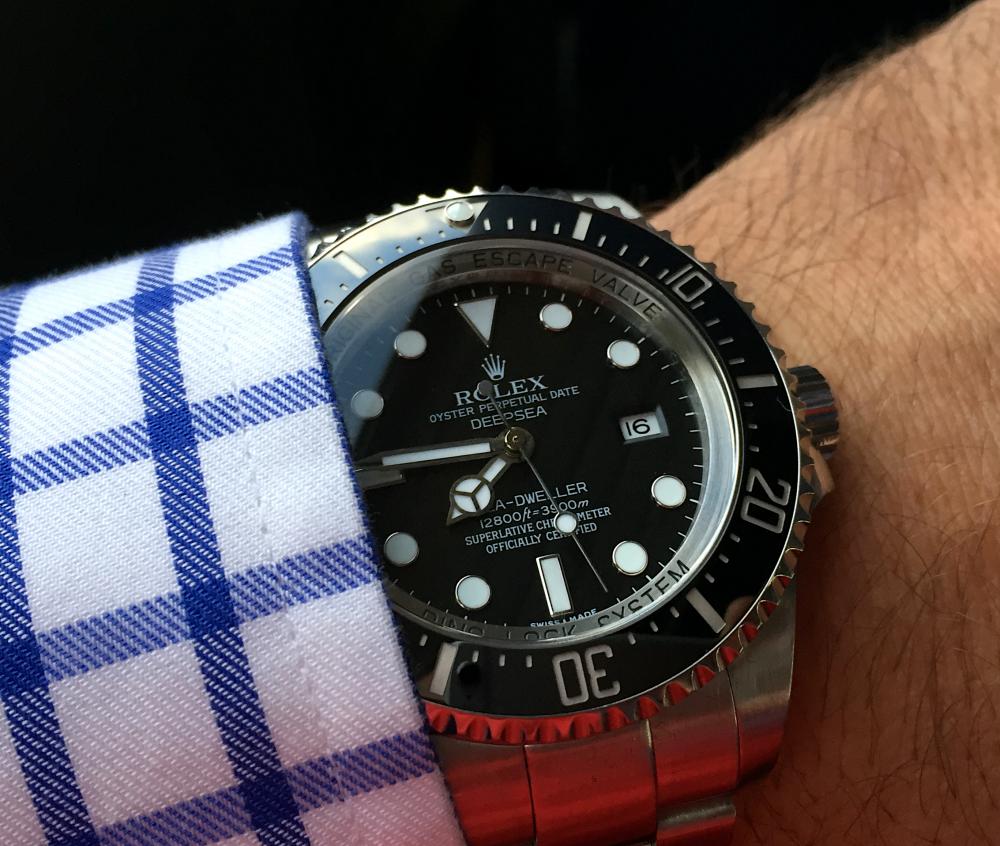
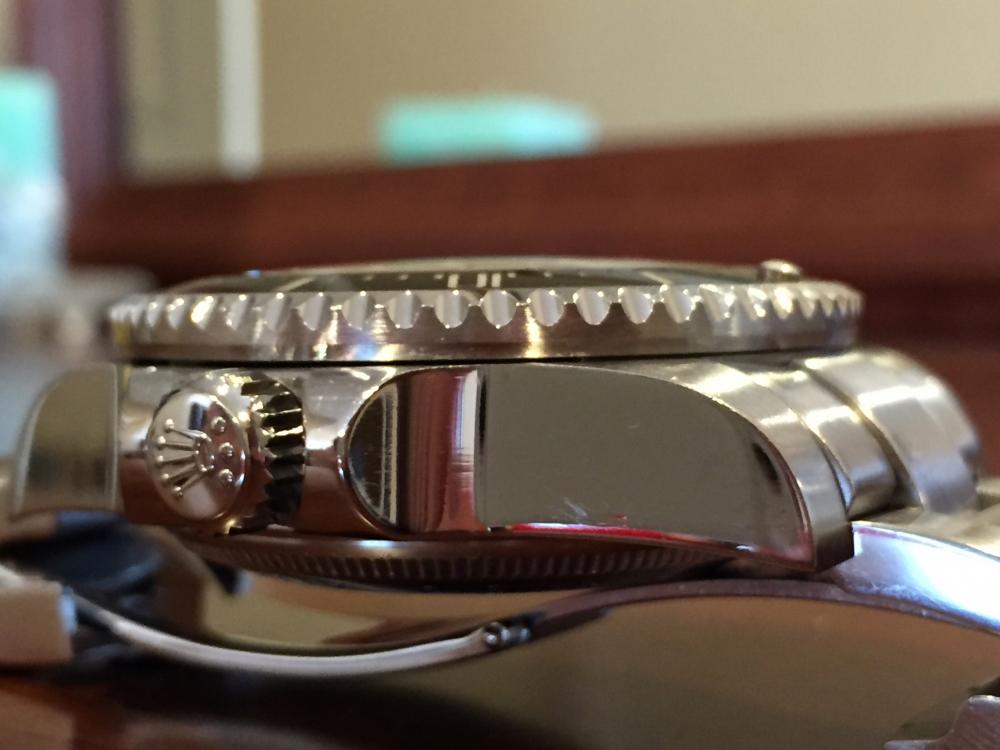
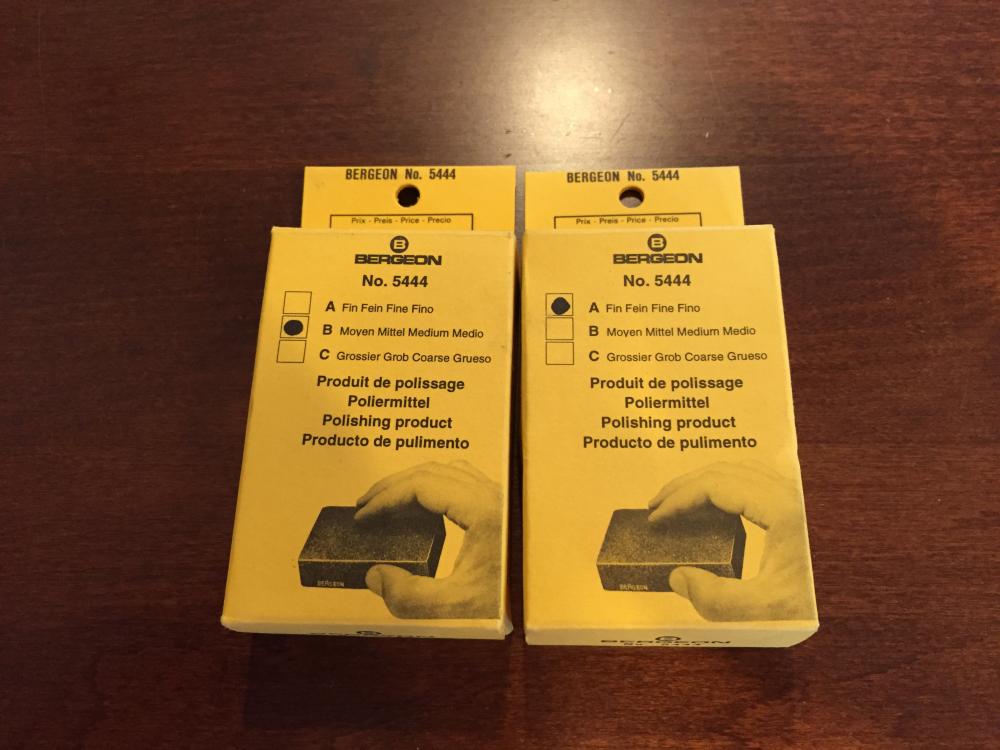
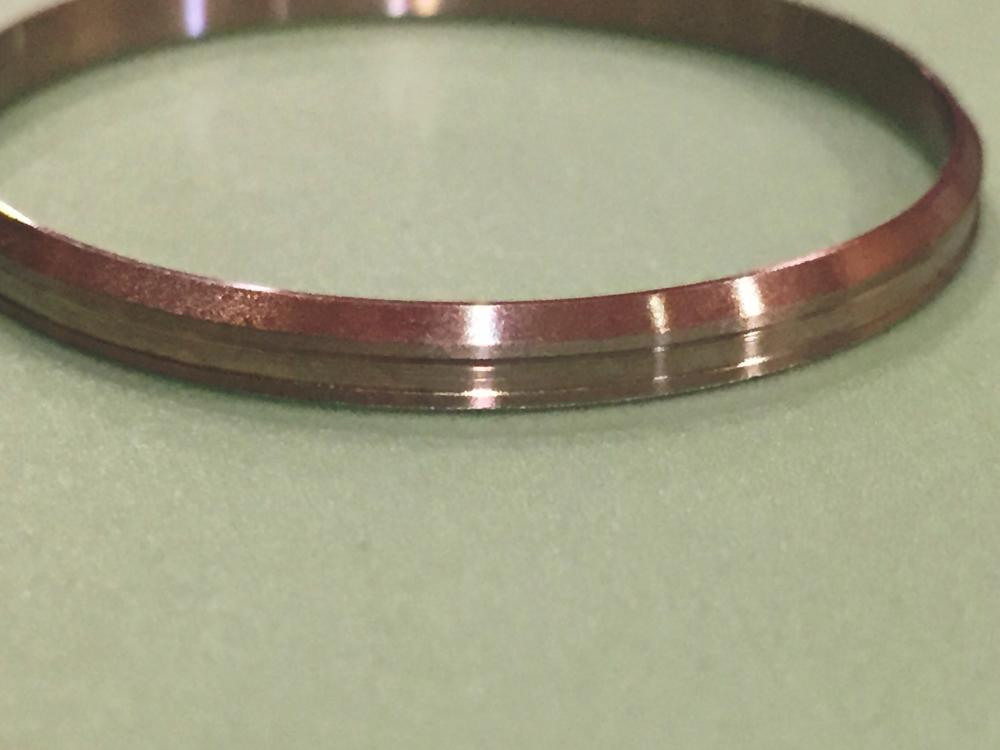
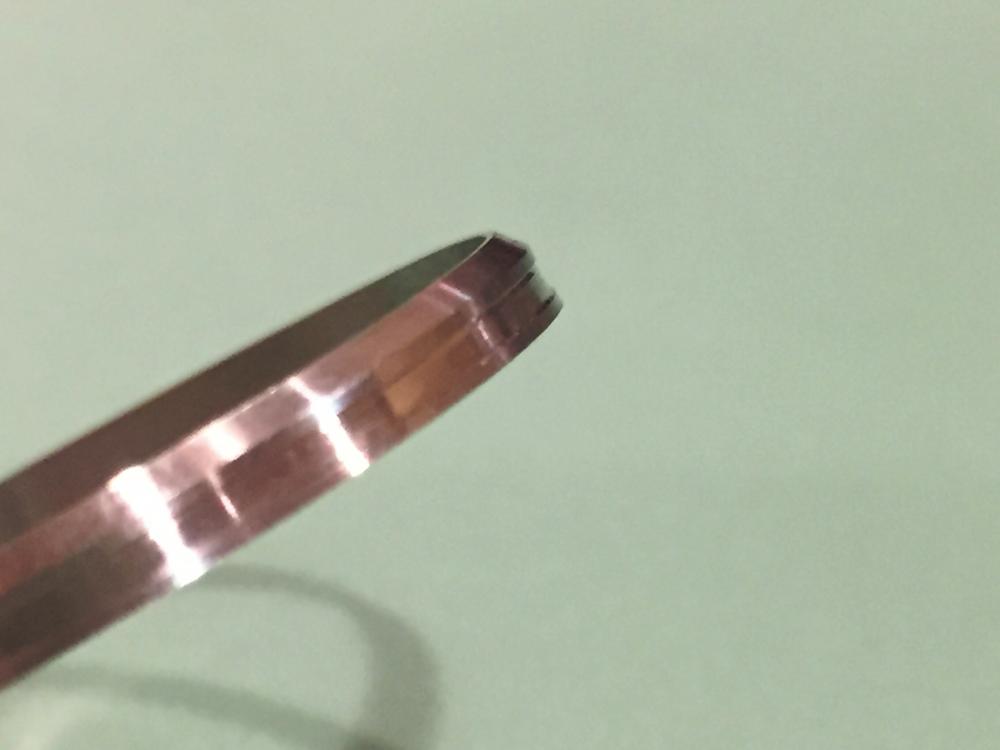
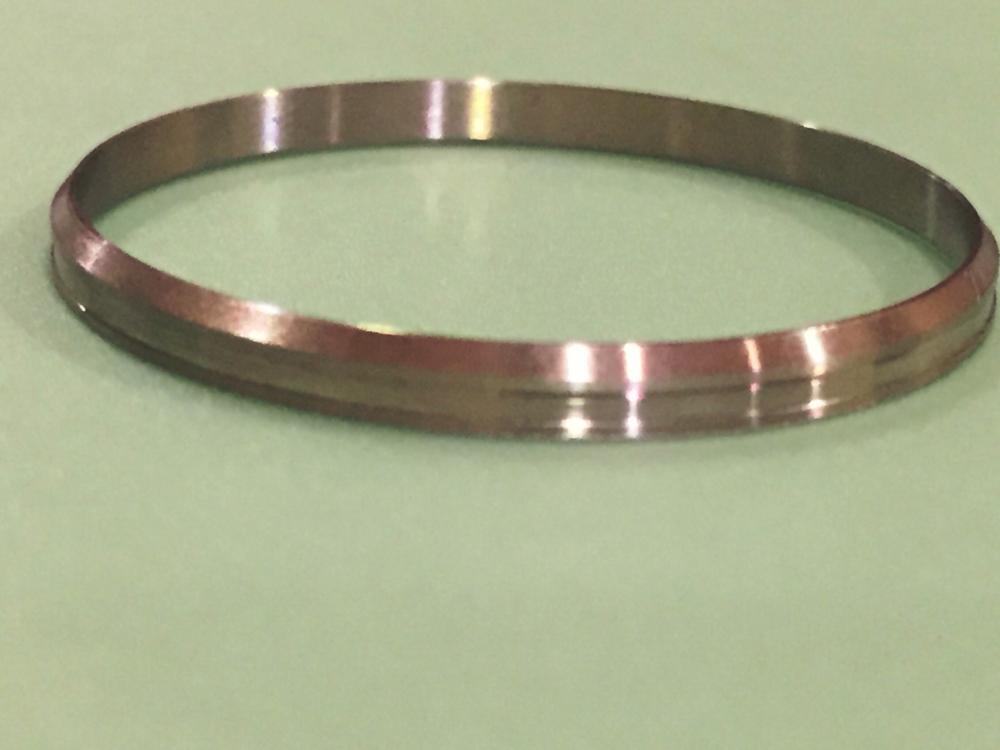
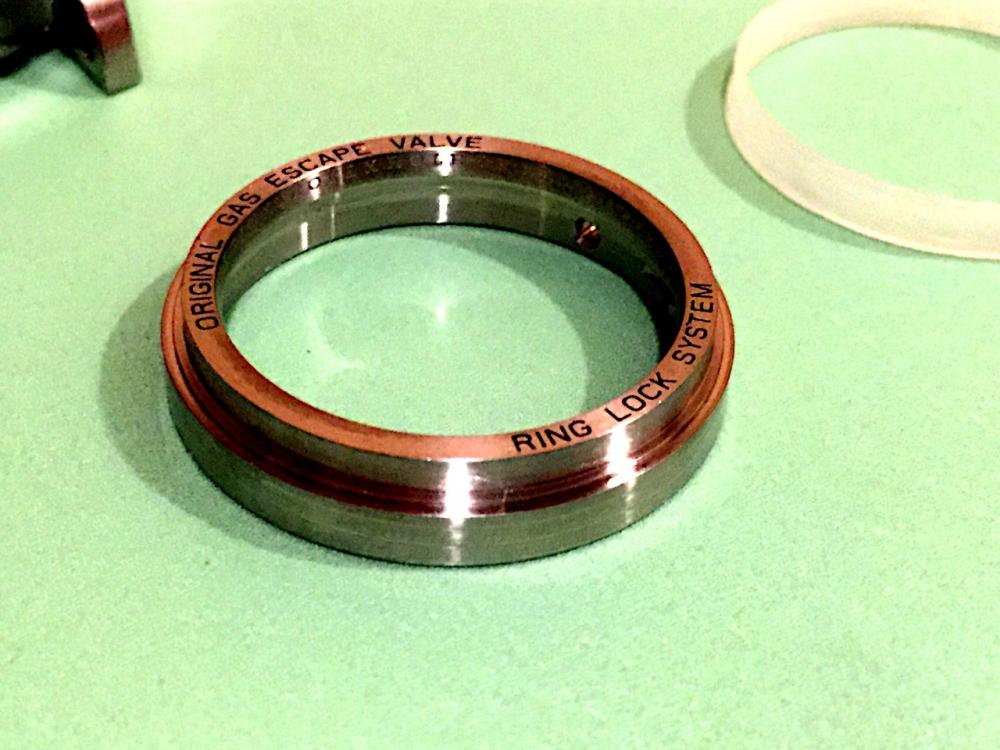
Hello everyone! As promised, here’s my DSSD Gen Bezel mod. I guess you can say that I fell into this one. I was looking for a gen dial after reading PeteM’s post on the differences in Rolex gen dials for the DSSD. So when one came up for sale on the boards, I couldn’t help but jump on it! That same member was also selling a gen bezel with gen insert. Well, after a little salesmanship and negotiating by the Sacsah1, I had a gen bezel assembly with gen bearings and click. Very exciting! Now came the research. I had reached out to PeteM, BK, and the member that sold me the dial and bezel, Sacsah1. Pete built an incredible franken DSSD from gen parts that he stumbled upon, so I picked his brain a bit. To no surprise, Pete being Pete, shared a wealth of info on his journey to building the ultimate DSSD Franken. But most of what he did also included a lot of machining parts and mid-case. He did all the work on his own. Being the son of a Tool & Die Maker trained in Germany, I was not without some skills and more importantly… tools! Sacsah1, as I learned is a great connection to the gen parts world! He also had a lot of insight into what you can do and what you can’t do. He has worked with a few of this forum’s best modders on his own pieces and was a wealth of info for me as well. What I learned is that this mod of fitting a gen bezel on a Noob DSSD case was a problem that has frustrated some modders. BK provided guidance from what he learned that works with the Noob case and what needs modding. Here’s what I learned. First, how the gen is broken down. The clamping ring is the part that would need to be modified, as it was larger on the Noob than the gen. The bezel would not snap down on it. CAUTION: By trying to force the bezel on, I nearly destroyed the fastening ring. The fastening ring is a nylon ring that sits inside of a groove in the bezel. I was able to repair it so that it was functional. But it’s damaged. Some of it was flattened and nearly torn. Thanks to Sacsah1, I have a new one on its way! The Noob DSSD is actually pretty amazing! They built it part by part to the gen. Not necessarily to spec, but really close. When chatting with Pete, he mentioned that he had some extra parts and a double AR’d crystal. I purchased the crystal from him without hesitation and he offered to send me all his extra parts for just shipping cost. A truly noteworthy member of this community! In order for the bezel to fit, I had to machine down the outside of the clamping ring to a point where the center groove is cut. So it’s practically smooth all the way down. I could still make out where the groove was cut. I checked my progress every now and then by putting the clamping ring into the bezel (without the fastening ring installed) until it rotated smoothly inside the bezel. I used a sharp tipped Jewelers file to hand cut a new groove into the clamping ring. I later learned that I cut that groove about 0.75mm too high, leaving a gap between the bezel and the mid-case. I ended up machining down the height of the ring by 0.75 mm. By machining the clamping ring down, the rep bezel would no longer fit. I got a bit nervous that if this didn’t work, I’d be up the creek. I reached out to BK who had an extra clamping ring in his toolbox and sent it to me for the cost of postage. With a plan B, I felt comfortable to push this forward. Clamping ring before: After machining: Bezel gap before: After: To say that I was a bit anxious when it came to putting it back together would be an understatement. I did realize that that by machining the ring down, I did stretch the diameter a bit. I decided to heat the ring up to a red glow and quickly cooling it down. That did the trick and it was back down to its original inner diameter. I found some pics of a gen mid-case of a DSSD and saw a machining pattern on the case under where the bezel sits. I decided to cut the same pattern into my Noob mid-case as well. I also sealed up the HEV with clear Jeweler Epoxy while in there. When I had everything apart; I ultrasonically cleaned all the parts and rebrushed and polished the case and bracelet. I used Bergeon medium and fine Satin Bars to achieve that Rolex look. It came time to reassemble the case and see if this whole endeavor worked. I carefully reinstalled the fastening ring into the bezel and made sure that all the pinched areas were deep in its setting and placed the bezel over the clamping ring, and it snapped into place! HOLY CRAP! THIS WORKED! It rotated smoothly and had that perfect click! In order to have the top of the crystal sitting evenly with the bezel, I pressed the crystal in place with the bezel already on. There it is! Gen bezel and insert on a Noob case! So, This DSSD has the following: Gen Bezel and insert Get click and bearings Gen Dial Double AR Crystal I have to say that the AR’d crystal makes this whole thing pop. The gen uses a very high quality crystal that almost looks AR’d. Pete compared it to his buddy’s gen and the rep looked better. Not by much, but better. With this crystal, the dial and bezel really pop! I want to give a shout out to those that helped make this mod possible! Thanks to Sacsah1, PeteM, and BK! Thanks for reading! P


 1 point