When you buy through links on our site, we may earn an affiliate commission.

jmb
-
Posts
4,800 -
Joined
-
Last visited
-
Days Won
9
Everything posted by jmb
-
Nice looking dial, I didn't know tritium had that short of a life. Makes me glad I didn't get that high-dollar tritium front sight put on my Colt!
-
gavidoc, thanks for pointing that out a bit clearer, that's why I decided not to do a "how-to" on the procedure. I really can't think of any easier way of doing it and the only way I've found that works reliably is to locate and drill each hole. Drilling through and nailing the bottom in the same setup was what got one of my holes a couple thou off and slightly buggered up the back side when the bit broke through. But, if anybody is curious and has a Harbor Freight store nearby... I
-
Now that it's sorta done I think I'll wear it for a few days to see if the crystal will fall out...
-
With all of the activity on the "no-date" front around here lately I felt left out so I figured I'd build me up one. It still has a ways to go but it will get there (I think) with a couple more mods. I started out with an example that had a very low crystal and no lug holes so I popped out the crystal, drilled the lug holes, and set back in a 30.0 mm dia. x 3.0 mm thick crystal from ofrei. After looking at condemore's fantastic pics of his "budget GMT" I now see I need to polish the edges of the crystal I used as the top has a slight bevel but the sides are "frosted" looking. I still want to either re-shape or replace the crown as it just seems a bit bulky and unrefined, and of course polish the edge of the crystal or maybe even put in a 2.0 mm thick crystal as this one really sticks out a lot farther than I thought it would. Here's what it looked like out of the box. Typical no-date rep with no lug holes: This is after a couple hours in the shop this evening. I still need to finish brushing or buffing it, I haven't decided whether it will be all brushed or have polished sides. One last observation, although this was the cheapest of my cheap subs the case is made of the hardest stainless so far - I broke two cobalt bits drilling these lug holes while the last drilled like butter. I think I'll be buying the rest of my cheapies from this supplier. But, enough jaw-jacking - here we are: Now that I have this done I can devote the weekend to machining hand pressers!
-
Jkay, yeah, you're correct. Any time I ever drill into a surface that's not perfectly perpendicular to the drill bit I always use an end mill to "spot face" where I'm going to drill AND still use a center drill. If the location has maybe +/- .010 I might skip the center drill and just use a stub drill but on this I was trying to get closer than that.
-
That's slick, much nicer than my bargain-basement GMT Master II! After looking at yours I see that I need to figure out a way to polish the edge of the crystal on my last project...
-
Predfan, surely there are people around that do this. I think I'm going to buy a few more "inexpensive" no-date Subs, drill the lug holes, generally spruce 'em up. Since I don't need a drawer full of "no date" subs maybe I can then pawn them off! :-) Maybe by then I might know what I'm doing... Carl, thanks for the encouragement, it's fun to tinker. I may be about to run out of gas on the super low-budget Sub as my next project might have been a different bezel insert but these super cheap ones just have what amounts to a "sheet metal" insert and there would be much machining to be done to fit a thicker insert. But, it might get the crown reshaped as soon as I make a holding fixture to stick it in so I can chuck it in the lathe...
-
You can't directly drill into the lug, at least I wouldn't try it. I first used a 1/16" carbide endmill to lightly spot where the hole would be, then located started the hole with a small center-drill, and followed up with a drill bit. It's somewhat tedious but not too bad if you have the stuff laying around...
-
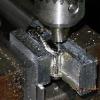
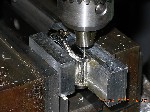
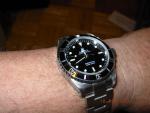
OK, I have sacrificed my $43 Submariner on the alter of knowledge in order to discover a way to drill thru-holes in the lugs. There seemed to be a lot of info on how to re-drill existing holes but I could find nothing on drilling lug holes where no thru-holes ever existed. I have finished my first attempt at drilling lug holes where no external holes existed. All-in-all I'm not too unhappy with the results and feel the next attempt should go rather smoothly. I tried three different "techniques" until I decided which was the best way to proceed, consequently one of the holes is a few thousandths off but not really noticeable especially when on the wrist. I don't think I'm going to attempt a "how-to" article as probably most of what I would describe as far as hole location, etc., would only make sense to another machinist. I'll just show one pic of my setup in the mill. I finished this a few days ago but was waiting for the correct spring bars from ofrei, which arrived today. While I was at it I also reshaped the CGs a little bit and decided that a tool/shop watch should not be shiny so I gave the entire case a fine brushed finish that hopefully will not show scratches as bad. Here are a few pics of the finished product. The only trick is to get whatever it is you are working on clamped down solid so it won't move and where whatever operation you want to perform can be precisely located relative to your fixture. That's about all i'm going to say about that! This is the watch before I started on it. Even though it was only $43, including shipping, and is probably as "incorrect" as you can get I have really gotten attached to it. I've worn it pretty much constantly since I've gotten it and have decided it's now a perfect watch (strong spring bars, brushed finish, etc.) to wear while farting around in the shop. I have it regulated to about +2 sec/day and it hasn't missed a beat. All that said, I'm glad I didn't destroy it but I wouldn't have lost any sleep if I had. I can confirm that a $40 range Rolex rep does indeed have a stainless steel case, albeit somewhat on the soft side. The lack of hardness was fine with me as it made the drilling much easier and besides being a cheap ba$tard I'm a bit on the lazy side! This was how I fixed and secured it on the mill: Here are the results: My next attempt at this will be on my $33 "no-date" Submariner. Now, back to making hand pressers...
-
I told anybody that would listen that's what I was buying them for... As far as the ball, I'd really be curious as to it's origins! It was from an e-Bay seller in Australia...
-
Oh yeah, BTDT and got several T-shirts... :-p
-
Yeah, that's how much "jumped" onto it just by touching it to the tube! Most of it got wiped off, and it's cheap!
-
Probably would be a good idea. I started doing this years ago when I was working with screws going into plastic. It was about the only way I could ensure I didn't get at least one crossed...
-
Woo Woo!!! I just reviewed and approved the pictures of my new eurotimez upgraded V5 so I should have it shortly!!! Man, I'm pumped!! Is it here yet, is it here yet, is...
-
Zig, thanks for the suggestions, they make a lot of sense and I'm just starting to learn this stuff. I do have the covered trays and would probably have used them but I figured the whole thing only took about 30 minutes so it wouldn't matter. I need to "make" myself develop good habits like what you mentioned. Klock, I thought about that AFTER I did it but I appear to have gotten lucky and I did grease all three when assembling it I probably should have mentioned that part. Speaking of O-rings, are they standard metric O-ring sizes or are they some special size? I probably need to lay in a stock of these, and case-back O-rings as well... I have edited the initial post and incorporated these suggestions/observations.
-
OK, I replaced the humongous Sub crown on my cheapo GMT and therefore had a crown and tube left over that I was itchin' to put to use. I recently got another slightly better quality (mostly) cheap sub but it came with a "twin-lock" type seal arrangement which I wasn't real happy with so the light bulb went off. I decided to put the crown and tube I removed from the GMT into the new Sub. I know nothing about this but just approached it from what appeared to me as the logical way to do it. Here's how I did it: The first couple of pictures removing the case back and stem didn't turn out for some reason so you'll have to use your imagination as I'm too lazy to tear everything part and rte-shoot them! But, I basically remove one of the link screws and separate the band - I think this is easier than removing a spring-bar but some might prefer to do it that way. This allows unhindered access to the case back which can be removed with the opener of your choice, I use a "sticky-ball". Once the back is removed pull the stem out to the "time set position", depress the "latch", and remove the stem by gently pulling it out of the case. This picture shows the a21j stem retainer release from the reinstall picture as the removal picture didn't turn out: Then the stem can then be removed. You will notice that there is no external O-ring on the old tube and that's the reason I am changing it: As with most of the lower priced reps this one has the movement secured by a plastic retainer/spacer (white in this case) which you simply pull up and off: At this point I usually put a surgical glove (non-powdered) on my left hand, and turn the watch over and let the movement assembly drop into my hand. I have been reminded by The Zigmeister that at this point the movement assembly should be stored in a covered tray, or at least protected in some manner (between layers of watch paper). I'm sorta lazy and and haven't developed all of the god habits I should so I just set the movement aside on a paper towel - which is another no-no: Although I think there is a special wrench to remove genuine Rolex tubes this rep tube didn't look like there were any provisions for any kind of wrench. I snagged a small tapered reamer out of my toolbox (nice to be a machinist sometimes) which I then lightly tapped into the tube. I have read that some use a small E-Z Out and see no reason why that wouldn't work just as good: The tube has a standard right-hand thread so it removes with a CCW rotation: After a few turns the tube is removed: Here you can see the physical difference between the new and old tubes: I lightly pressed the "new" tube onto the tapered reamer and applied just a bit of blue thread locker (Loc-Tite, Permatex, etc.). Klocklind1 correctly points out further in the thread that I should have removed the internal O-ring before doing this, and I thought about that afterwards, but I appear to have gotten lucky - this time: Install the tube into the case by engaging the threads and rotating it in a CW direction until just snug. You don't want to risk breaking off the tube, stripping it's threads, or "reaming out" the inside of the tube. The thread locker will keep it plenty secure once it cures: After the tube is installed clean up the excess thread locker: Put the movement assembly back into the case and reinstall the stem. This is the perfect time to apply a bit of silicone grease to the internal O-ring, O-ring up in the crown, and the external O-ring. Reinstalling the crown/stem assembly is basically the opposite of removal - insert the stem through the tube and into it's hole in the movement, then depress the stem release and press the stem inward turning slightly if needed: You will feel it sort of click into place and you can then release the latch. Make sure you can wind, set date, and hack and set time. I got lucky on this one as the stem and crown assembly I removed from the other watch just happened to be the correct length so I didn't have to "modify" the stem length. If all is good then screw down the crown: Reinstall the movement retainer (or screws and tabs if yours is a higher quality case): If you are satisfied that the dial is aligned and everything looks good grease the O-ring and reinstall and tighten the case back: Put the band back together by lining up the link and reinserting the screw: Using the proper screwdriver lightly rotate the screw CCW until you just feel a light "click" reverse rotation direction and snug up screw. Not too tight as you don't want to strip the threads: That's it!
-
No frankens in the works right now just taking extremely low price reps and "upgrading" them with easy and cheap mods to make them look not quite so obvious. Do you think the crown I used in this GMT is reasonably close in shap to a gen crown? Several of my cheap subs that will be used in my projects have rather blocky crowns so if this one is a good copy and reasonably priced for about $20 I will buy a few, if not I will then try to mod the blocky one.
-
I have a goal of keeping all of them under $100. Right now I have about $60 ($43 for watch and about $20 for crown and tube) into this one. If you guys will give me either a thumbs up or down on this crown I will order some 7mm versions if it is OK and I'll take a few snaps when I install it onto the "No-date" Sub project I'm working on.
-
This style, and new Daytona, are the only styles I have extras of, but I'm still looking! How does the crown look? I think it looks a bit more correct than most of the rep crowns I've seen and I may order a few more. I just want to make sure that it's not a wasted $20 for crown and tube.
-
Thanks, vortx.
-
A while ago I posted one of my budget "finds" which was a "Pepsi" GMT Master II and the majority of the feedback seemed to be centered around the fact that it had a Sub band and the crown was freakin' huge. I tried to do something about that this evening and I'm surprised at how a couple little items can change the total character of a watch. The first thing I did was to change the crown tube and crown from the overgrown 7 mm Submariner style "Triplock" to the more correct 6 mm "twin lock". Once people pointed out to me how huge the original crown was I agreed, it looked horrible! Kinda like a zit, it just stuck out and the more I looked at it the worse it looked to the point that I only wore it for one day and it went into the drawer! I'll let y'all be the judge: Second "upgrade" - I changed the band. I didn't have a "proper" late model GMT band but I did have a couple new style solid end-link Datejust II bands (I think that's what they are) so off came the Sub band and on went one of these: This is still a long way from being correct, and probably never will be but I think this makes it a bit more presentable. People also mentioned that they thought the cyclops "just didn't look right", still trying to look at pictures and figure out what I need to do about that. So, I think the next thing on the agenda will be to put the CGs on a bit of a diet, not too much, just slim 'em down a tad... Oh, y'all let me know what you think of the crown as I might want to lay in a stock of them while I can. Hey, having fun and now know how to change a tube and crown and size and fit stem so el-cheapo has served the purpose I bought it for - plus it keeps good time!!
-
Somewhat incorrect GMT Master II

-
What kind of properties need to be adhered to as far as the cleaning solution? I have an ultrasonic cleaner and use it on motorcycle carburettors so the cleaning crap I have is rather "robust" and probably not suitable for watch gears!
-
Heh, as long as it was frozen in the correct orientation and not like a half tooth off!
-
Isn't this "outgassing" property what is counted on when super glue fumes are used to enhance/discover finger prints on items? As far as viscsity, there are a variety of "gel" superglues that don't run all over the place.