
manodeoro
-
Posts
303 -
Joined
-
Last visited
-
Days Won
7
Posts posted by manodeoro
-
-
15 hours ago, Nanuq said:
@manodeoro, I used to. I worked on the arctic coast near Nuiqsut, Kuparuk and Deadhorse. Are those names familiar?
Not at all ... I can locate those names in/near Alaska but that's all.
Ekofisk, Johan Sverdrup or Coral South means more to me as I have often heard my sons quote those names (they sometimes quote SAE too).
My 2 sons, now 33 and 28, both work in oil and gas industry.
The older one works in Norway since 2009 ... he dives a lot so I built him a 16800 COMEX last year.
The younger one "is based" in France but during the last 2 years he has spent most of his time abroad, Norway / Singapore / India / Russia / etc ... why do I think about building him a GMT ?

-
 1
1
-
-
6 hours ago, Dlf said:
Ugh oh!
")
well I think there’s many different avenues to take on this build, I did as much as I could with the tools and parts available at a minimal cost, didn’t exactly end up cheap though as per usual.
The silix case is ok but has many drawbacks as manodeoro mentioned,
like the bigger than “gen” rehaut, and have to glue the plexi, weld, or some drastic machining.
A cartel case would solve that but then the case shape is off by a way!, even with fernaggling and shaping .
i’d pick what you’re happy with and try work around the obstacles that you’d find easier .
justin can do some nice engravings .
yes you can solder the fixed bars.
be patient took me over a year 🤣
Hi Rick my friend … your Millsubs are definitely awesome
I’ve been stopped on my build just because of « silly » question ; engravements or not engravements ?
I know justin nice work but I’m EU based and I couldn’t find anybody here to do the job except for laser engravings which would be solo.
I’m trying a side road those days to do my DIY engravements but if I fall I’ll stop temporizing and finish my build.
-
MY BAD !!!!
I'm sorry but I can't find how to edit my post.
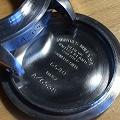
So something IMPORTANT : dial opening on A/6538 is of course not 36.2mm but 26.2mm
If you use a 26mm dial you get that special and really tiny "gap" one can see on some vintage Rolex models, just between the rehaut and the dial.
On my own build I'm using a 26 mm so I have that specific gap.
If you wonder how I do, using an 11 lignes (26mm) movement and a 26mm dial, to get everything stay firmly together in case with a 26,2mm dial opening ... just don't ask me because it's a secret

-
@Nanuq ... may I ask/know if you work in oil and gas engineering ?Very nice work!! But one detail you left out, are those SAE or metric washers you used beneath the lugs?

Envoyé de mon Moto G (5) Plus en utilisant Tapatalk
-
On 9/25/2018 at 7:55 PM, mzinski said:
Hello! I'm currently planning out my Burford dial, A/6538 build and I'm in the middle of my research and parts acquisition. From what I've read, there are many opinions on what case to use based on thickness, shape, dial size, and price. For me, I'm not going down the rabbit hole of a VN case build - I simply cannot afford $1050+ out of the gate on this build. So that said, I'm looking at building this around a Silix, HR, or Cartel case. Where I'm getting stuck is the size of the rehaute on these cases - I have no idea what aftermarket crystals can be installed in these various models.
The build I'm currently thinking:
- Silix, HR, or Cartel Case and Case Back
- Aftermarket Tropic 19 Crystal (Clarks, Ofrei, Sternkreuz, etc)
- WSO 1665 Bezel Assembly (planning to reshape to approximate the German silver bezels)
- Custom dial (another member of another forum)
- ETA2840
- Athaya 800 Crown and Tube (plus stem adapter)
- Aftermarket hand set (Ofrei, Raffles, etc)
- Ernst Westfall military insert (eBay seller)
- WSO 2mm spring bars (until I figure out how to fix the bars - maybe soldering?)
- Reshaping, luming, and assembly by yours truly
- Case engraving...I still need to figure that one out...
First, let me establish and confirm - I should be looking to install a Tropic 19 to be reference correct. If that is the right assumption, let me move on to Tropic 19's - if not, please correct me!
From what I understand, there are multiple variations of the Tropic 19: http://www.ofrei.com/page419.html with ID's of 30.45, 30.48, and 30.30 (and probably others from other sellers).
I have read this watch is meant to be pretty beefy and the images on RPR appear to be tall and rounded - so I would suspect the 20A variation would be the right one. The 20A comes in with a 30.30mm ID.
Are any of the Silix, HR, or Cartel cases going to provide me with a reasonable friction fit to any of the available Tropic 19 crystals? I prefer to assembly without heavy use of glue or spacers. It's one thing to add a thin bead of silicon glue as a safety measure, it's another to require that glue to hold things in place.
Anyways, any insights on the project is much appreciated. In the meantime I'm going to get back to obsessively reading everything I can find.
Hi buddy and welcome to the "A/6538 build Club"
") and congratulations
and congratulations
Dlf was the first trying that build and only one to finish it (as far as I know), mine should be finished within a few weeks (if everything goes well) and you'll be the third guy nutty enough to walk that path

If you dont mind I will share some of my "experience" here.
About the crystal a T19 is, IMHO, definitely the right pick.
If you start with a Silix case you'll find that the rehaut and dial opening are NOT the right size, way too large.
On my own A/6538 topic here (I still have to re-upload the pics)
I explained how I have shaved the existing rehaut (in fact my good friend and fellow countryman mascob1 did that following my technical blueprints) then grafted a new rehaut (latheworked by mascob1) on the Silix case.
At the end of the way I had a "correct" case with a 36.2mm dial opening and a rehaut perfectly fitted to receive a T19 (dont remember which one I ordered but I designed the rehaut so that hte one I got fit perfectly ... almost
)
To be honest the Silix case is a good and cheap way to start but almost everything has been reworked, rehaut, lugs, caseback (tried to "mimic" a gen one), etc ...
Bezel assembly ... I started with a WSO 5513, which is supposed to be a little thicker than the 1665 one (but I'm not certain it really is).
At the end I finished just keeping the upper part of the 5513 bezel (I shaved the bottom part) that I bronzed to mimic the "oxydated german silver" and clipped it on a custom bottom part so now I have a really thick bezel with a stainless steel lower part and a "german silver" upper part.
The retaining ring is custom too ... so that the custom lower part of the bezel clips well on it.
Custom dial ... DIY
Springbars ... I ordered 44mm Panerai bars (1.8mm thick) and tubes and will "hammer" on the case (lugs drilled 1.7mm / case in oven / bars in freezer / hammer everything together) then cut the exceeding tips, sand everything flush and polish.
Working that way no solder is needed ... just brute force

Almost evrything else is the same as in your list, except for the movement which will be a 21J
But I'll swap later if I really like the watch as it occurs that a friend recently gave me a non working auto swatch with an ETA2840 in it so I'll try to service it
About the stem adapters ... Athaya is crasy and sell those items far to high ($2.50 each) ... cousinsuk sells a pack of 5 for £0.85 plus shipping
Insert ... I'd really like to see your Ernst Westfall one
I think that's all ... keep us informed about that build
-
Sardinian flag and "Italian" watch


Envoyé de mon Moto G (5) Plus en utilisant Tapatalk
-
1
-
-
3 hours ago, jmb said:
Great job on the dial! Here's my early 70s franken (all gen except crystal, movement, and hands) which I sold a few years back in a fit of insanity. Keep working on the lugs and the bezel is still a hair fat but you're getting there.


Thanks @jmb
An enthusiastic quoting from you is one of the best rewards I could have hoped for
")
Your're 100% right about the lugs and the bezel !!! so I'll certainly do some more casework within the next months.
About the bracelet I'll probably keep the Oyster (I'll age it a little) as my build is supposed to be from the mid 70ies so a rivet bracelet would'nt be period correct I suppose.
I still have a question for you ...
HOW could you sold such a beauty ??? You were 100% insane when you did that
-
Most of the time « under the radar » but shiny as hell with some early sun
The more I wear that watch the more I love it
Envoyé de mon iPhone en utilisant Tapatalk -
Very nice work!! But one detail you left out, are those SAE or metric washers you used beneath the lugs?
Well ... I’m French you know so, despite my openness and all respect due to the Society of Automotive Engineers, I always use metric washers
Envoyé de mon iPhone en utilisant Tapatalk -
Awesome tutorial. Thanks. Really informative

Sent from my Lenovo K53a48 using Tapatalk
You’re welcome
Envoyé de mon iPhone en utilisant Tapatalk -
Ordered 3 cases, now about to hunt for the rest.....
3 cases ... Phong’s ?
If YES would you share a link ?
Envoyé de mon iPhone en utilisant Tapatalk -
3 hours ago, Sogeha said:
I’m very impressed by your ingenuity. Well done
3 hours ago, Champagnesky said:wow awesome work mate.
1 hour ago, RichardH said:Great post, and really nice job! Thanks for sharing the photos, I'm just about to start a similar project myself.
Cheers - R
Thank you all buddies

@RichardH ... good luck on your project and hope you'll enjoy it, and fell free to chime here if you think I can be of any help.
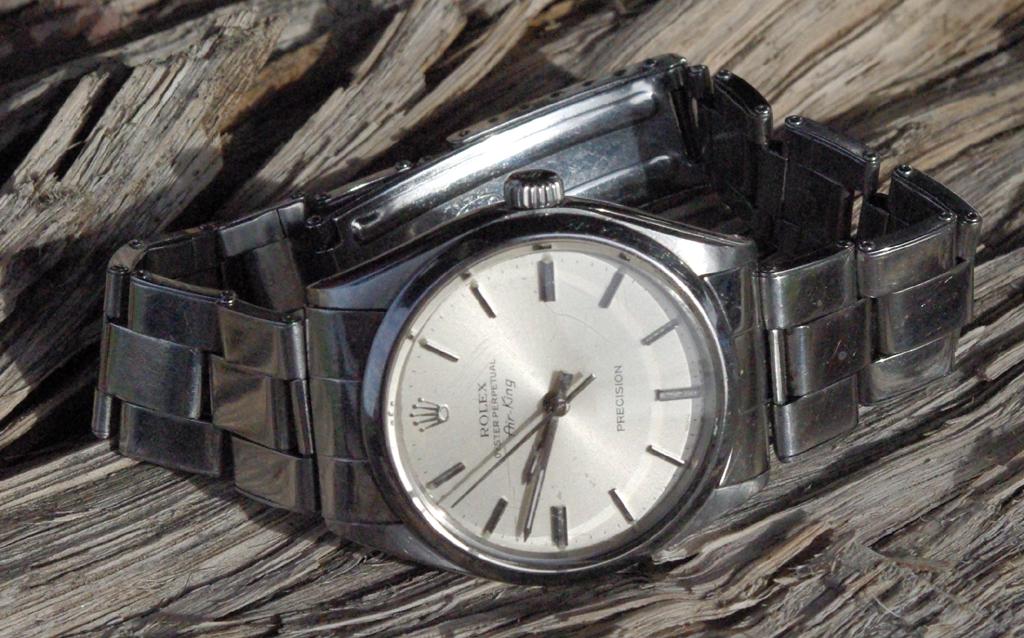
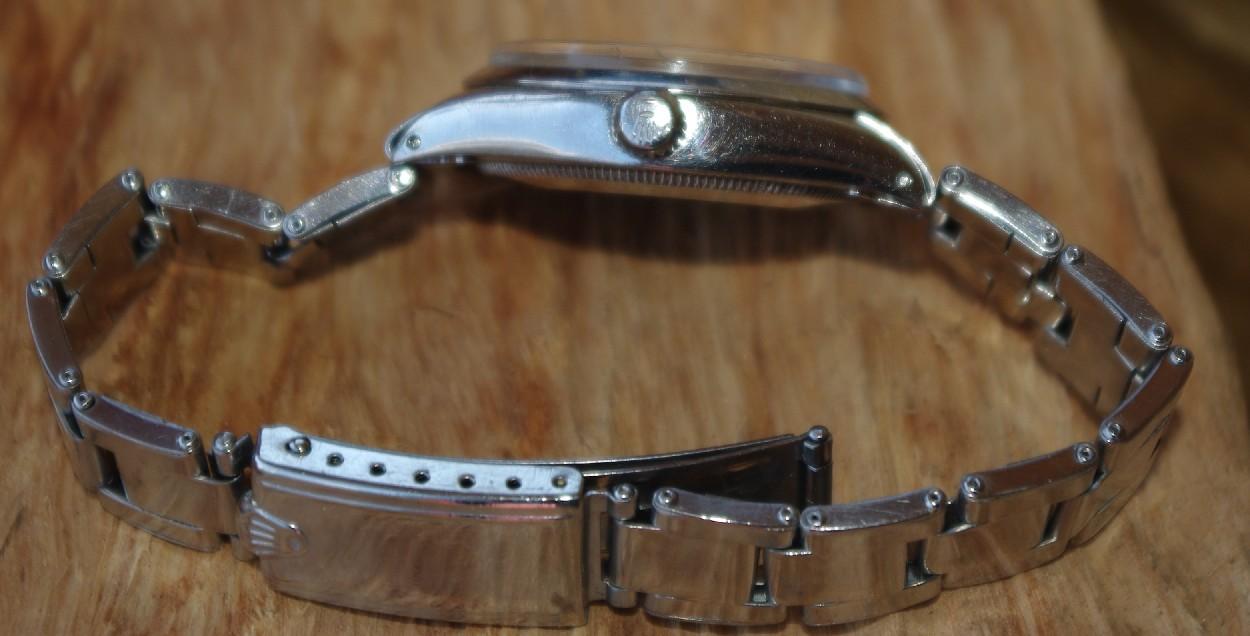
If I started to build a twin watch I would probably start with a 34 mm Oysterdate Precision case ... though I would have to source a different caseback as the 6694 Precision has a "rounded" caseback and the 5500 looks more like a 1002 caseback (with a flat brushed center).
But the trickiest part (not so tricky) is the dial as, as far as I know, there is no 5500 Rep dial.
So you have to start with a blank sunburst no-date dial, add a set of bar markers (8 thin and 3 thicker but all of the same length) and a matching coronet and build the Air-King dial.
50% of the fun is there cause when you have finished with that a lumed everything ... you're happy.
The 5500 hands are not thatveasy to source too but if you get a complte 34mm Precision watch you can use the handset
-
1
-
-
20 hours ago, earloflondon said:
Awesome mate. Many thanks.

Sent from my Lenovo K53a48 using Tapatalk
thanks mate
Sent from my Lenovo K53a48 using Tapatalk
I said I would put my tutorial about "how to drill watch lugs with a dremel" on that forum so now it's done
Here
-
Last year (February),as I was just searching infos for my first build, I went on forums asking for some help about drilling lugs with a dremel.
It really seemed to be a dead end way but I tried and tried again and today I'm glad to say that YES ... it's possible to drill your watch cases with a dremel.
I have never seen a tuto showing how to drill lugs when you live in a city flat and have a dremel but no place for a real drill-press (unless you show your girl/boy friend how to open the main door and leave) so I hope this one could be usefull.
So ... let's go to the facts.
A few days ago I had to drill the lugs of a 16610 case with non pre-drilled lugs (and a sh...y paperclip bezel construction) so I have made some pics all along the process.
I have NO drill-press (I know I could show my better half how to open the main door and leave but ... I'm not ready to do that).
So what did I use and how did I do ?
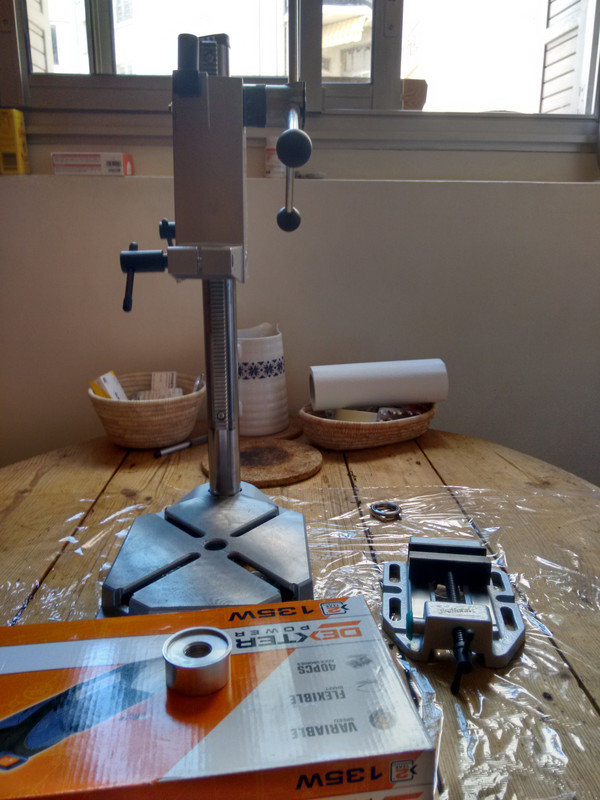
My tools :
- a punch
- my 40$ dremel-like
- a 50$ little drill stand (got it on sale on Amazon)
- an 43 mm adapter (10$ on ebay)
- a cheap (but good) vise
- 1mm + 1.3mm HSS drill bits
- cutting oil
- "The Foundation" (Zac Brwon Band)
I choosed a 5027000 Wolcraft drill-stand because it had a toothed rack and a return spring, it could be put in parts and in a card box (altogether with vise, drill bits and cutting oil) in less than 5 minutes.
That cardbox goes to the cellar when I dont need those tools while my dremel-like stays in a drawer with all the watch parts and ongoing projects.
And if you ever wonder why I use 1mm drill bits AND 1.3mm drill bits :
- it's easier (IMHO) to center on the hole you punched if you drill 1mm first then 1.3mm
- where I leave (Europe) I can buy 10x1mm HSS drill bits for about 5$ and 1.3mm HSS drill bits I bought on cousins.uk are 5$ each so I really take care of them
An now the process (took me about 1 hour).
1 - Open the cardbox and build the drill stand
You'd better protect your (kitchen) table because you will use a bunch of cutting oil
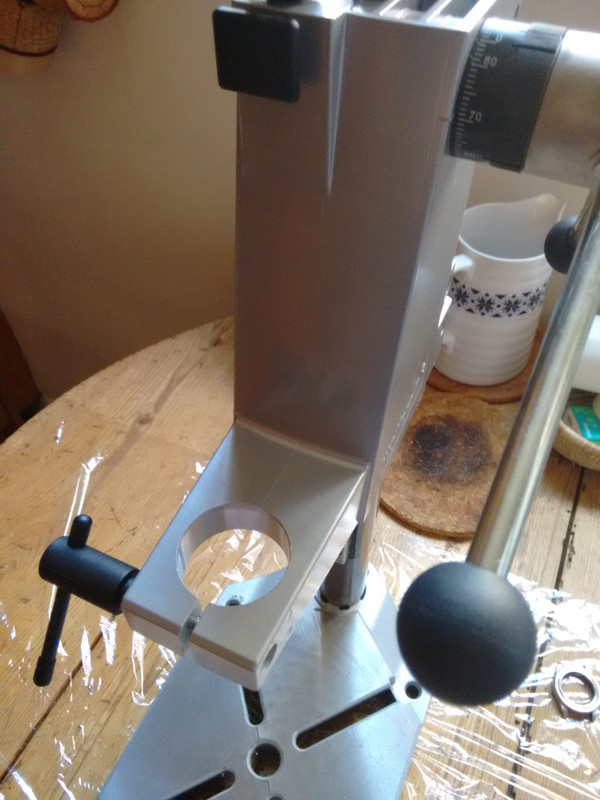
2 - Put the 43mm adapter and prepare you drill bits
Of course you screw you dremel on the adapter and put a 1mm HSS drill bit ... I forgot to take a specific pic
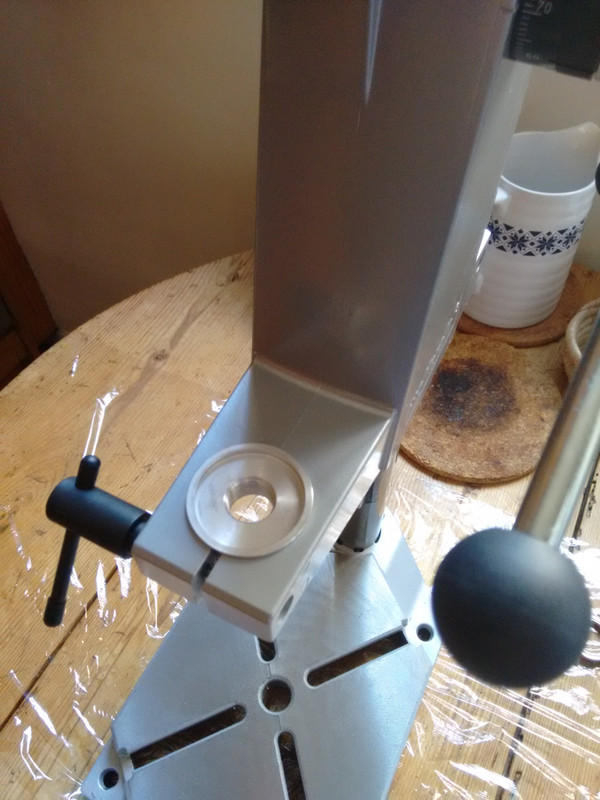

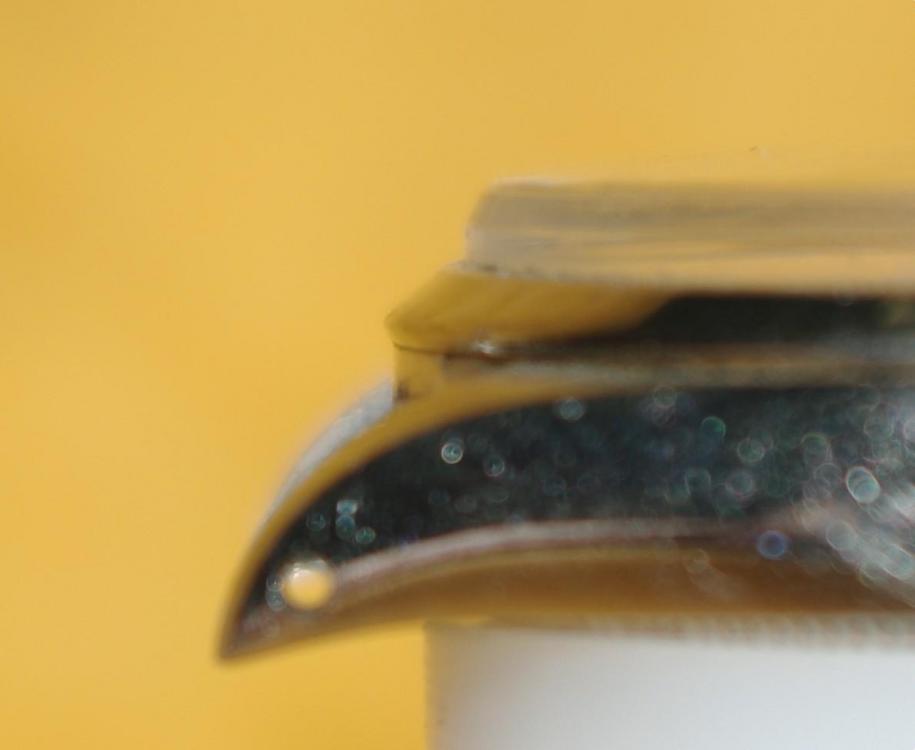
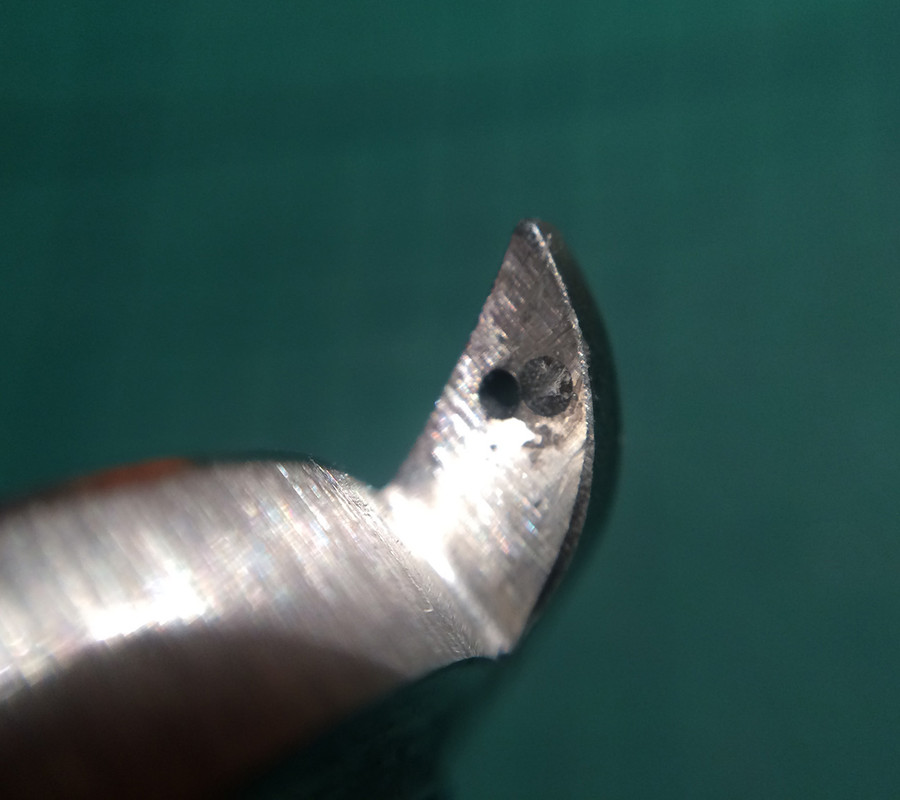
3 - Punch the watch lugs
Note that I had already marked the lugs with an extra-fine permanent pen
You'd better punch large enough so that the 1mm drill bit can easily find its place in the hole
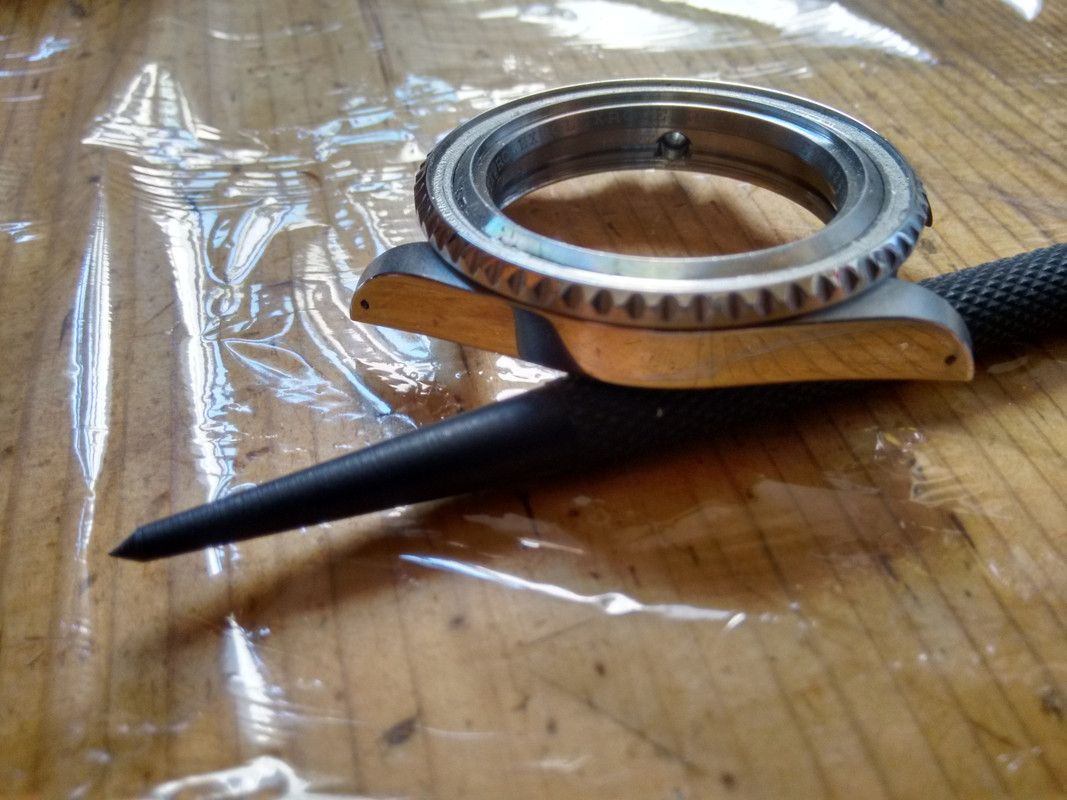
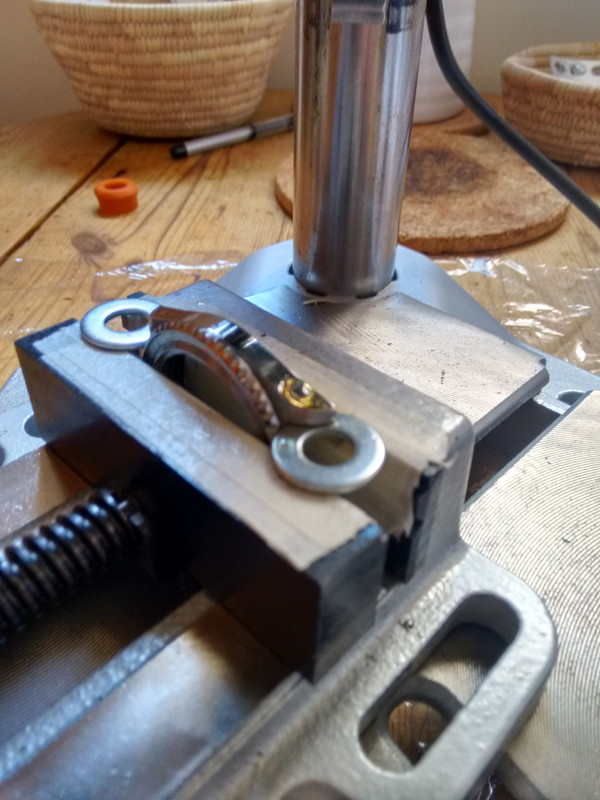
4 - Place you watch case in the vice
I put some painter tape on the vice to protect the case
It's better to place some metal pieces under the lugs so that the case dont go down when you push a little with the drill bit

5 - Place the vice on the drill stand and center the drill bit precisely on the punched hole

6 - Put some oil on the punched hole and drill
Don't be stingy with the oil ... there is never too much of it
About the speed I used I cannot be precise because my dremel-like has a variator marked from 0 to 5.
I worked bteween 1 and 3 so the speed was probably between 7000rpm and 18000rpm.
From my very short experience in drilling and depending on the drill bits, I would say that the speed is good when the "steel-dust" comes out easily with some oil while you drill.
And do not forget to clean the lug and put some new oil every times it looks like the last PIC here ... about 3 times on every lug.


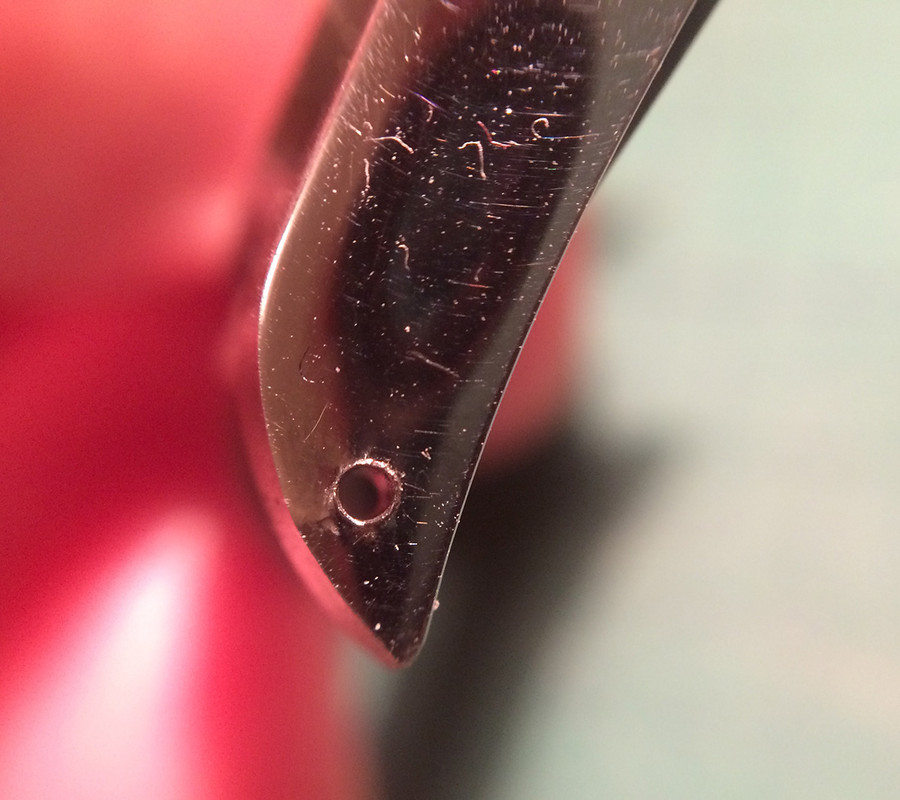
7 - Now you have drilled all 4 lugs with a 1mm bit, so place the 1.3mm bit on the dremel-like and drill again
That part is very easy as you process the same as with the 1mm drill bit.
But do not forget about beeing "oily"

8 - Now you have an early-oily 16610 case so just wash it and clean it and it will be just "early"
You still have to thin the lugs a little, cut nice chamfers, polish the sides and crownguards and do a nice Rolex brush on the upside of the case, but all this is itty-bitty cause you have done the tough part.

Hope this helps.
And please leave your comments, questions and advices.
-
2
-
-
@mzinski
 congrats !!!
what a helpull (emphasis HELFULL
) tutorial ... as I already have everything you used there I'll definitely put the two-component glue in my drawer and follow your steps.
-
Here's the complete build story
It all started when I saw, on a UK site, a watch showing a beautifull patina.
That 5500 Air-King was at £3.000, a fair price IMO though I really had a better use for such an amount at that very moment.
But I must admit that I fell in love at first sight and I craved to have one.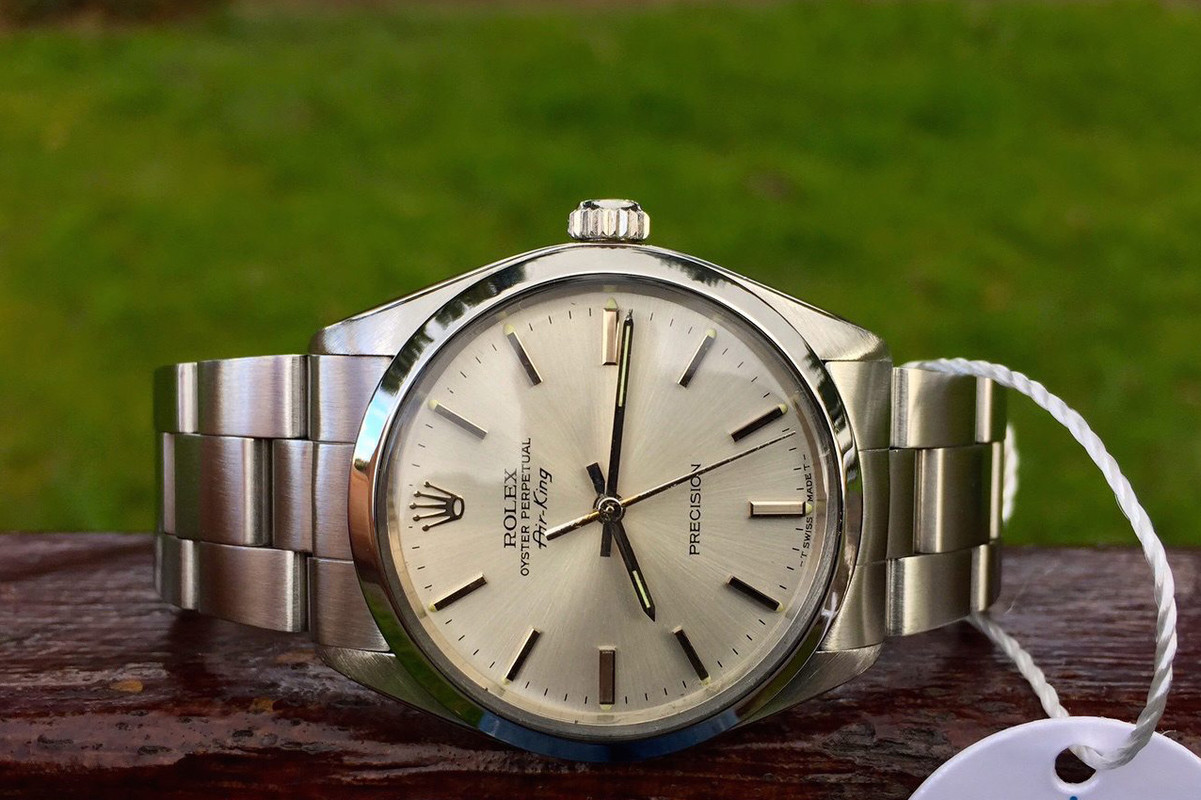

I already had 2 Air-Kings, 14000 models in my drawers.
One was a DHGate I got from @English Gent for the amazing amount of £67 shipped.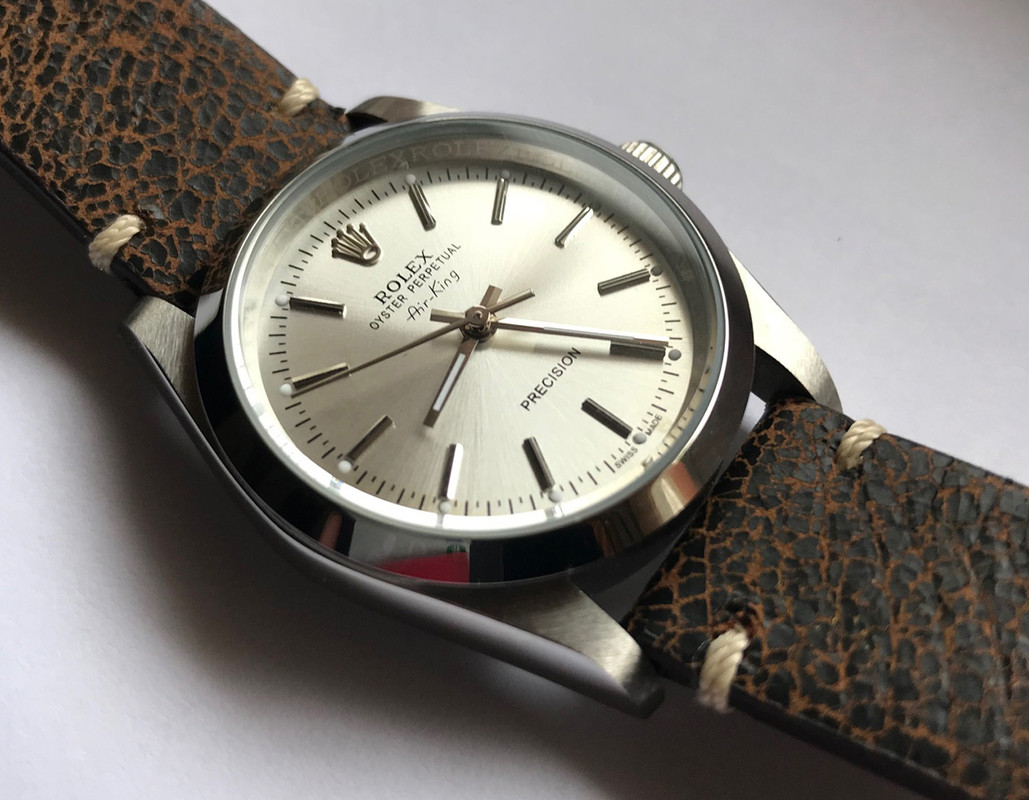
The other one I bought from Silix, only $100 shipped, just to check if a$30 difference could imply a difference in the making.
And yes there was a real difference as the Silix had a better dial, a better movement and a much better case and bracelet.Then, considering the fact that the DHGate one was a little small (not exactly 36mm) and spent almost all its time in the drawer despite the fact that she was really nice on the wrist, I decided that I could take my chance.
So I decided I could try to transform a soso 14000 into a nice 5500 ... thus the really long journey.First I had to mod the dial.
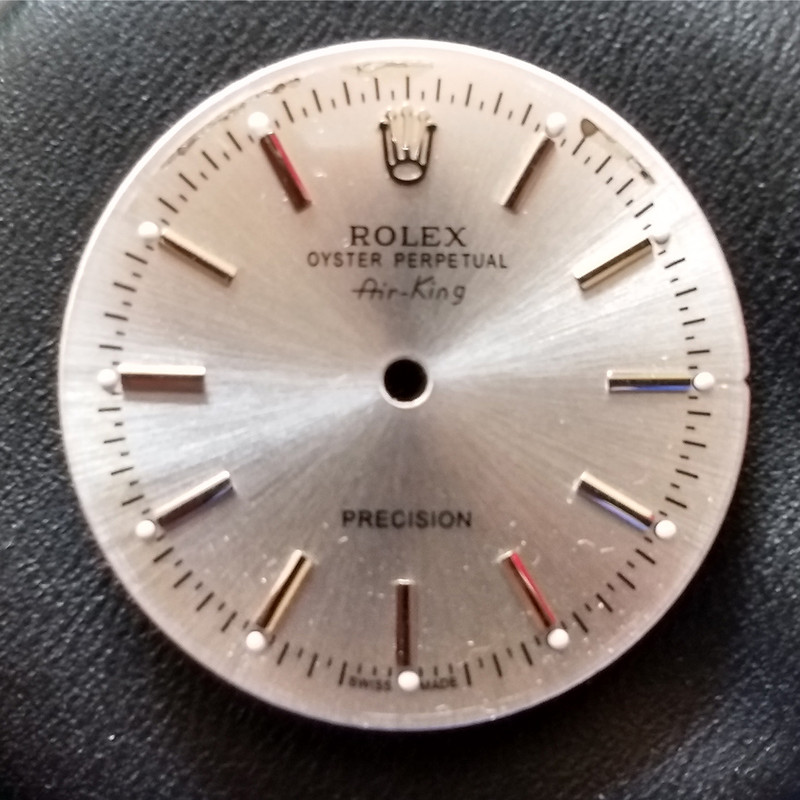
I removed the bar indexes and the crown and put them aside then I stripped all the letterings, using acetone and Q-Tips and only kept the "soleillé" (sunburst)
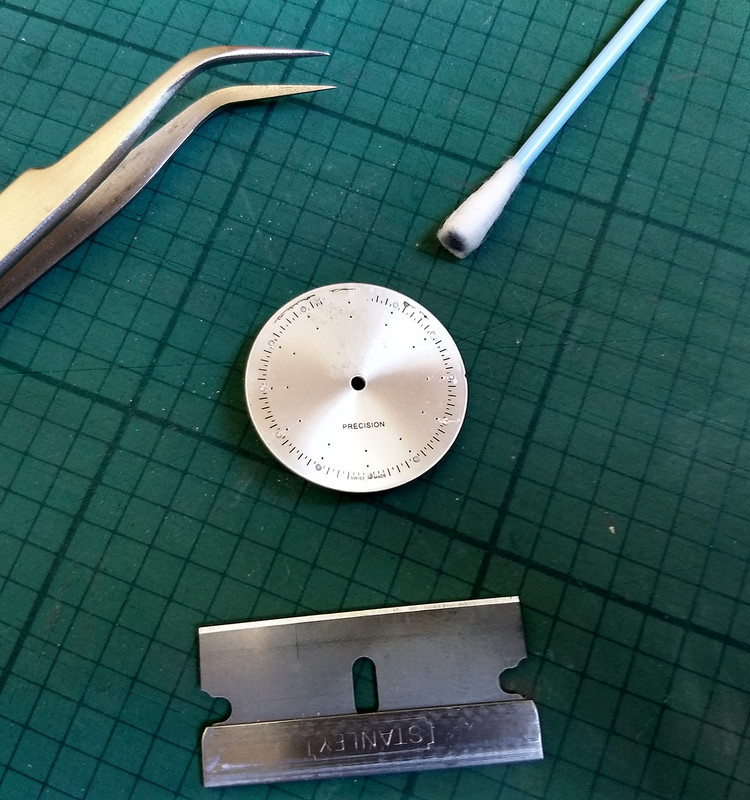
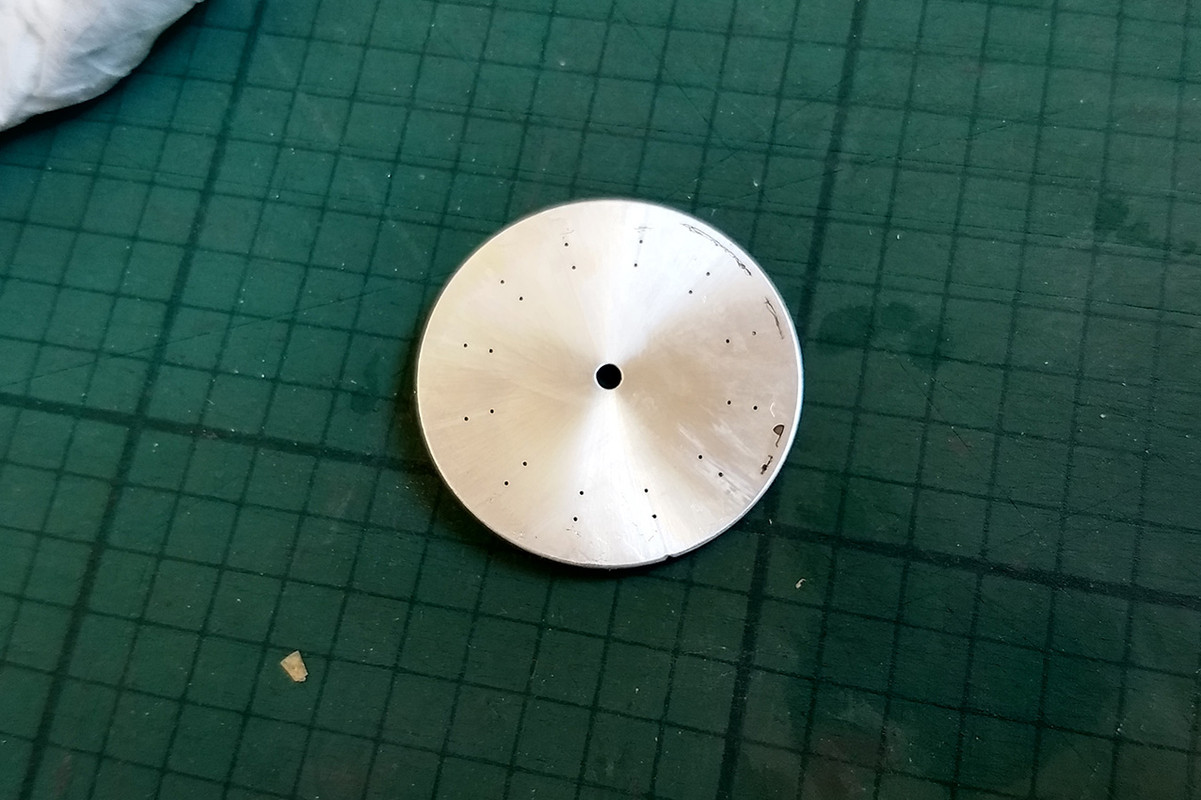
I had already designed a 5500 Air-King Precision patina dial and had printed it on clear decal paper so I just had to put it on
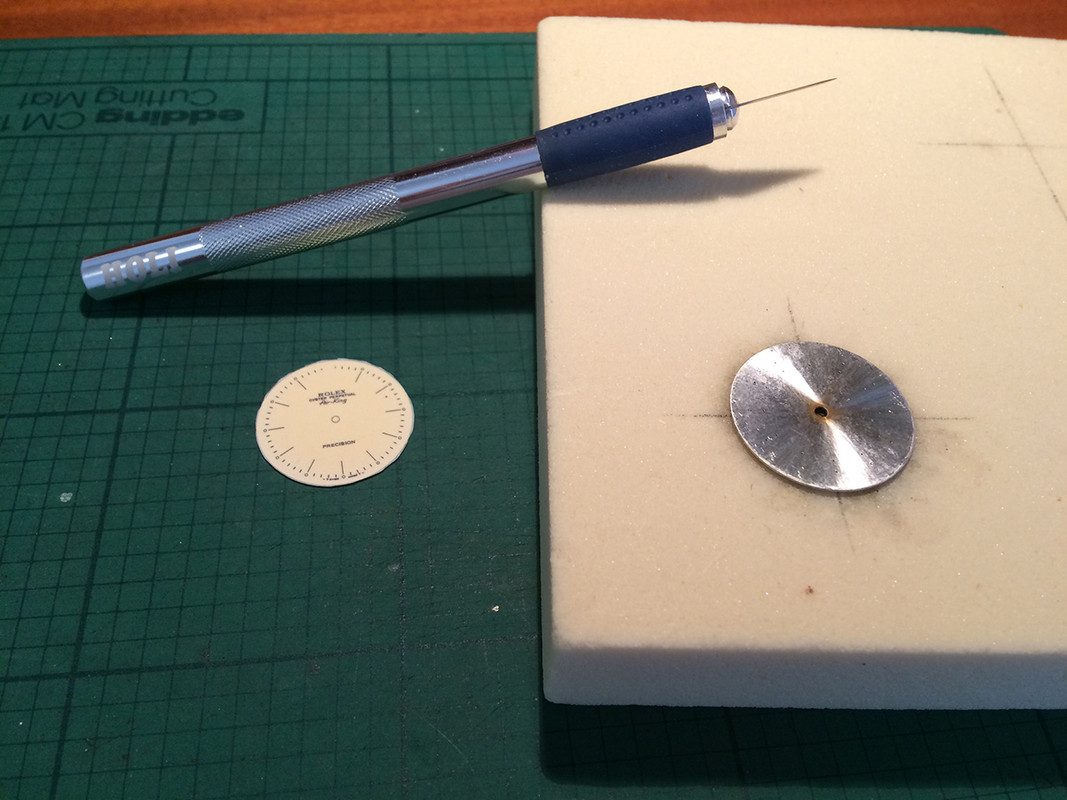
I picked the "right" indexes and a better crown from my spares, put them on the dial - with cyanolit because their positions had to be moved a little more close to the rehaut (about 1/2mm).
I used 8 "thin" indexes and 3 "bold" indexes (at 3/6/9) and I reworked the crown a little with a diamond files so that it could look a litte more "genlike".
Then of course a set of 5500 Precision hands and some dots of DIY vintage lume.

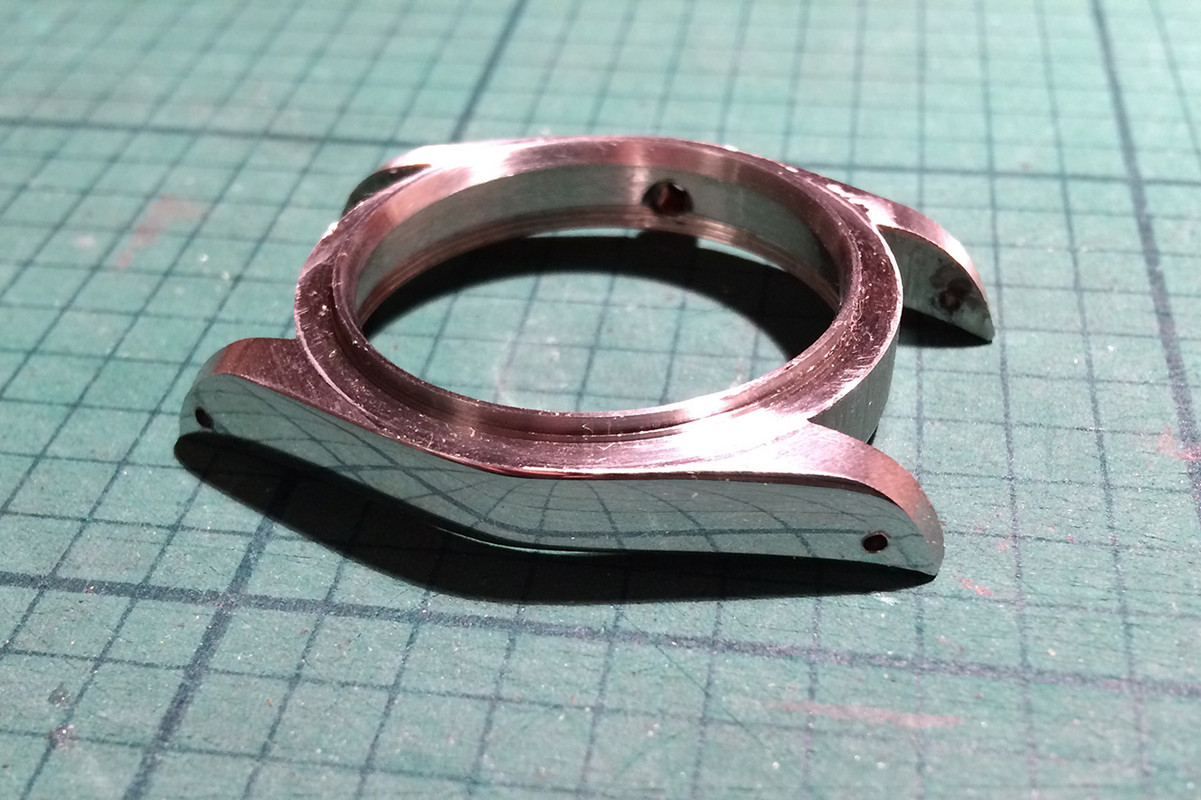
Before putting the dial and movement in the case I had to rework it a BIG lot :
- thinned the case and lugs a little to get closer to the 34mm size
- drilled the lugs from scratch so that they could get vintage spring bars
- filled the existing lug holes with solder so that the spring bars could not be "stucked" inside
- erased the engravements on the rehaut and thinned it a little so that it could receive a Tropic crystal
- reworked the bezel to the outer size of the Tropic Crystal
- thinned the lugs and bezel again while smoothing everything
- chamfered the inner side of the crwon so that the final look could be more « genlike »
- mod standard springbars to vintage 1,8mm springbarsI did not took pics of all the phases along the process but here are some

What else ?
It’s been a long but really interesting process and that I’m really happy with the final result.
Hope you enjoyed the story.
-
1
-
 2
2
-
-
1 hour ago, alligoat said:
Looks nice. I wear the 1503 Date and the size doesn't bother me in the least. I like the close up of the tritium dots- cool!
Thanks buddy
Well ... to be completely honest there's no tritium dots on that dial ... just home-made water-based lume on a DIY "sunburst patina decal dial "
I'll soon post the complet story of that build
29 minutes ago, bobandshawn said:Beauty. PM in bound about...
B
Thanks Bob ... why not so let's talk about that
-
44 minutes ago, earloflondon said:
It looks cool but I don't have the machinery for that, nor do I have the guts to take the risk
 . Still, nice one to consider thanks mate
Sent from my Lenovo K53a48 using Tapatalk
All you need to get is a dremel, some good HSS dril bits, a cheap drill stand and a good punch to mark the lugs before drilling.
About the guts ... I don't know where or if you can order those but if you search your trunks you should find some

I had posted a tuto on other watch forums but the pics are gone (thanks to hosting pics) so when I'll re-upload the pics I'll post the same tutorial here.
-
1 hour ago, earloflondon said:
Thanks mate. I didn't realize they have only one lug drilled on each side
Sent from my Lenovo K53a48 using Tapatalk
You're welcome
It probably depends on the model but I would say that 4499 definitely have plain lugs on the "crown side" and drilled lugs on the "oppositve to crown" side.
Removing the bars on such a watch could a PITA.
-
On 9/21/2018 at 5:52 PM, earloflondon said:
In fact, no particular model is on my mind. I thought otherwise. When I decided to work on the case, I thought it'd would turn out only in something similar to a bubble back. So I said to myself, I should aim for a shape near to something like this


Sent from my Lenovo K53a48 using Tapatalk
Really nice project and congrats for all the work you already did.
Looking at those watches, and though your project is a "fantasy watch", I think you could drill the lugs oppositve to the crown side (and only those) so that your case could be more accurate.
Like the one below
-
1
-
-
22 hours ago, JSebWC said:
Where are you ordering these parts from?> I didn't know there was another source for a Milgauss dial other than Yuki...
Great progress on the case so far....look fwd to seeing the dial you choose.
Looking at the pics I would say rafflesdials/Riyi
-
1
-
-
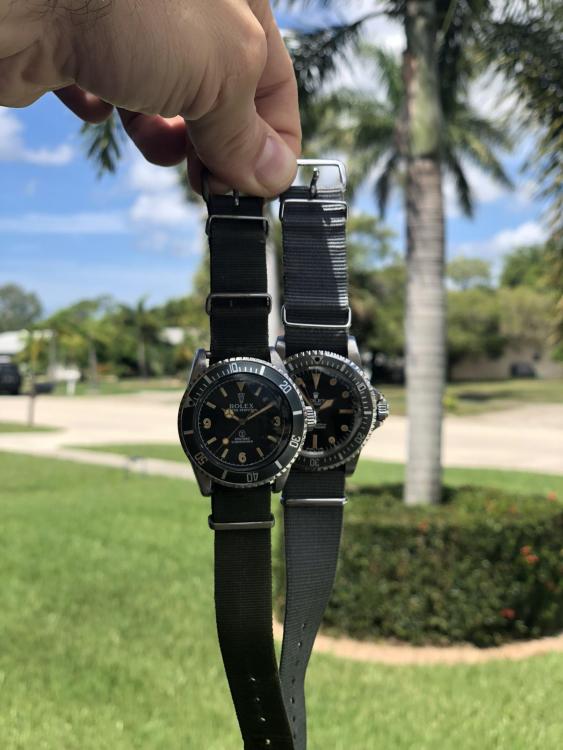
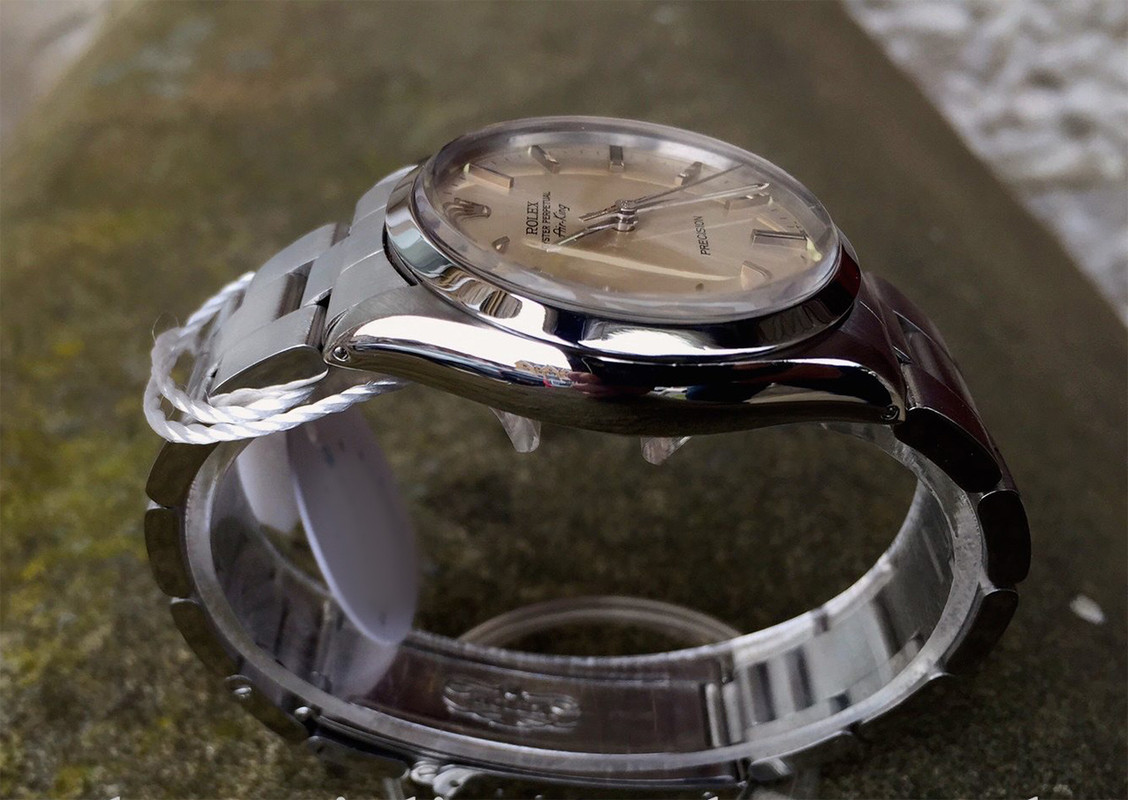
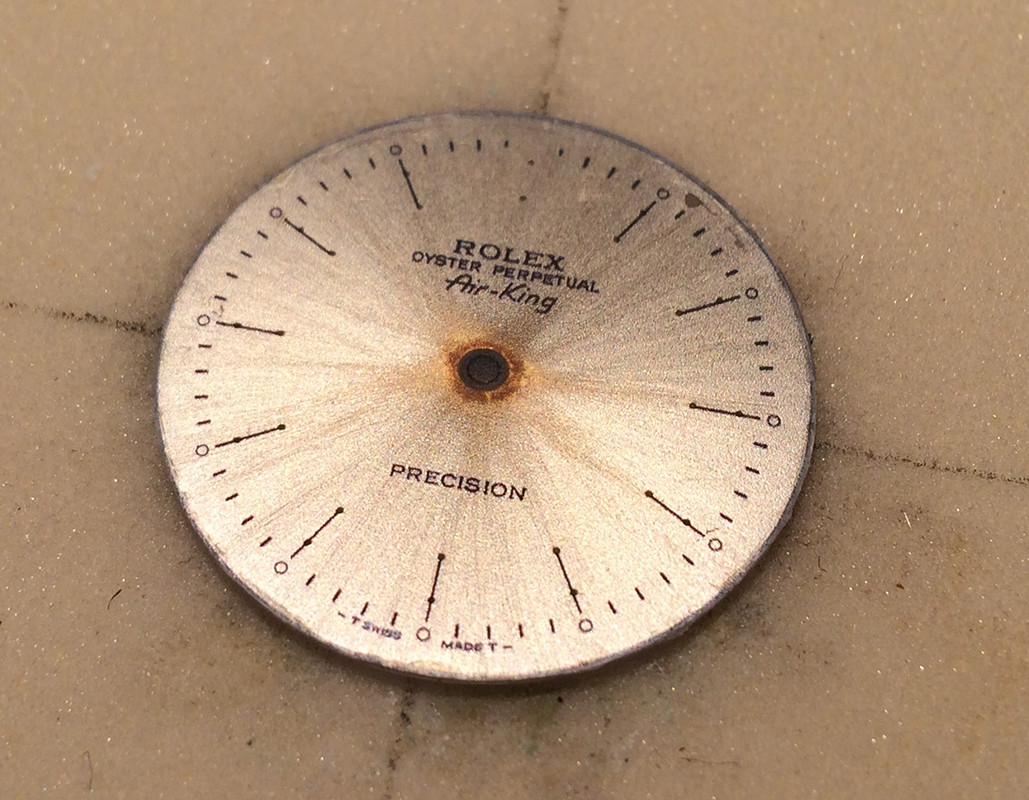
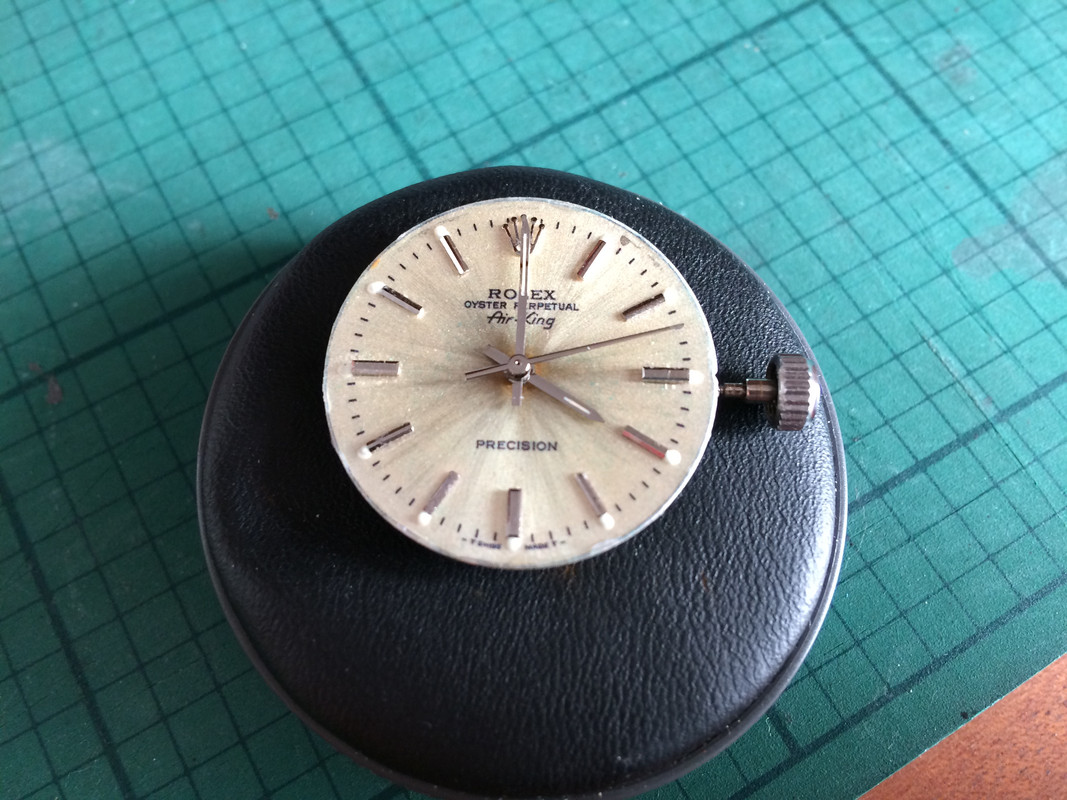
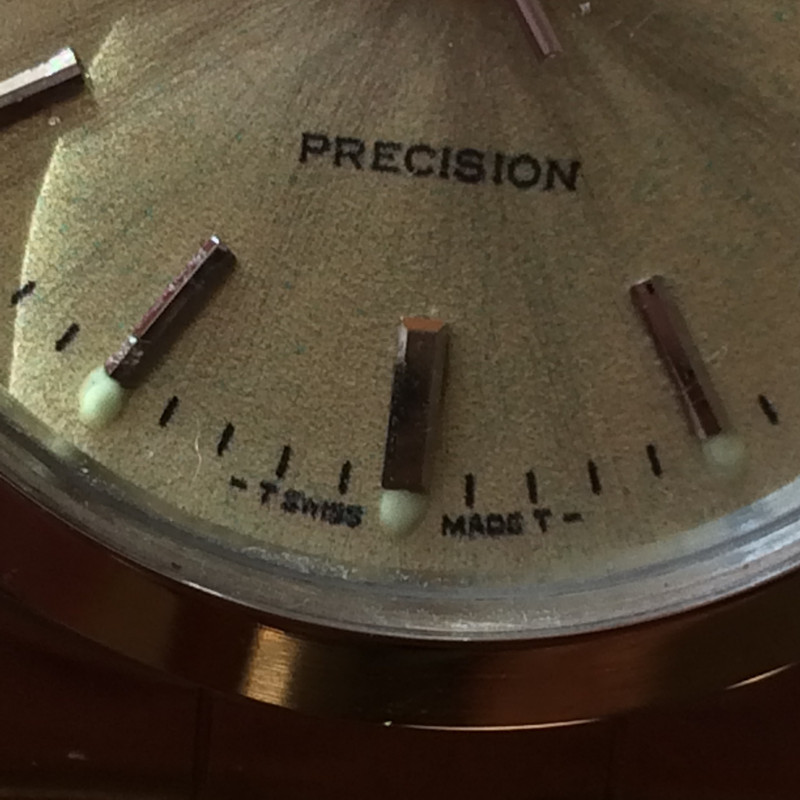
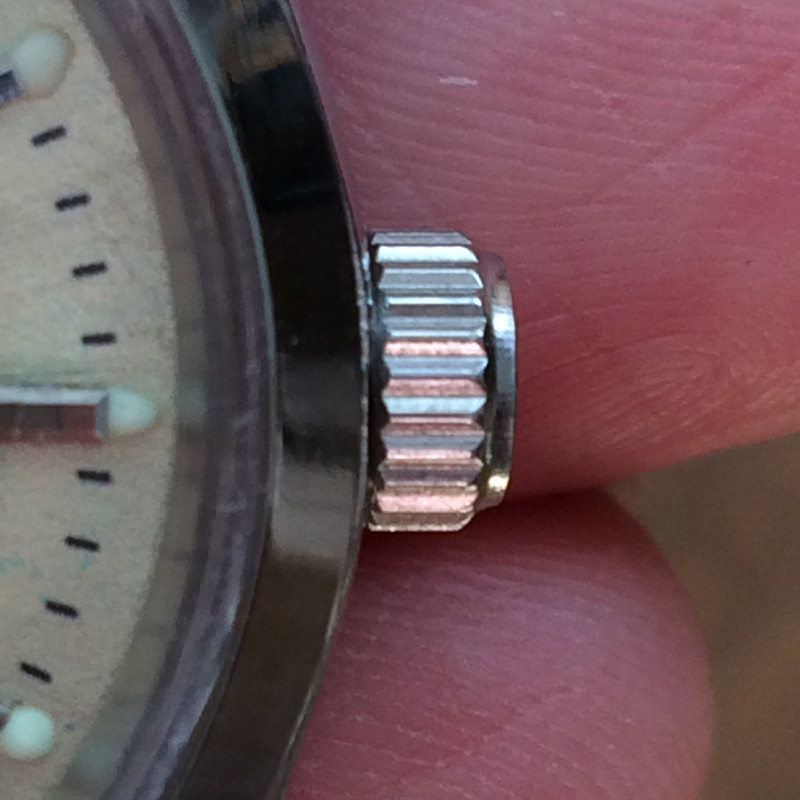
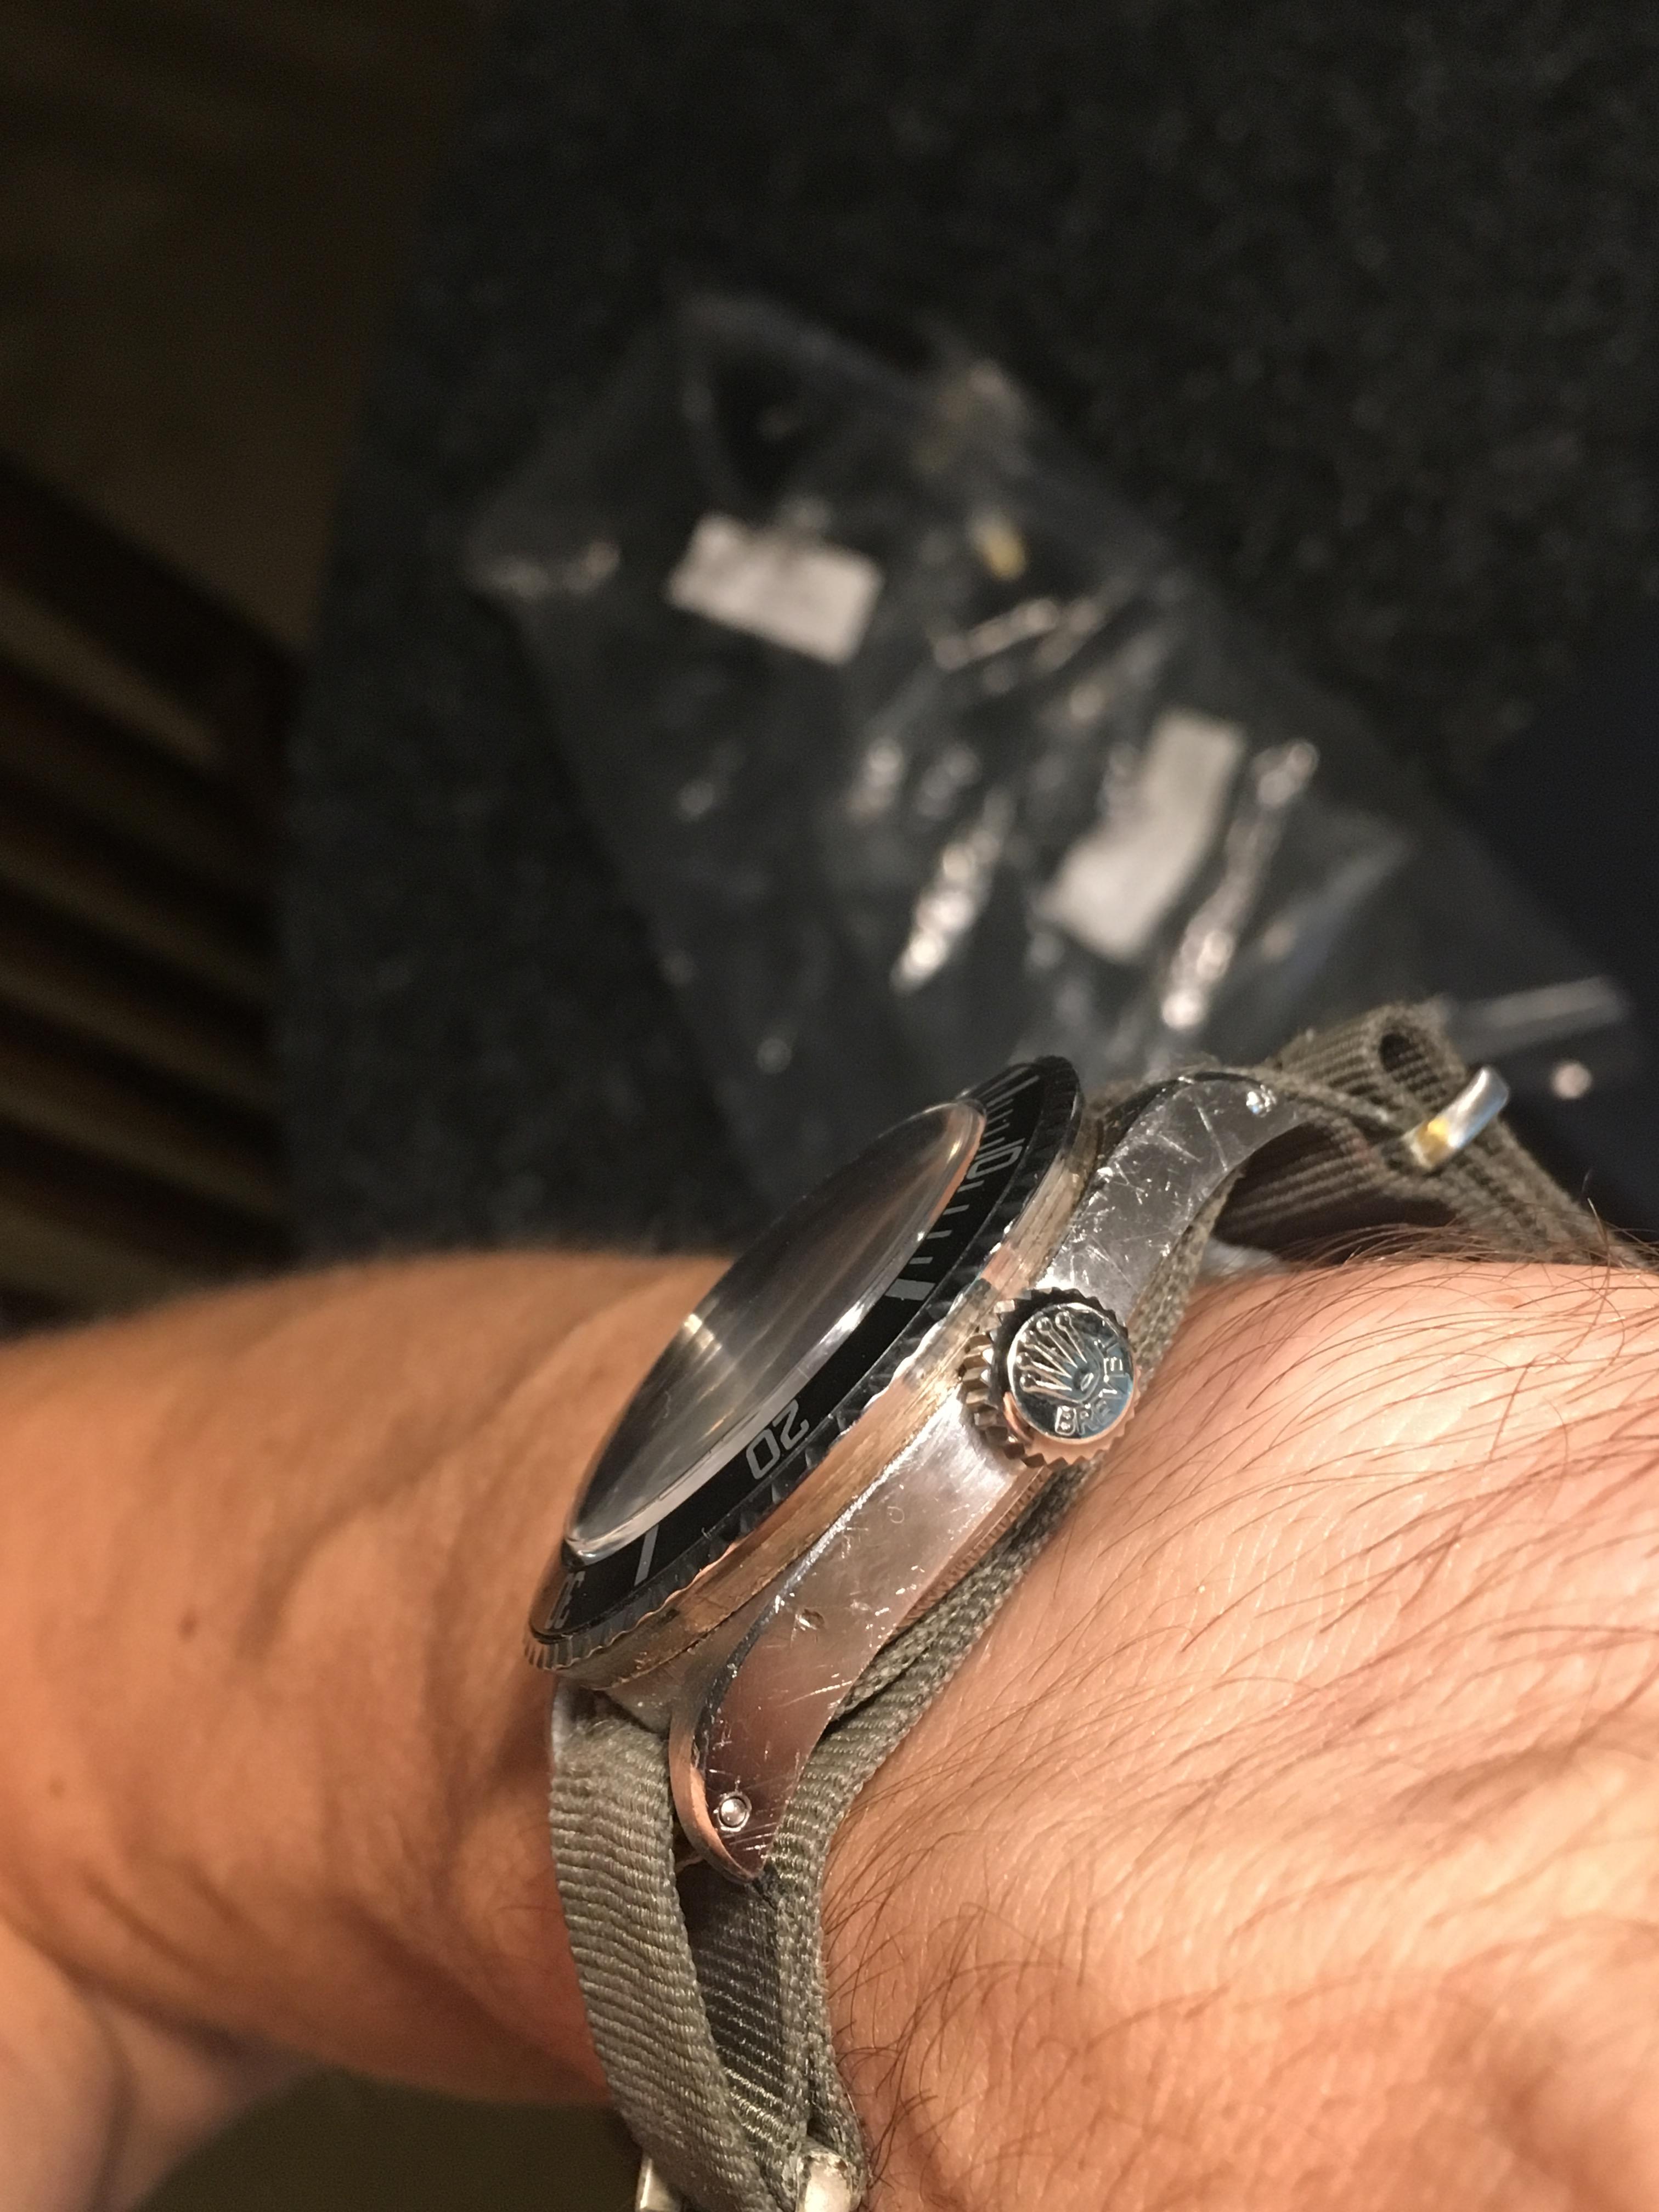
May I introduce you to my newcomer, a 5500 Air-King Precision circa 1975.
That watch shows a really nice patina dial and offers a thrilling experience on the wrist ... for vintage watch lovers of course.
And it's been a really long journey to get that petite on my wrist.
I'll tell you the complete story a little later but for the moment … i just hope you'll enjoy the pics.

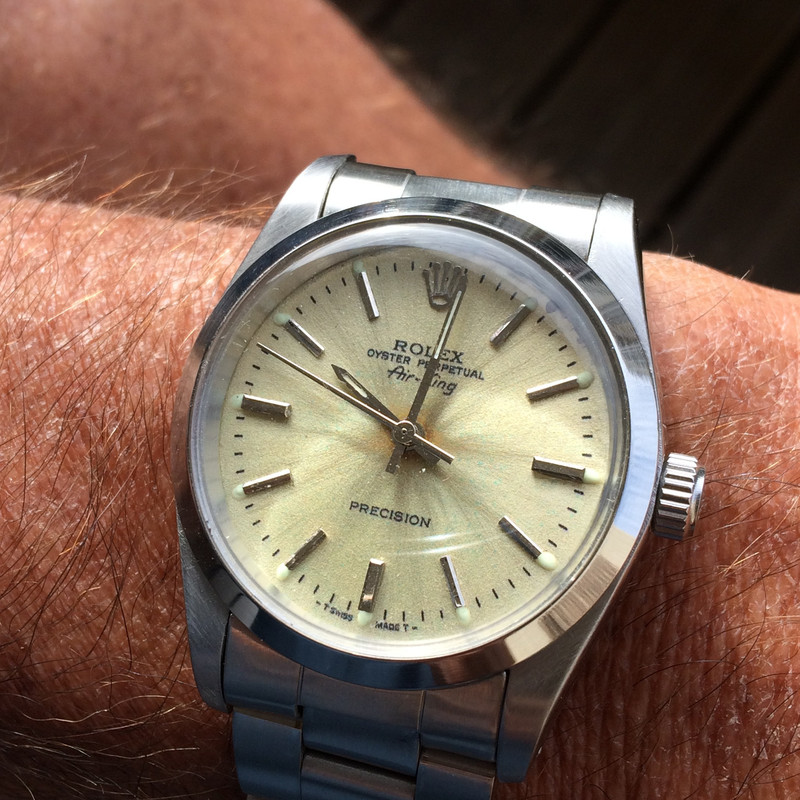

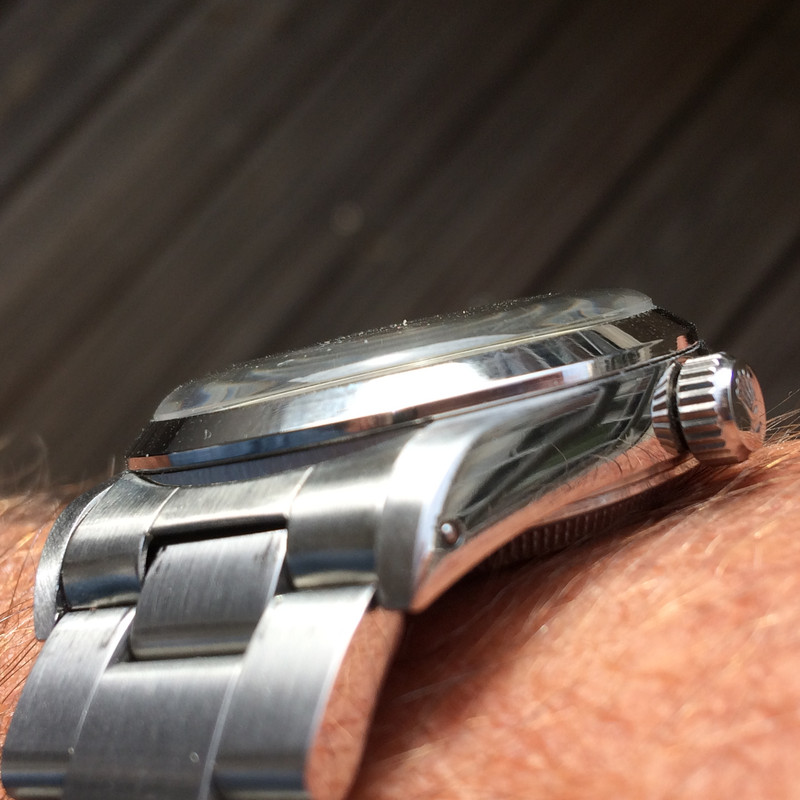
Here are some close-up pics … I’m definitely in love with that crown
The complete story about that watch will come soon

-
20 hours ago, JSebWC said:
.jpg.a42d50ad874005a007d66b4fbf1586da.jpg)
Incredibly nice dial
 May I ask where you sourced it ?
It's so clean that I could suppose that it's a DIY ...
If YES congratulations for the work you've done
If NO congratulations nevertheless
-
1
-
-
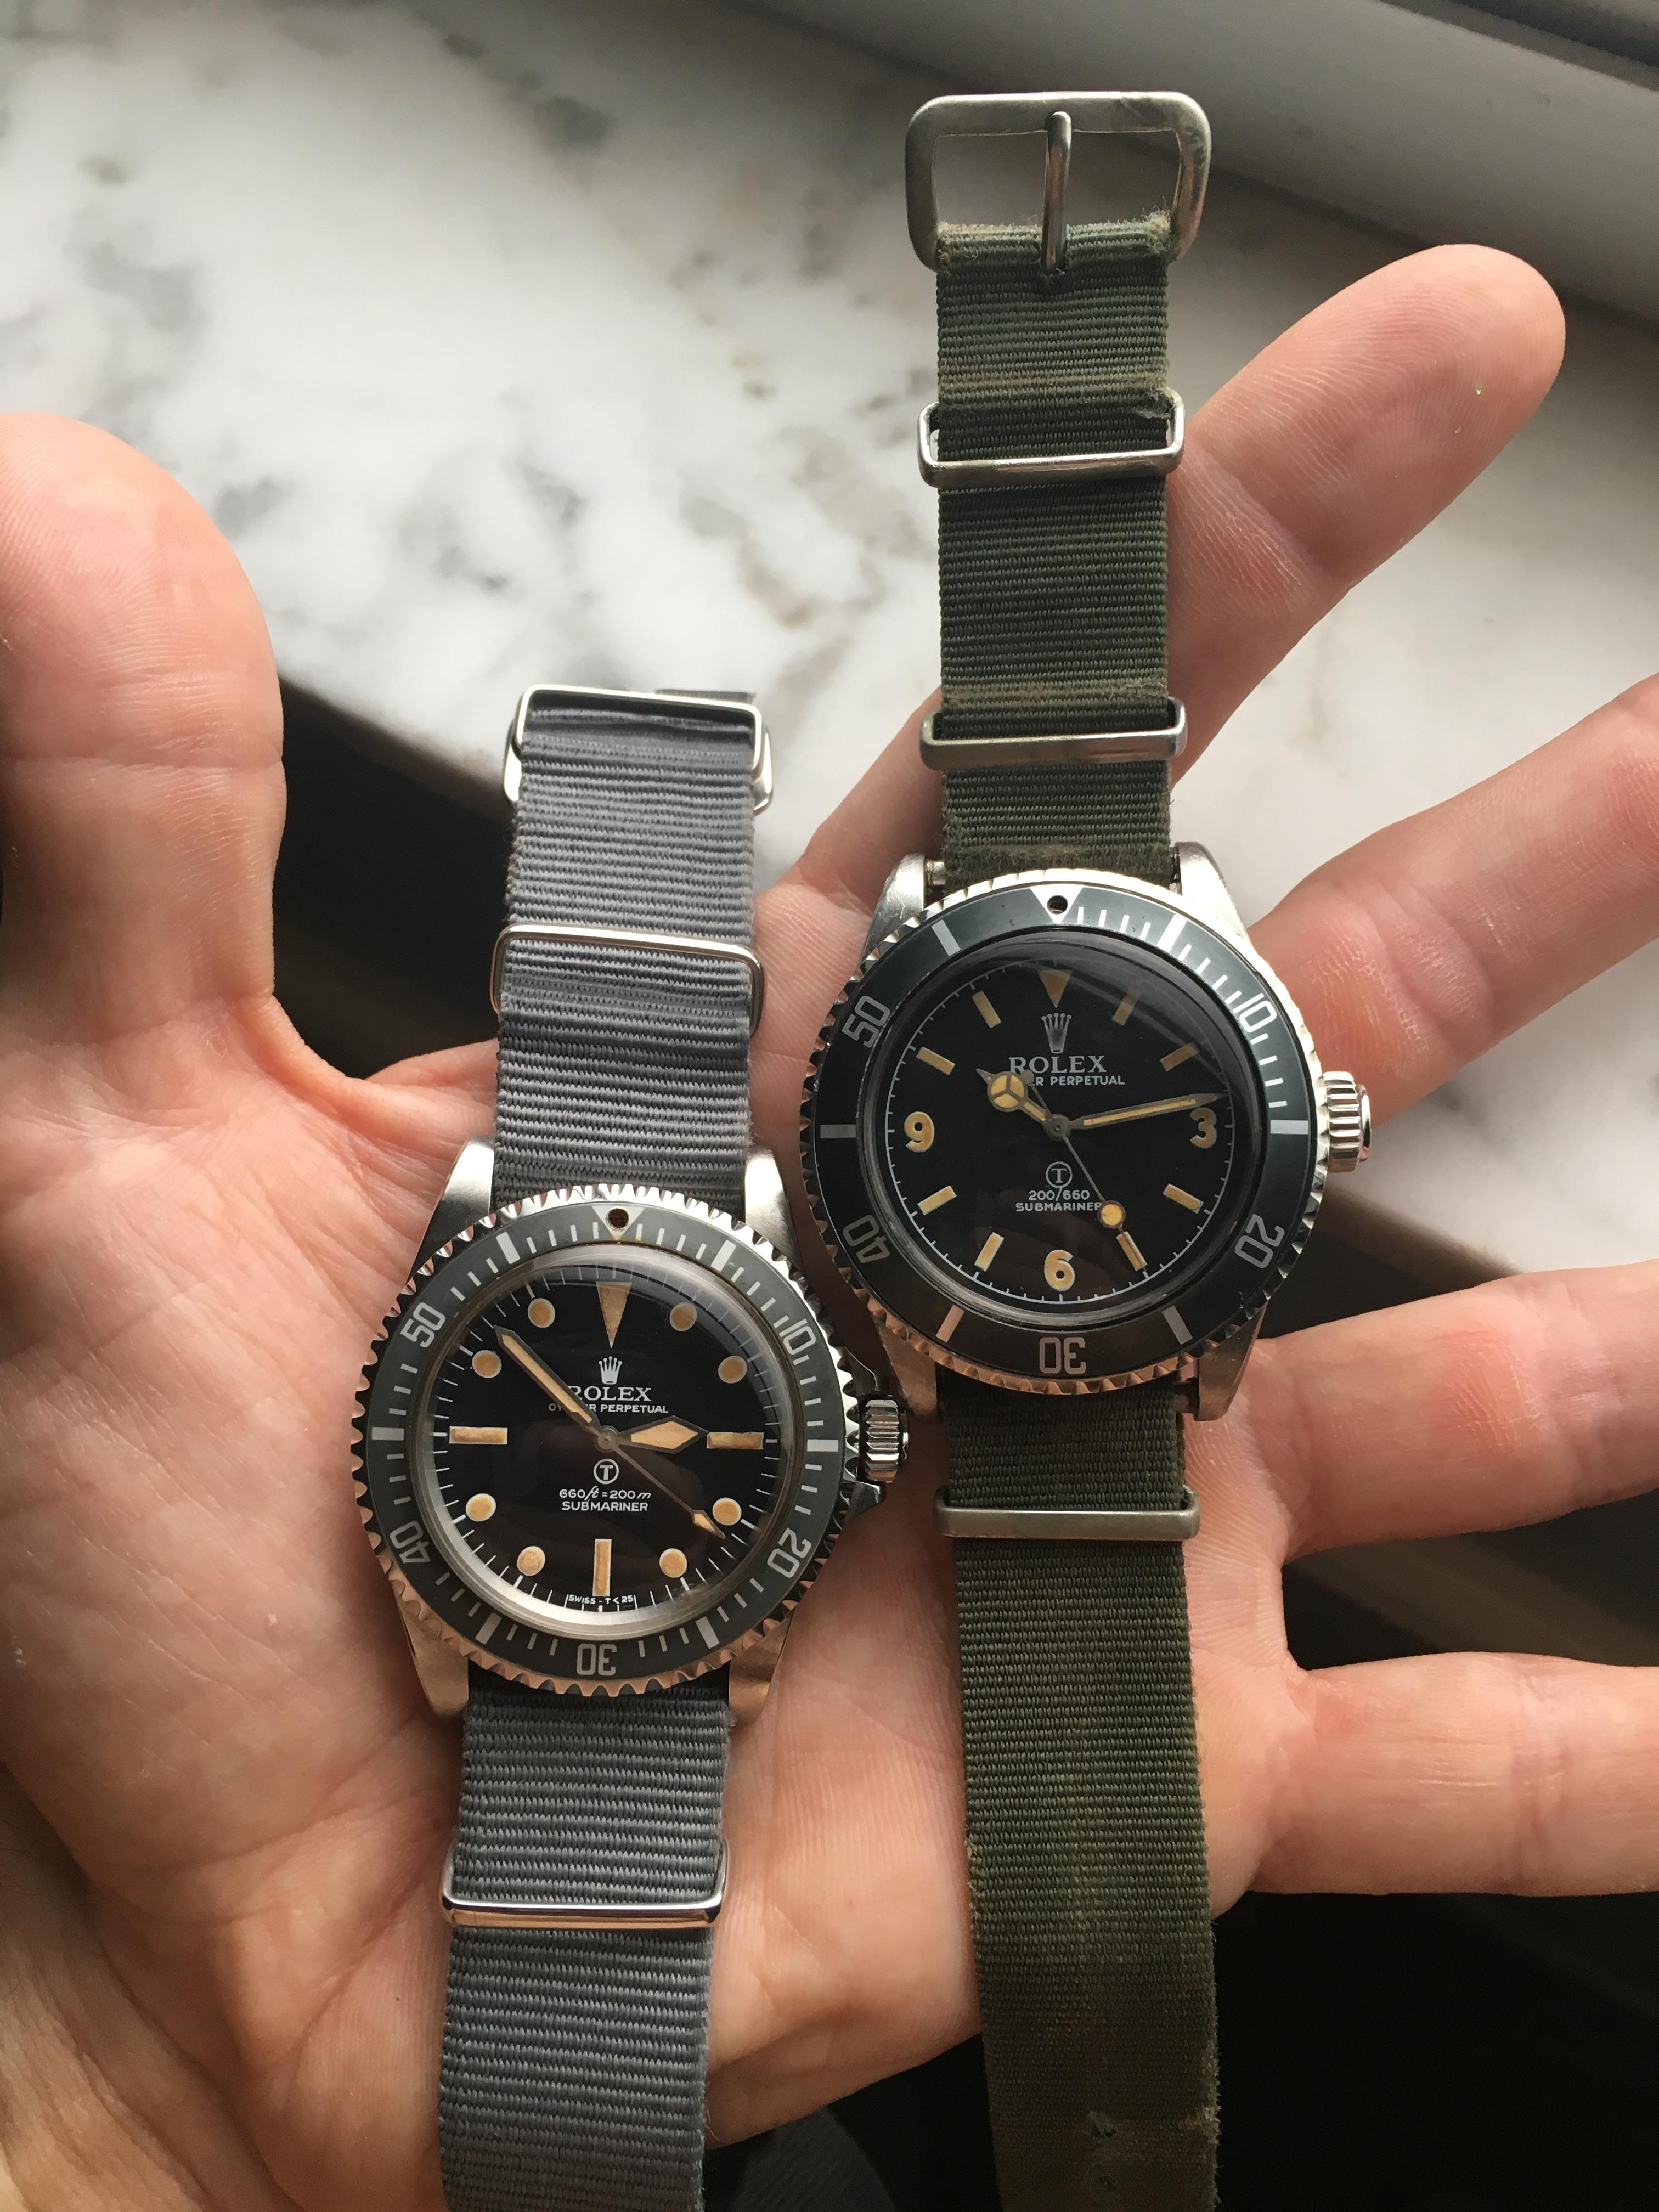
9 hours ago, Dlf said:
Thought some people might like to see the finished sub.
still have to pressure test and maybe tighten up the bezel.
But hey not bad
ill post some better pictures when I get my phone back.

Hi Ricki
Glad to see that A/6538 finished and congrats for the result.
Mine is still on the bench waiting for case and caseback engravements but I really think I would be able to show it in a few weeks.
Congrats again for that build ... you have done a great job !!!
-
2
-


Not such an easy (but still easy) way to drill non pre-drilled lugs when you’re a city dweller
in Watch Repair & Upgrade
Posted
OMG ... I only realize now that I never posted about that watch here ...only on other board.
I solemnly promize to repair this forgetfullness