quaresma7 Posted December 20, 2013 Report Share Posted December 20, 2013 very very nice...where could you get movment and dial?! Ebay?! Quote Link to comment Share on other sites More sharing options...
fitch Posted December 20, 2013 Author Report Share Posted December 20, 2013 various sources; ebay, rwg, r-l-x, vrf, local collectors/sellers etc. etc. Quote Link to comment Share on other sites More sharing options...
quaresma7 Posted December 20, 2013 Report Share Posted December 20, 2013 various sources; ebay, rwg, r-l-x, vrf, local collectors/sellers etc. etc. Thanks for your reply! Quote Link to comment Share on other sites More sharing options...
wiesn089 Posted December 21, 2013 Report Share Posted December 21, 2013 Stunning, love it! Quote Link to comment Share on other sites More sharing options...
fitch Posted December 21, 2013 Author Report Share Posted December 21, 2013 found some time to make some additional pictures still lovin' it Quote Link to comment Share on other sites More sharing options...
ProMariner Posted December 21, 2013 Report Share Posted December 21, 2013 wow it looks nice Quote Link to comment Share on other sites More sharing options...
highoeyazmuhudee Posted December 21, 2013 Report Share Posted December 21, 2013 Quote Link to comment Share on other sites More sharing options...
fitch Posted January 28, 2014 Author Report Share Posted January 28, 2014 Time for a small update; I changed the insert for a another one; perfectly even faded from matt black on the inside to darkblue~blue on the outside, color of the pearl matching with the dial and hands I hope you enjoy the pics 1 Quote Link to comment Share on other sites More sharing options...
F.Castro Posted January 28, 2014 Report Share Posted January 28, 2014 Its the nicest rep comex i have seen! Fantastic build! Quote Link to comment Share on other sites More sharing options...
Chuck P Posted January 28, 2014 Report Share Posted January 28, 2014 Wonderful piece. Quote Link to comment Share on other sites More sharing options...
freddy333 Posted January 28, 2014 Report Share Posted January 28, 2014 Love it. Well done. Quote Link to comment Share on other sites More sharing options...
panerai153 Posted January 28, 2014 Report Share Posted January 28, 2014 Very well done. Beautiful job!! It's too bad HH couldn't get the case deal off the ground. I was really looking forward to a 1680 case for my 1680. I believe his cases solved the problems of the Polex Design MBW cases, using a 5513 case for a 1680. Oh Well, maybe some day!! But yours is a super nice watch, wear it well, and wear the heck out of it. Let it get it's aging from use. Quote Link to comment Share on other sites More sharing options...
fitch Posted January 28, 2014 Author Report Share Posted January 28, 2014 Will do and thanks for all the nice comments guys Quote Link to comment Share on other sites More sharing options...
Archetypal Posted January 29, 2014 Report Share Posted January 29, 2014 Super watch. Happy days. Quote Link to comment Share on other sites More sharing options...
altesporsche Posted January 29, 2014 Report Share Posted January 29, 2014 Beauty !! I have the same build going now except for Im using a Whoopy 5514 COMEX dial .. Im itching to get this competed ! Quote Link to comment Share on other sites More sharing options...
mjmj Posted January 30, 2014 Report Share Posted January 30, 2014 This is a fantastic build. Well done. It looks great! Quote Link to comment Share on other sites More sharing options...
6now Posted January 30, 2014 Report Share Posted January 30, 2014 Impressive. How much was the build cost for you? Quote Link to comment Share on other sites More sharing options...
JAY48 Posted February 2, 2014 Report Share Posted February 2, 2014 Gorgeous, I'm drooling all over my keyboard! I have one question; did the first insert you installed have a glossy surface before you mildly bleached it? I installed a new bezel insert on my homage and it is too glossy for my liking. I was hesitant in bleaching because I've never attempted it before and I don't have scrap bezels to test with. I gave it a coat of matte acrylic clear as a temporary fix, but I would love to achieve the effects you have achieved! Quote Link to comment Share on other sites More sharing options...
fitch Posted February 2, 2014 Author Report Share Posted February 2, 2014 Yes, the insert was a standard (rolex) service replacement insert that was also glossy. It seems all the inserts have a solid glossy finish/ varnish so whenever i customise an insert i start with gently remove the glossy layer; i let is sit in bleach but only for a little while and then i use a mild scrubbing cloth to gently and evenly remove the glossy layer. Use bleach carefully as some sorts are very agressieve. I also put it in a box with screws and stones to give is many small scratches. After that i used cape cod to polish it to a semi-gloss finish. For the black insert this is were i stopped, hope this info helps; whatever you do; take your time because you can't go back and make the insert darker again and repeat the bleaching/ scrubbing process if needed 2 Quote Link to comment Share on other sites More sharing options...
JAY48 Posted February 2, 2014 Report Share Posted February 2, 2014 Yes, the insert was a standard (rolex) service replacement insert that was also glossy. It seems all the inserts have a solid glossy finish/ varnish so whenever i customise an insert i start with gently remove the glossy layer; i let is sit in bleach but only for a little while and then i use a mild scrubbing cloth to gently and evenly remove the glossy layer. Use bleach carefully as some sorts are very agressieve. I also put it in a box with screws and stones to give is many small scratches. After that i used cape cod to polish it to a semi-gloss finish. For the black insert this is were i stopped, hope this info helps; whatever you do; take your time because you can't go back and make the insert darker again and repeat the bleaching/ scrubbing process if needed Thanks, this is exactly the info I need! The bleach I have at the moment is Clorox and is pretty strong. Quote Link to comment Share on other sites More sharing options...
fitch Posted February 2, 2014 Author Report Share Posted February 2, 2014 Ok, if it's your first try be carefull with it, better to repeat the process then to ruin is in your first try; bleach can work pretty fast and if you don't remove the gloss layer you won't get an evenly faded insert which will result in a less authentic looking aged insert good luck! Quote Link to comment Share on other sites More sharing options...
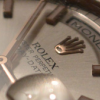
fitch Posted February 23, 2014 Author Report Share Posted February 23, 2014 updated it with a new (old) dial and matching hands 1 Quote Link to comment Share on other sites More sharing options...
netniet Posted February 23, 2014 Report Share Posted February 23, 2014 Damn, this looks nice. A great inspiration for my upcoming 5513 project. Quote Link to comment Share on other sites More sharing options...
jackflash Posted March 29, 2014 Report Share Posted March 29, 2014 Beautiful watch! Congrats. Quote Link to comment Share on other sites More sharing options...
droptopman Posted March 29, 2014 Report Share Posted March 29, 2014 Wow, what a stunning build. Quote Link to comment Share on other sites More sharing options...
Recommended Posts
Join the conversation
You can post now and register later. If you have an account, sign in now to post with your account.