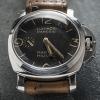
irate03 Posted December 16, 2012 Report Share Posted December 16, 2012 FINISHED this is my first finished strap !!! there are obviously some flaws and errors that I will endeavour to learn to correct for the next one, but please critique away !! info - French army ammo pouch, not sure of age. I tried to keep some of the original stitch holes and cracks in to keep the character of the leather. 2 Quote Link to comment Share on other sites More sharing options...
markiemark Posted December 17, 2012 Report Share Posted December 17, 2012 Im not a vintage fan myself, but that looks pretty well done mate! Quote Link to comment Share on other sites More sharing options...
jc0515 Posted December 17, 2012 Report Share Posted December 17, 2012 Nice job! I keep thinking about tryiny it, but haven't taken the plunge yet. Good luck with your future projects. Quote Link to comment Share on other sites More sharing options...
irate03 Posted December 19, 2012 Author Report Share Posted December 19, 2012 Thanks, I've made another one !!! Ok so here are some little pics along with a few from the 24mm strap I made last week. This one is 26mm and very soft. I'm still waiting for a different type of tool to thin the leather, the one I have only really works well on ends. So this strap has stayed nice and thick. Quote Link to comment Share on other sites More sharing options...
the_rymeister Posted December 20, 2012 Report Share Posted December 20, 2012 Nice straps buddy, something I'd love to try,have you done anything like this before? I keep eyeing up all the tools on eBay keep up the good work mate Quote Link to comment Share on other sites More sharing options...
irate03 Posted December 20, 2012 Author Report Share Posted December 20, 2012 Nice straps buddy, something I'd love to try,have you done anything like this before? I keep eyeing up all the tools on eBay keep up the good work mate These are my first straps, I've been building the watches for about a year now and I wanted to try straps so I could build the whole package top to bottom. Quote Link to comment Share on other sites More sharing options...
tmg Posted December 21, 2012 Report Share Posted December 21, 2012 Nice work sir! A flat GPF Mod Dep buckle would really finish the straps. Love your 6154. Quote Link to comment Share on other sites More sharing options...
Mike on a bike Posted December 21, 2012 Report Share Posted December 21, 2012 irate want to bang me out me for Pam 000 ? Quote Link to comment Share on other sites More sharing options...
xpletiv Posted December 21, 2012 Report Share Posted December 21, 2012 Those are awesome pieces of work!! Quote Link to comment Share on other sites More sharing options...
irate03 Posted December 21, 2012 Author Report Share Posted December 21, 2012 Nice work sir! A flat GPF Mod Dep buckle would really finish the straps. Love your 6154. Thanks, for daily wear I prefer a normal buckle which sits flat out of the way. But I've just ordered a bronze GPF buckle to go with a special build coming soon. Quote Link to comment Share on other sites More sharing options...
mt666tm Posted December 27, 2012 Report Share Posted December 27, 2012 Very nice work on the straps, nice Pam's, and nice photography... this thread is a win! Quote Link to comment Share on other sites More sharing options...
irate03 Posted January 6, 2013 Author Report Share Posted January 6, 2013 finished another ammo strap from the same pouch as the strap above. Dark Ammo strap fitted with an Elias bronze buckle. I think this will look good with bronze / copper compression bar tubes as you can see them through the holes in the leather. Both straps below are from the same ammo pouch, the darker brown strap is darkened just with neatsfoot oil. Not sure if i'll keep this strap yet hence the reason I've not punched buckle holes in it yet, it may look good with a build I have coming soon. Quote Link to comment Share on other sites More sharing options...
irate03 Posted February 5, 2013 Author Report Share Posted February 5, 2013 New strap for my 6152/1 - new leather this time, hand stitched, vintage compass finish buckled by Elias. Quote Link to comment Share on other sites More sharing options...
the_rymeister Posted February 6, 2013 Report Share Posted February 6, 2013 You make it look so easy irate, trust me guys I'm currently getting into straps at the moment and its not as easy to make it look perfect as it looks. Great straps buddy Quote Link to comment Share on other sites More sharing options...
irate03 Posted February 6, 2013 Author Report Share Posted February 6, 2013 I'm so happy with this one, the tan strap above is a little stiff, I know it will soften with use but this one is made from softer leather to start with, it started out natural veg tan so I've been experimenting with dark creams and stains. it also stars yet another Elias super buckle, this time a slightly aged and darkened bronze. Quote Link to comment Share on other sites More sharing options...
BigBuys Posted February 6, 2013 Report Share Posted February 6, 2013 This is scary good work for first attempts! I think you have an opportunity to pay for your REP collection by making straps. My only critique would be to tighten up the area between the tube and the boxed stitch. I think these are usually glued around a long pin that is removed after the glue sets up. Keep up the great work! Quote Link to comment Share on other sites More sharing options...
irate03 Posted February 6, 2013 Author Report Share Posted February 6, 2013 This is scary good work for first attempts! I think you have an opportunity to pay for your REP collection by making straps. My only critique would be to tighten up the area between the tube and the boxed stitch. I think these are usually glued around a long pin that is removed after the glue sets up. Keep up the great work! Thanks, it would be great to be able to make a few to sell to pay for parts for new builds. As for the stitching, some vintage straps had a wider gap, i'm also using compression bars and a tube so the strap 'bulks' up a bit when it's fitted. Quote Link to comment Share on other sites More sharing options...
omgiv Posted February 6, 2013 Report Share Posted February 6, 2013 Those are beautiful straps. Congratulations!!!!! Quote Link to comment Share on other sites More sharing options...
irate03 Posted June 13, 2013 Author Report Share Posted June 13, 2013 some more recent straps first Kampf style strap from some new ammo pouches. Staring Elias' wonderful vintage compass style buckle. Quote Link to comment Share on other sites More sharing options...
Redfone Posted June 16, 2013 Report Share Posted June 16, 2013 Great job. Giving me the inspiration to try make my own. Just ordered a bunch of tools from eBay. Quote Link to comment Share on other sites More sharing options...
B3nj4min3 Posted June 17, 2013 Report Share Posted June 17, 2013 Superb vintage straps there. Think I'll be ordering some up in the near future. Quote Link to comment Share on other sites More sharing options...
jellytots Posted June 17, 2013 Report Share Posted June 17, 2013 Unreal - as a starting out attempt those are just unbelievable - any avaikable for sale? Quote Link to comment Share on other sites More sharing options...
irate03 Posted June 17, 2013 Author Report Share Posted June 17, 2013 finished an oil darkened brown strap. with a nice aged Elias brass buckle. Quote Link to comment Share on other sites More sharing options...
irate03 Posted August 9, 2013 Author Report Share Posted August 9, 2013 During my holiday in Spain I picked up an old military leather belt, it was in pretty scruffy dry condition and had a very cracked surface but parts of it were still soft so I thought I'd take a gamble. I've used saddle soap and leather conditioners as well as some aloe vera hand gel which absorbed and moistened the leather quite well after stitching I gave a couple of coats of tan-kote to try and seal the surface as it does still shed a few bits, over time it with naturally rub of more loose pieces. stitching was kept to a minimum because I didn't want to encourage the leather to split under pressure. I'm very pleased with teh Elias brass buckle, I burnt off some olive oil over the stove then soaked it in salt water and vineger then left it plied up with a bunch of old coins outside in the rain overnight, the finish is really nice. This is a keeper and a little memento of my holiday. Quote Link to comment Share on other sites More sharing options...
jvilla510 Posted August 10, 2013 Report Share Posted August 10, 2013 Absolutely beautiful straps... Quote Link to comment Share on other sites More sharing options...
Recommended Posts
Join the conversation
You can post now and register later. If you have an account, sign in now to post with your account.