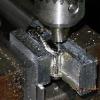
jmb Posted July 21, 2011 Report Share Posted July 21, 2011 I have drooled over the Snowflakes y'all have posted and vowed to build one. A while back TeeJay kindly, and graciously, laid his last Snowflake dial decal set on me. I set it aside until I was prepared and in the correct frame of mind to make the dial. I had ordered a rep "vintage style" case set from one of my parts suppliers a while back and was somewhat disappointed due to it's non-gen like construction but all-in-all it looked pretty good and to my delight I found I could still swap crystals around albeit with a bit more work than just pressing down a compression ring. Sly was nice enough to part with some leftover "axe hands" from his Tudor project and I always have a movement or two laying around so I finally had most of the ingredients to make it happen except motivation. After "conversing" with Ubi over the past few days he provided me a little spark of motivation so I got to work. Ubi is really good at motivating and inspiring and for this I thank him. The first step in the dial process was creating a dial "blank" the proper diameter so I cut a 28mm circle out of some .016" brass sheet and drilled a center hole. After de-burring and sanding the disc I then sprayed it gloss white in preparation for the decals and set the dial out in the 100 degree Texas sun to dry. Once the paint was thoroughly dry I applied the the first of two decals. The first decal was all black except for clear areas where the "printing" and other features would be on the finished dial. The reason for this was to help ensure that there was a good opaque coverage of black. After this decal dried I then applied the top decal which was all black except for clear wherever white was supposed to show through. This was then followed by two coats of Testors "Dullcote" to seal the surface and provide a nice flat no-gloss finish. This two decal method was the brainchild of member slartibartfast (spelling?) and really worked out nicely. I now had a base dial and after the Dullcote dried completely I applied Glow, Inc. V10 Watch Lume to the markers using an oiler. I did this under the microscope periodically turning off the lights to ensure I had fairly even coverage and luminosity - the results were gratifying. When I charge this for about 20 seconds with an LED flashlight the emitted light is almost bright enough to read by and although it dims within several minutes It is bright enough to read the entire night. I now had no further excuses so I prepped my case, machined down an old rep crystal of some kind, glued it in place with clear silicone, and assembled the remainder of the watch. This particular case has a groove milled in the top of the rehaut for the crystal to locate into and it is about .030" deep so the crystal (5513 size) fits fairly snugly into the groove after machining the inside edge to fit the groove. All that is left is to "flatten" the case back and apply the proper engraving and probably change the pearl. Here is the semi-finished product, hope you enjoy the pics as much as I did building it! Here is my first attempt at engraving a "curved" back. You can see that some of the characters are distorted on the inside edge due to the depth about 3 times that of tghe outer edge. This sort of reinforces my thinking that any engraving should be done on flat surfaces. I have seen pics of a lot of alleged gens that had flat case backs so I think I will mill them flat before engraving. Quote Link to comment Share on other sites More sharing options...
asf Posted July 21, 2011 Report Share Posted July 21, 2011 Love it man! Quote Link to comment Share on other sites More sharing options...
Nanuq Posted July 21, 2011 Report Share Posted July 21, 2011 That's a fascinating read! Do you have photos of the decals before applying? From the description it sounds like they have to *exactly* lie above each other so the text can show through both superimposed cutouts. No way could I align them that precisely! What text and icon will you engrave into the caseback? What you need to do now is get an old MBW crown and machine a bevel onto the "case" side, so it looks like a 702. Quote Link to comment Share on other sites More sharing options...
bones Posted July 21, 2011 Report Share Posted July 21, 2011 Lovely build mate. Very nice indeed. Quote Link to comment Share on other sites More sharing options...
sly Posted July 21, 2011 Report Share Posted July 21, 2011 I love it, Nice J.. Quote Link to comment Share on other sites More sharing options...
explor_er Posted July 21, 2011 Report Share Posted July 21, 2011 (edited) Looks great! If you're thinking about building a few to sell let me know! Edited July 21, 2011 by explor_er Quote Link to comment Share on other sites More sharing options...
redwatch Posted July 21, 2011 Report Share Posted July 21, 2011 Amazing! Only comment I would make is that the markers at 3 - 6 - 9 need to be a little bit longer. The hour hand tip should line up with the end of the marker. Also, the seconds hand should intersect those markers in the middle of the diamond shaped top of the hand. Quote Link to comment Share on other sites More sharing options...
highoeyazmuhudee Posted July 21, 2011 Report Share Posted July 21, 2011 jmb you always impress me. Quote Link to comment Share on other sites More sharing options...
bones Posted July 21, 2011 Report Share Posted July 21, 2011 Damnit Justin, now you've got me looking at gen Tudor subs on chrono24!!!! Quote Link to comment Share on other sites More sharing options...
Ephry73 Posted July 21, 2011 Report Share Posted July 21, 2011 Very nice Quote Link to comment Share on other sites More sharing options...
valerian Posted July 21, 2011 Report Share Posted July 21, 2011 J, this is amazing work. I wish I could do half the stuff you manage! Wear it well, or even better, sell it to me! Val. Quote Link to comment Share on other sites More sharing options...
woof* Posted July 21, 2011 Report Share Posted July 21, 2011 jmb you always impress me. Me too..every single time! It's very nice J. This one looks like a lot of work with that dial, but a great result! Quote Link to comment Share on other sites More sharing options...
highoeyazmuhudee Posted July 21, 2011 Report Share Posted July 21, 2011 i assume you cant make any more of these dials...? cause, honestly it looks better than yukis. did you even get that case back engraving thing sorted? Quote Link to comment Share on other sites More sharing options...
TeeJay Posted July 21, 2011 Report Share Posted July 21, 2011 Looking good That's an interesting technique in applying the lume over the top of the matte coat When I did my 6200 dial, I lumed them varnished, but would I be right in thinking that your technique creates a noticeable difference in texture between the lume and the dial? That's a fascinating read! Do you have photos of the decals before applying? From the description it sounds like they have to *exactly* lie above each other so the text can show through both superimposed cutouts. No way could I align them that precisely! What text and icon will you engrave into the caseback? What you need to do now is get an old MBW crown and machine a bevel onto the "case" side, so it looks like a 702. I don't have a pic of the uncut decals, but the base layer has larger rectangular areas left clear, which each section of text on the top layer then fits over, not literally two layers of text to line up I'm sure Slartibartfast would be proud to see his decals being used in such an awesome project i assume you cant make any more of these dials...? cause, honestly it looks better than yukis. did you even get that case back engraving thing sorted? Without the AutoCAD software and high dpi printer to create the decals, Slartibartfast was the only source, and sadly, he hasn't been posting for a while Quote Link to comment Share on other sites More sharing options...
Nanuq Posted July 21, 2011 Report Share Posted July 21, 2011 Man, can you imagine how perfect you could get with a COMEX dial? The overlay of "COMEX" onto white onto black might actually look right. Quote Link to comment Share on other sites More sharing options...
blix Posted July 21, 2011 Report Share Posted July 21, 2011 Excellent work - next level modding indeed. Quote Link to comment Share on other sites More sharing options...
jmb Posted July 21, 2011 Author Report Share Posted July 21, 2011 Highoey - I've got a few pieces of artwork done and have had some success with them on flat case backs. I've made CAD files for a PanAm logo, Prince Oysterdate/Sub, and later Tudor engraving. Nanuq - I can take one of the ugly fat rep crowns and machine off about half of it and make it look like a 702... I have bought a printer that is supposed to be able to print opaque white but I have not been able to find the time to become an expert graphics artist. I do my engraving artwork in Autocad so maybe I can do a dial that way. I had wondered about making a "proper" COMEX decal that could be applied to a regular non-COMEX dial. TeeJay - The lume is also fairly "flat" but on close inspection, and at the right angle, you can tell it's a bit "lumpy". This was my first lume job other than little DJ style dots... Quote Link to comment Share on other sites More sharing options...
lhooq Posted July 22, 2011 Report Share Posted July 22, 2011 Fantastic work, J! When I saw it on the WC, I had no idea just how much effort had gone into making the dial. Quote Link to comment Share on other sites More sharing options...
hackR Posted July 22, 2011 Report Share Posted July 22, 2011 really nice, J...i always enjoy the pieces you build and the details you put into them... well done!... Quote Link to comment Share on other sites More sharing options...
TeeJay Posted July 22, 2011 Report Share Posted July 22, 2011 Man, can you imagine how perfect you could get with a COMEX dial? The overlay of "COMEX" onto white onto black might actually look right. I'd not considered that, but yes, that would be pretty much spot on, and probably look good at anything upto maybe 12 inches/close inspection, where COMEX would then look too flat against the rest of the dial, but other than that, yes, it could definitely work :thumbsupsmileyanim: Quote Link to comment Share on other sites More sharing options...
StormTooper4 Posted July 22, 2011 Report Share Posted July 22, 2011 Blimey good work indeed Quote Link to comment Share on other sites More sharing options...
lhooq Posted July 22, 2011 Report Share Posted July 22, 2011 I have seen pics of a lot of alleged gens that had flat case backs so I think I will mill them flat before engraving. Luckily, the caseback on my DW 7032 is completely flat! Hmm... Quote Link to comment Share on other sites More sharing options...
ubiquitous Posted July 22, 2011 Report Share Posted July 22, 2011 Fantastic! Let me see if I have an acrylic pearl for you... Quote Link to comment Share on other sites More sharing options...
Ephry73 Posted July 22, 2011 Report Share Posted July 22, 2011 I'm more than very interested in these decals. I have a dual blank for the right size I need and this will simplify my project for a 5514 Tudor sub. E Quote Link to comment Share on other sites More sharing options...
TeeJay Posted July 22, 2011 Report Share Posted July 22, 2011 I'm more than very interested in these decals. I have a dual blank for the right size I need and this will simplify my project for a 5514 Tudor sub. E I believe they were printed onto water-transfer paper using a high quality laser jet printer (1200 dpi is coming to mind, but may be wrong) The design of the slides was created using AutoCAD software, but I'm afraid I don't know any more than that... Hope it's of help Quote Link to comment Share on other sites More sharing options...
Recommended Posts
Join the conversation
You can post now and register later. If you have an account, sign in now to post with your account.