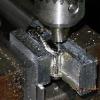
jmb Posted April 22, 2010 Report Posted April 22, 2010 OK, I had originally bought my wife two Ladies Datejust reps - a silver dial and black dial. She really liked the black dial and wore it daily until the a21j went FUBAR. I tore it apart and put it in a bag and vowed to fix it someday. While perusing the "Bay the other day I came upon this... ... and decided to put it in this... ... and power it with this: I gathered and made the rest of the bits I figured I'd need and finally got motivated: It seems things are never easy and building stuff like this will likely cause me to go insane someday. The dial dropped right through the case - RAT'S BALLZ!!! I had also ordered a plexi crystal as I figured this thing should look sorta "retro" and found that the crystal a lot smaller than the glass one and there wasn't enough meat to just turn it to size so I figured my only option was to construct a new rehaut. The first step was to mill off the old one: And I then made a fixture to hold the case so I could attach the new rehaut straight and drilled and tapped it so it would also function as a clamp: At this point I figured I better make the rehaut. After measuring the gen dial (18.15mm) and the crystal ID I made a sketch of what I would need, cut off a chunk of 303 and started making chips. Center-drill the piece: Drill out big enough for boring bar to fit through: After boring to minimum ID, then boring a short length at a 10 degree angle for the rehaut you wind up with this: I then parted off the correct amount: After de-burring the new rehaut and some final sanding/fitting it was ready to mount: Case was mounted onto fixture with the top of the fixture covered with wax paper: Some JB-Weld was mixed, laid onto the mating surfaces, and new rehaut set in place on the case: I then clamped everything together and let the epoxy set up: After a short curing time, and before the epoxy had reached full strength, I un-clamped everything and took the case off the fixture: I used an Xacto knife to carve away the excess JB-Weld on the inside and test fit the dial - MUCH BETTER!! I then trimmed away the excess epoxy on the outside and test fit the crystal - fit like a glove! I then set the bezel and plastic retainer in place and realized this would just look wrong so I will machine a smooth bezel with an appropriately smaller ID. I really like fluted bezels but even with some sort of stainless "reducer" the original just wouldn't look right. The jury is still out as to whether the quick-set JB-Weld will hold I suppose time will tell. If the joint fails I will re-glue with the original formula slow curing JB-Weld. Now that I have this one under my belt I find that I will probably need to do the same thing to get a vintage Tudor dial into a rep DJ case: But, that would be the subject of another story!
ubiquitous Posted April 22, 2010 Report Posted April 22, 2010 Pretty hardcore, Justin! You are a whiz at the lathe, no doubt!
Katerchen Posted April 22, 2010 Report Posted April 22, 2010 GREAT work done here... Hope "the lady" appreciates your efforts as well George
Katerchen Posted April 22, 2010 Report Posted April 22, 2010 @J... and Ubi forgot to add: Id say... thats "TRUE LOVE at the lathe"
sander Posted April 22, 2010 Report Posted April 22, 2010 Great job man! Looks to me I need a lathe as well Show us when you finish it.
HauteHippie Posted April 22, 2010 Report Posted April 22, 2010 Wow. Have you thought about putting a slight bevel on the ID of the rehaut? But either way, wow.
freddy333 Posted April 22, 2010 Report Posted April 22, 2010 Very impressive work, but I think I would have just bought a surplus/used gen case on the bay ($50-$100 for a ladies case), which would accept the gen dial/crystal. All you would need is to make a spacer to fit whatever (non-Rolex) movement you decide to use.
txcollector Posted April 22, 2010 Report Posted April 22, 2010 Very nice. I think I will need a lathe one day. I have the opposite problem. I have a dial that's a hair too big for the case. Is there an easy way to mill the rehaut to shave off a little bit? If there's a way to do that with a dremel it would be perfect for me
jmb Posted April 22, 2010 Author Report Posted April 22, 2010 Freddy - If I could find a gen case for $50 I'd damn sure buy it but the ones I've seen have been $200 - $400 for SS! Chief - I put a 10 degree bevel on it - I didn't want youze guyz razzing me about having a "wokky" rehaut. If I can come up with a way to hold the case AND machine the ID maybe i'll add a few more degrees...
freddy333 Posted April 22, 2010 Report Posted April 22, 2010 Freddy, if I could find a gen case for $50 I'd damn sure buy it but the ones I've seen have been $200 - $400 for SS! The last time I built 1 (a year ago), ladies case prices were cheap (relatively little demand for ladies Rolex parts). Maybe they have become collectible?
dluddy Posted April 22, 2010 Report Posted April 22, 2010 You guys have all the cool tools good stuff jmb
mastrmindalliance Posted April 22, 2010 Report Posted April 22, 2010 Wow man, you've got skills! Awesome!
tmg Posted April 22, 2010 Report Posted April 22, 2010 Ditto, nice work J! Pretty hardcore, Justin! You are a whiz at the lathe, no doubt!
omegaunit Posted April 23, 2010 Report Posted April 23, 2010 Very nice jmb. I should post pics of the fixture I made that allows machining of the rehaut, very handy.
Dizzy Posted April 23, 2010 Report Posted April 23, 2010 its amazing what you guys can make in your metal shops.. i wouldnt have even thought of doing this.. i would have just got a new case or new dial hahaha. I think the JB weld should hold up fine as there isnt going to be any tension on the two parts. I would definatly add a bit of an angle to the rehaut next time you pull it apart just so the rehaut doesnt look so thick. You could also apply this idea in reverse to a submariner case with a "woky" rehaut to straighten it out. Mount the case to your lathe and take off some of the angled material.. As long as you dont exceed the dial dia. I've seen a lot of nice looking sub cases that are ruined by a woky rehaut. Excellent work!! Dizz
jmb Posted April 23, 2010 Author Report Posted April 23, 2010 omega - that would be cool. I was thinking about something along the lines of an expanding mandrel...
lhooq Posted April 23, 2010 Report Posted April 23, 2010 Always impressive, jmb. I love reading about these projects of yours. "Look around. Can you form some sort of rudimentary lathe?"
krpster Posted April 23, 2010 Report Posted April 23, 2010 Dang! That's awesome. I love following along the lengths you guys go to. Truly inspirational.
TeeJay Posted April 23, 2010 Report Posted April 23, 2010 He, he, he... "Have lathe will mod..." That's some mad work, amigo, totally awesome
Recommended Posts
Create an account or sign in to comment
You need to be a member in order to leave a comment
Create an account
Sign up for a new account in our community. It's easy!
Register a new accountSign in
Already have an account? Sign in here.
Sign In Now