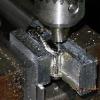
jmb Posted May 13, 2010 Report Share Posted May 13, 2010 Attention is now focused on the exterior of the case. I coated the top surface with layout dye and scribed the general case outline. I then clamped the block into the milling vise and machined the "sides": I machined to just a bit shy of the layout line: I then rotated the case and milled the other three corners in a like manner: I then set an aluminum bar into the vise at a 45 degree angle and bolted the case to it. I then machined the "top" of the "ends": The case is then rotated and the other end milled: It is then flipped over and the back side of the ends are milled: The case is once again rotated and the operation repeated on the other end and the back screwed on just for grins: Back and crystal on it now at least resembles a watch case: The case was then roughed down to the layout lines on the belt sander and filed to final shape. It was then necessary to locate the center of the "bore" and prepare the case for the crown tube. After locating the proper spot for the tube the hole is drilled, the case slightly counter-bored, and the hole tapped: Without disturbing the relationship between the machine chuck and the work the proper tap is clamped into the chuck and rotated by hand to get the tap started straight. The case can then be removed and the tube hole tapping finished by hand: At this point it is actually starting to LOOK like a watch: The case is now rough-brushed on the top and top/bottom end angles, the top case edges filed at a 45 degree angle, and the case sides polished: Finally, the bezel is polished, all case pieces washed, and everything put together: The final chapter will be mating the case up to the band. But, that chapter has yet to be written so I must leave you hanging for awhile! Quote Link to comment Share on other sites More sharing options...
ubiquitous Posted May 13, 2010 Report Share Posted May 13, 2010 Quite possibly one of the coolest how-to's I've ever seen. This is the sort of behind the scenes stuff that one never sees otherwise. Good stuff, J! Quote Link to comment Share on other sites More sharing options...
jmb Posted May 13, 2010 Author Report Share Posted May 13, 2010 R, glad you enjoyed the journey and good words from a builder of your prowess are greatly appreciated. Quote Link to comment Share on other sites More sharing options...
ubiquitous Posted May 13, 2010 Report Share Posted May 13, 2010 With your skills, you could make some killer bespoke time pieces... Quote Link to comment Share on other sites More sharing options...
jmb Posted May 13, 2010 Author Report Share Posted May 13, 2010 I dunno, I'm basically kinda lazy... Quote Link to comment Share on other sites More sharing options...
ubiquitous Posted May 13, 2010 Report Share Posted May 13, 2010 Yeah... Your write up on your self made watch from a block of steel looks anything but lazy... Quote Link to comment Share on other sites More sharing options...
watcher Posted May 13, 2010 Report Share Posted May 13, 2010 That is simply amazing!! I envy your talents very much and enjoyed this post and part 1 more than any I have read for a very long time! Thankyou for sharing Quote Link to comment Share on other sites More sharing options...
chiman12 Posted May 13, 2010 Report Share Posted May 13, 2010 man...that is so cool!!! I'm getting "mill" envy!!! Quote Link to comment Share on other sites More sharing options...
jmb Posted May 13, 2010 Author Report Share Posted May 13, 2010 I'm glad that some have found this process interesting and even entertaining. If I would have included all of the phrases, adjectives, and exclamations used during it's construction probably every other word would here would be [censored]! Since a little shaver I've always been fascinated by how things work and are put together so I guess this is a natural progression (regression?) for me... Quote Link to comment Share on other sites More sharing options...
HauteHippie Posted May 13, 2010 Report Share Posted May 13, 2010 Fantastic! How long does a project like this take from the block of metal to a finished case? Quote Link to comment Share on other sites More sharing options...
highoeyazmuhudee Posted May 13, 2010 Report Share Posted May 13, 2010 you're definitely a master of your craft Quote Link to comment Share on other sites More sharing options...
vafarmer70 Posted May 13, 2010 Report Share Posted May 13, 2010 Yeah... Your write up on your self made watch from a block of steel looks anything but lazy... This had to be repeated. I really am going to have to drive to SW Ft Worth and check this out. Quote Link to comment Share on other sites More sharing options...
Slartibartfast Posted May 13, 2010 Report Share Posted May 13, 2010 How long does a project like this take from the block of metal to a finished case? Beat me to it! So how long did it take? BTW what a great write up! You have some serious talent there. About half way through, I thought it was turning into an Oysterquartz. Quote Link to comment Share on other sites More sharing options...
jmb Posted May 13, 2010 Author Report Share Posted May 13, 2010 Chief, I started this one on Tuesday. Quote Link to comment Share on other sites More sharing options...
jmb Posted May 13, 2010 Author Report Share Posted May 13, 2010 Slarti, if you have an Oyserquartz dial in the works I'd be happy to "test drive" one for ya! Quote Link to comment Share on other sites More sharing options...
Watchmeister Posted May 13, 2010 Report Share Posted May 13, 2010 Quite the contrary, this post is fascinating. Very cool to see case formation from a block of steel. Keep posting these. Quote Link to comment Share on other sites More sharing options...
alligoat Posted May 13, 2010 Report Share Posted May 13, 2010 Amazing JB, thanks for sharing the process with us, it's pretty cool to see how it's done. Quote Link to comment Share on other sites More sharing options...
HauteHippie Posted May 13, 2010 Report Share Posted May 13, 2010 Chief, I started this one on Tuesday. Heh, quick. Quote Link to comment Share on other sites More sharing options...
Katerchen Posted May 13, 2010 Report Share Posted May 13, 2010 AWESOME Tutorial and coolest watch "out of the block"! Just saw it today Now this is the stuff i would love to see everyday here Keep up the good work! George Quote Link to comment Share on other sites More sharing options...
krpster Posted May 14, 2010 Report Share Posted May 14, 2010 Great stuff! I love the pictures of the case sitting on the CAD prints. Clearly you have given this significant thought and energy. Nothing short of dedication....far from lazy. Keep it coming my friend. Quote Link to comment Share on other sites More sharing options...
TeeJay Posted May 14, 2010 Report Share Posted May 14, 2010 Fantastic work and writeup, bro I can't wait to see how you fit the bracelet in the end Quote Link to comment Share on other sites More sharing options...
jmb Posted May 14, 2010 Author Report Share Posted May 14, 2010 Ubi and I are scheming something up that I think will look rather tasty! Quote Link to comment Share on other sites More sharing options...
stilty Posted May 14, 2010 Report Share Posted May 14, 2010 Brilliant! Absolutely Brilliant! BTW, your bezel die got some use today. Works perfect! Quote Link to comment Share on other sites More sharing options...
dluddy Posted May 14, 2010 Report Share Posted May 14, 2010 Yeah... Your write up on your self made watch from a block of steel looks anything but lazy... Agreed. That is some amazing stuff Quote Link to comment Share on other sites More sharing options...
lhooq Posted May 14, 2010 Report Share Posted May 14, 2010 Motherflanger... While the odds of me touching a lathe anytime soon are pretty low, I am really enjoying reading about your efforts, jmb. Hope to read many more chapters after the next one! Quote Link to comment Share on other sites More sharing options...
Recommended Posts
Join the conversation
You can post now and register later. If you have an account, sign in now to post with your account.