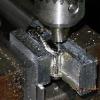
jmb Posted February 1, 2015 Report Posted February 1, 2015 I finally got all the pieces parts and additional electronics scrounged to build and add a 4th axis to my engraver. This is something I've wanted to do for quite a while but never had the time to spend on it. Once all of the parts got here I had to replace the 3 axis interface in my controller and add a driver for the 4th axis motor. After I had that debugged I slapped together a simple rotary axis, hooked everything together, and surprisingly it actually worked! After some tweaking I gave it a try this morning and here is the results of my first test on a test piece of stainless stock. I have some more experimenting to do but I think I'm almost there. Further down in the thread are pics of the engraving on a case... 1
Ephry73 Posted February 1, 2015 Report Posted February 1, 2015 Oh suki!!! J, that is the start of great things indeed.
PAM-snob Posted February 1, 2015 Report Posted February 1, 2015 Not too bad! Sent from my iPhone using Tapatalk
martijnp Posted February 1, 2015 Report Posted February 1, 2015 This is opening some doors. Great work J.
jmb Posted February 1, 2015 Author Report Posted February 1, 2015 I loaded up a beat up case and tried "for real" on this test - I think we have a winner! Probably could have went about .001" deeper but all-in-all I'm pretty happy with it. 1
Beachcomber Posted February 1, 2015 Report Posted February 1, 2015 Really good Sent from my iPad using Tapatalk
dieselpower Posted February 1, 2015 Report Posted February 1, 2015 Fantastic stuff J, keep up the great work.
HaydenM Posted February 2, 2015 Report Posted February 2, 2015 Fantastic, can't wait to see the next set of everybody's 1016 builds.
irolexu Posted February 2, 2015 Report Posted February 2, 2015 So happy this is happening in my back yard!!
droptopman Posted February 2, 2015 Report Posted February 2, 2015 That looks awesome J. Sent from my droptop using telepathy.
jmb Posted February 2, 2015 Author Report Posted February 2, 2015 OK, here's the flip-side. I engraved this side about .001" deeper than the other and I think it's about right...
DVNE Posted February 2, 2015 Report Posted February 2, 2015 The best at it just got better. AH-MAZING!
Beachcomber Posted February 2, 2015 Report Posted February 2, 2015 It looks good but not quite there in my opinion. Engraving on the older Rolexes look almost scratched in vice engraved, I know that sounds silly but... Sent from my iPhone using Tapatalk
kbh Posted February 2, 2015 Report Posted February 2, 2015 I don't know squat about what an old gen looks like but I personally like the 2nd attempt before going .001 deeper. I think it looks great.
IAN2109 Posted February 2, 2015 Report Posted February 2, 2015 I ike the second attempt, very crisp, great job
jmb Posted February 3, 2015 Author Report Posted February 3, 2015 So, is it the general consensus that the very lightly engraved looks better/more authentic than the deeper engraved?
ww12345 Posted February 3, 2015 Report Posted February 3, 2015 That would be my opinion. However, pics don't represent how it looks in real life...
JoeyB Posted February 3, 2015 Report Posted February 3, 2015 So, is it the general consensus that the very lightly engraved looks better/more authentic than the deeper engraved? I think it depends on when. The early 1950s 'Brevet' look almost hand scribed in pictures, while the later 'Registered' 1950s look lightly engraved. I think the two you show are quite close to being correct for the later 1970s, `80s and since. 1954: 1959: 1675: 16710:
jmb Posted February 3, 2015 Author Report Posted February 3, 2015 I might be able to make it "sloppy" looking like the old ones by taking some tensioner pressure off the drive belt...
Recommended Posts
Create an account or sign in to comment
You need to be a member in order to leave a comment
Create an account
Sign up for a new account in our community. It's easy!
Register a new accountSign in
Already have an account? Sign in here.
Sign In Now